Power on device
Содержание:
- Touch Panel
- Installing Picture Editing Software GIMP
- To Sum up
- Step 3
- Let’s review the previous version and read the thinking behind it
- Background
- More recommended Software Solutions
- Content Structure
- Installing Arduino IDE
- TK-Labs LattePanda Shield
- Key Features
- Original Blog Post
- Booting the Device
- Overview
- The size is the biggest challenge
- LattePanda Emulation
- Releasing Official Linux Ubuntu Support on LattePanda
- What can Linux do on LattePanda?
- Summary
Touch Panel
What You Will Need
Official eDP display for LattePanda Alpha and Delta.
Warning
The MIPI display design for the LattePanda 1st genernation is not compatible with the eDP display connectors designed for the Alpha and Delta. This compatibility issue is caused by the different CPU architectures and positioning of circuit elements.
Installation Steps
Warning
Make sure the LattePanda is disconnected from its power source before connecting the touch screen. Make sure the cable is installed correctly before turning the power on. Failure to follow these instructions below may cause a short circuit and damage the LattePanda or display.
- Make sure the LattePanda is powered off and the power supply cable is disconnected.
- Open the touch panel latch on the LattePanda board.
- Align the touch panel cable with the LattePanda touch panel connector. Make sure the copper cable connection pads face the LattePanda connection pads.
- Connect the touch panel cable.
- Press down on the latch to secure the cable.
Installing Picture Editing Software GIMP
Given that most software is made with Windows and Mac operating systems in mind, it can be hard to find good substitutes for Linux operating systems. One picture editing software that is an adequate substitute for great software like Adobe Photoshop and is available for Linux Distribution operating systems is GIMP.
This guide will teach you how to install GIMP onto your Ubuntu OS and start using this software for your images and creative artistry.
Steps
Step 1: In order to install GIMP software, you will first have to install «flatpak.» So, please open up the Ubuntu terminal (with your mouse or with «Ctrl + Alt + T») and enter the following command:
sudo apt install flatpak
Step 2: Now that you have flatpak installed, you can now begin to run some flatpak commands. Now, from your terminal enter in the next command:
flatpak install http://flathub.org/repo/appstream/org.gimp.GIMP.flatpakref
This will download and install all necessary software and additional packages that the software will need to run correctly. This may take a while, so you may want to find something to do while your terminal finishes the operations necessary to download and install these packages.
Step 3: You now have the software downloaded and installed onto your LattePanda SBC! Sometimes, the icon may not appear in the Application Manager dock, in which case you may have to manually boot it from the terminal using this code:
flatpak run org.gimp.GIMP//stable
Please refer to GIMP’s official website if you would like to learn how to fix the problem of not seeing the GIMP icon appear in your Application Manager.
To Sum up
Overall, the cost of Windows ML is very low. It takes half a day to build a good development environment. Even a hardware engineer can run a few demos of neurons on the LattePanda. Alpha happens to support DirectX 12, so iGPU and acceleration of eGPU can be done on Windows ML.
This allows everyone to open up some imaginary space. The next step will be to train a model to recognize members of a whole team, like ours. The official release also provides some model training tutorials. You can also use other neuron model training tutorials, and finally convert the model’s format to the ONNX standard to import it into the system. You can achieve corresponding results. You can be expected to build a set of office-specific Face ID, face-scanning payment and door-access control is the next step to get started on.
Furthermore, I believe that the existing resources released are believed to be only some of the development tools and materials used by Microsoft to warm up the market. There is reason to believe that in May of this year, a Microsoft Build will have some further tools and materials to help developers base on the latest AI Technology to achieve more industry-standard upgrades and utilities.
Step 3
Open IDLE Python to check whether or not the pyfirmata package has been installed correctly.
Enter the following command:
If no error message appears, this means that pyfirmata has been successfully installed. Please refer to the picture below.
Create a new python file through the IDLE program and enter the following code. Change ‘COM3’ into the port that was shown on your device previously on Arduino. Pin 13 is selected as the default pin, as it has the built-in light.
Code:
from pyfirmata import Arduino, util
import time
board = Arduino('COM5')

    board.digital.write(0)
    time.sleep(1)
    print("on")
    board.digital.write(1)
    time.sleep(1)
    print("off")
The IDLE window should display on/off messages which represent the status of the light. Feel free to play around with the other pins and explore the different options available to you. Here is the GIF again on how your Arduino should blink. Enjoy!
Let’s review the previous version and read the thinking behind it

LattePanda prototype thermal design v0.2
At the beginning, we want to develop a thermal solution, which is perfect for desktop development scenarios and embedded application both. It should be simple, stable! But we quickly realized a big problem. If a 7w TDP CPU runs applications with full load and you don’t want to lower the CPU speed, with standard fin heatsink, the size of heatsink should larger than 1,000 cm2, that’s the reason why the benchmark of some SBC products or laptops with passive cooling solution is lower than another product with the same CPU. However, the TDP of Alpha processor is about 15w.
So, if we want to unleash the real power of our processor, we must have different solutions for embedded and desktop usage. For Kickstarter backers and developers, we prefer to use the active cooling solution. And we kicked off another passive cooling design for commercial and embedded applications as a project branch.
Well then, next problem comes
Active cooling means noisy for most of people who don’t like it. If you do a simple search on google, you can easily find the definition of noise level.
| Noise Source | Decibel | Decibel Effect |
| Passenger car at 65 mph at 25 ft (77 dB);Living room music (76 dB); radio or TV-audio, vacuum cleaner (70 dB). | 70 | Arbitrary base of comparison. Upper 70s are annoyingly loud to some people. |
| Conversation in restaurant, office, background music, Air conditioning unit at 100 feet. | 60 | Half as loud as 70 dB. Fairly quiet. |
| Quiet suburb, conversation at home. Large electrical transformers at 100 feet. | 50 | One-fourth as loud as 70 dB. |
| Library, bird calls (44 dB); lowest limit of urban ambient sound | 40 | One-eighth as loud as 70 dB. |
| Quiet rural area. | 30 | One-sixteenth as loud as 70 dB. Very Quiet. |
| Whisper, rustling leaves | 20 | |
| Breathing | 10 | Barely audible |
Table source: www.industrialnoisecontrol.com
Basically, 20-30 dB is the nighttime ambient noise level, which is also our target noise control range. We tested more than 40-50 different fans and cooling solutions. The suitable design requires consideration from the following perspectives: fan blade shape, overall fan size (With the same air volume level, the bigger the fan, the smaller the noise), bearing rating, vent flow design, fins Design, motor speed matching. For these reasons, we did a lot of testing.
Background
To power your LattePanda 1st gen product, there are two different power source interfaces. The first one is the commonly used micro USB port. The other one is any one of the 5V GND (ground) pins, which are all labeled «CN2 Header Pins» on the board.
- The MicroUSB port is more appropriate for desktop development scenarios.
- The CN2 Header Pin is a good power source for embedded applications, which have limited space yet provide a stabler, stronger power source (with higher amperage to feed enough current for sensing the system simultaneously, at about 3~4 Amps) for the system.
- The current necessary for a LattePanda with a full computational load is about 1.6 Amp. However, when booting the system, the peak current required is about 2 Amp.
More recommended Software Solutions
These sections below will show you more recommended Software Solutions, please choose one for your Server Computer and Client Computer according to your needs. This tutorial contains installation guides for Microsoft Remote Desktop and NoMachine. You can setup other software solutions accordingly.
-
Microsoft Remote Desktop (RDP): Support for Server Computers with Windows 10 Pro or above OS (such as LattePanda Alpha or Delta), you can use Microsoft’s standard RDP protocol for quickly configuration, seamless copy and paste, and get a full virtual machine experience
-
NoMachine: Supports all Windows, MacOS or Linux, NoMachine will unleash the performance potential of the streaming cable. You can coding, watch videos or even play games in your Client Computer just like you would on a local device
-
Steam: To get the best gaming experience on your Client Computer, we recommend using Steam In-Home Streaming, 1080P HD, low latency, allow offline mode, support for all Windows and Mac OS
Difference Between Solutions Above
RDP Solution
    Server Computer - Windows Only
    Client Computer - Windows / MacOS / Ubuntu

NoMachine
    Server Computer - Windows / MacOS / Linux
    Client Computer - Windows / MacOS / Linux

LattePanda Delta / Alpha
    Works with RDP solution and NoMachine both

LattePanda 2G / 4G - first generation series
    NoMachine is recommended
    Or you need to install Windows Pro on it to enable RDP feature
Example
I have a LattePanda running Windows and Macbook Pro is my main desktop development computer.
Then RDP solution will be recommended.
But if you installed MacOS on LattePanda Alpha,plus you use MacBook Pro. Then NoMachine will the only option for you!
Configuration
If this is the first time for you to use LattePanda Streaming Cable, the complete process for configuration includes:
- Choose one Software Solution
- Setup software on Server Computer (Must be finished before Step 3)
- Setup software on Client Computer
- Enjoy seamless experience with dual devices
Let’s start!
This section will show you how to install drivers and Apps in your Server Computer. Click on the OS to jump to the corresponding section.
So What’s OS running on the Server Computer (LattePanda)?
- Windows — RDP
- MacOS — NoMachine: Refer to the Quick Start section
Content Structure
The docs is broken down into several parts, covering LattePanda 1st gen boards and LattePanda Alpha:
-
Getting started goes over how to power on your device with the pre-installed Windows system. Experience the power of the hardware.
- Power on Device
- Building Connectivity
- Optional Peripherals Introduction
-
Multiple OS Support shows different operation system supported on LattePanda boards
- OS Installation and setup
- Tools recommended
-
Hardware Introduction details the different parts of the LattePanda platform that come in handy as you build a cool project or commercial product.
- Hardware Interface
- Progromming guidance
- Projects introduces small projects you can build with entry level hardware tinkering background. Start your hardware innovation experience.
- Troubleshooting links tutorials and guides contributed by our community members to fix the problems you met with when tinkering the device.
The best way to use the guide is:
- Go through Getting started
- Review Hardware reference
- Check out Applications and OS recommendation for getting familiar with the software resources
- Search the Forums, reply posts or create topics for discussing your idea and problems when tinkering
- If you’re going to production with LattePanda, contact with LattePanda biz team via Email
Installing Arduino IDE
If you want to be able to utilize the Arduino Leonardo ATMega32u4 co-processor and all of the GPIO pins for ultimate connectivity and in order to maximize your use of the LattePanda SBC for your projects, then you’ll want to install the Arduino IDE onto this particular version of the Ubuntu operating system now running on your SBC. Let’s use the terminal again to install this program.
Steps
Step 1: Install Arduino directly by running this line of code in the terminal:
sudo apt-get install arduino
Note: Once installation is complete, you can now use the terminal to open the Arduino IDE software just by running the following code:
sudo arduino
or just open up the application in your application manager directly.
In fact, if you were to run the code:
arduino
in the terminal or open the Arduino IDE regularly, you should be prompted with a message that asks you if you would like to give the Arduino IDE program sudo privileges. Please click «yes,» or else the Arduino IDE program will not be able to access the co-processor via the internal USB connection.
However, if you accidentally click «no» or do not have this message come up, don’t worry. You may want to be able to run the program without opening the terminal, in which case, you will have to give the Arduino program sudo privileges by making it part of the dialout group. Follow these next few steps if you wish to make the Arduino IDE program part of the OS’s dialout group.
Step 2: In order to make your Arduino IDE program part of the dialout group, run the following code in the terminal:
sudo usermod -a Gdialout $USER
Note: Please note that this is not a secure and safe operation, as it will also add other possible devices into the dialout group and offer sudo privileges to them, as well.
Step 3: Now you can use Arduino! Open the Arduino program with either the code in Step 1 or opening it regularly after using the code in Step 2.
Now, let’s configure the Arduino IDE so that we can use it with our LattePanda SBC.
Step 4: Go to Tools → Board, and then please select «Arduino Leonardo»
Step 5: Go to Tools → Port, and then please select «ttyACM0»
Step 6: Now you can try it out! You can go to File → Examples → 01. Basics, and then select «Blink» to try out this Arduino sketch. When you open it, press the upload button in the top left of the program, and then you should see the LED located on the ATMega32u4 co-processor on the board itself begin to blink!
TK-Labs LattePanda Shield
TK-Labs in Korea have fabricated their own LattePanda stackable expansion shield. The expansion shield stacks on top of the LattePanda to unlock and enhance an array of features.
This is the second iteration of the design, and development is ongoing. Firmware is working but still under development.
Various new functions have been implemented using a STM32F373 MCU, including 16bit delta sigma ADC, 12bit ADC, 12bit DAC, DIgital Input, Digital Output, RTC, USB-VCP and Rs232c
A 5V@4A step down regulator is built in, so that the LattePanda is adequately powered. The underside of the board has a set of female headers that mate with the LattePanda’s CN2 power headers. A set of male headers on the underside of the board also mate with the LattePanda’s female UART headers to access the Cherrytrail chip.
Basic circuit tests and functional tests have been completed and a GUI for the firmware and test program (LABVIEW) has been created for the operation of the STM32F373 MCU.
The protocol for communication is a control protocol created by Mavlink to support various development languages.
There is a USB type A female connector to connect the LattePanda’s audio jack to the audio amplifier built in to the shield and the USB-VCP.
Key Features
- 10V~36V DC Barrel Jack Input (direct to LattePanda CN2 headers)
- Relay Out Terminal Blocks
- RTC Connector
- CAN-BUS Interface
- DC Output for cooling fan
- USB Serial Port
- 5V NPN Out
- 3W stereo audio amp out
- Intel UART connection headers
- LC meter connection
- STM32F373 MCU virtual COM Port
- STM32F373 MCU reset button
- Digital to analog out voltage trimmer
- 12bit digital to analog out (two channels)
- Thermocouple K-Type input circuit (Range 200 – 1200C)
- 12bit ADC (2 channels)
The board and firmware will be released later as open source and open hardware. Designs for this board are available under the Creative Commons Attribution-Noncommercial-No Derivative Works 4.0 international license.
Original Blog Post
The original TK-Labs blog post can be found here (Korean).A machine translated English version can be found here.Find TKLabs on
Booting the Device
Once you have everything ready, please follow these simple instructions below to get started.
1.Connect the USB into the USB power adapter, and then insert the microUSB into the micro USB port of the LattePanda (The micro USB port is located next to the SD card socket).

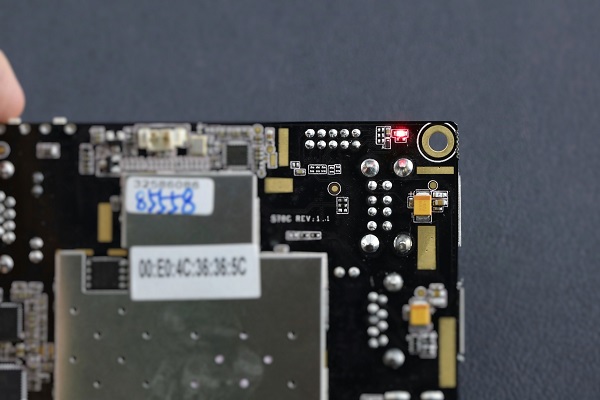
2.When plugged in, you should see the red LED indicator light up on the underside of the board. This means that the LattePanda is initializing. Wait patiently for a few seconds until the LED light goes out.
**Note: Do not unplug the power cable while the system is running. (If the red LED is on, this indicates that the is system is running) **
3.When the LED indicator turns off, press and hold the power button for one second to turn on the LattePanda. You should see the LED indicator light up again.
As you can see, this process is just the same as turning on a new computer! Now you can start working!
Overview
| LattePanda | LattePanda Alpha | LattePanda Delta |
|---|---|---|
| Models | Models | Models |
| 2G 32GB4G 64GB2G 32GB /w Windows 10 Home4G 64GB /w Windows 10 Enterprise | 800 — 8G (No eMMC)864 — 8G 64GB864 — 8G 64GB /w Windows 10 Pro | 432 — 4G 32GB432 — 4G 32GB /w Windows 10 Pro |
This guide will show you how to use LattePanda products to start up your little drive first. And kick-off your adventure of software plus hardware development.
Note
If you have any problem or idea when reading our docs, feel free to commit your suggestions directly on the Github Docs Repo or discuss through the FORUM. We, together with our community members, are always ready to help you and listen your suggestions!
The size is the biggest challenge
No doubt, the size is the biggest challenge for our thermal solution and whole product design both. Meanwhile, we should keep the perfect performance. We don’t want the active cooling solution affect the expansibility and stackable hat design on the top of LattePanda products. So, the height of the complete thermal solution will be limited in 7mm (including the thickness of fin heatsink) to reach our target thermal efficiency. It is not that easy for this industry as we known. At least, rare teams do like what we do.
However, in terms of design and mechanical restrictions, the size of cooling module cannot exceed the range defined by our interface or the ideal product dimension we prefer. Means the width of the solution should be less than 58mm. In this way, user can read the silkscreen on the pin headers clearly. (Carefully checking the design picture attached above, you will see a small gap between the cooling module and pin headers.) So, we need delivery effective solution, considering how will you use the product at the same time and make sure the solution won’t affect the user experience.
So, eventually, the active thermal solution we designed is customized fin heatsink plus eddy fan. In this way, a complete solution balances the perfect cooling effect, unleashing the full power of CPU chosen and minimizing the noise with rigorously fan components and materials selection. That’s what we want and worth you to own.
LattePanda Emulation
So far, we have discovered that the LattePanda has become incorporated into many different fields and subfields given its small size, powerful processing speeds, and high versatility and adaptability. Given this, a full evaluation of the ability and aptitude of the LattePanda SBC’s cannot be complete without some review on how these SBC’s perform while running emulators. From video games to operating systems, there are a variety of emulators which are vital to contributing to the ultimate user experience. Amidst certain pressures to construct operating systems instead of emulators to alleviate the strain that emulators may place on computers, emulators are here to stay for those computers which are built to muscle through the demanding and cpu-intensive operations. Given this present situation, we have gone ahead and compiled a list of emulators which have been proven to function just fine on the LattePanda SBC’s, especially the AlphaPanda.
Expect to see updates as we test emulators for handheld gaming systems on the LattePanda SBC’s and find other emulators to test and evaluate on our powerful mini computers!

Gaming
There are many gaming emulators on the market which either look to revive old games whose gaming consoles are no longer supported and too difficult to find anymore or to provide the avid gamer a means to delve into the realms of game storage swapping and testing the current groundwork for allowing one gaming-system-for-all gaming setup. One emulator frontend software that seems to recognize the desires of both types of avid gamers is LaunchBox, aka BigBox. This software gives gamers an old-school style format to browse game collections just as if they were choosing games on an arcade-style gaming system. However, this software won’t give you the complete ultimate gaming experience on your LattePanda without the proper emulators to run the games after selecting them. Here is our list of gaming emulators that have performed beautifully on the AlphaPanda and provided an average 55-60fps for just about all games tested.
Dolphin emulator for the Nintendo GameCubePCSX2 emulator for the Sony PS2PPSSPP emulator for the Sony PSPRedream emulator for the Sega DreamcastReicast emulator and its Retroarch core for the Naomi and Atomiswave
Also, for those gamers who are also Linux lovers, RetroPie and Batocera can also work just fine on Linux distribution operating systems running on the LattePanda SBC’s.
These are some of the most demanding emulators on most computers’ cpu, video and audio cards, and even RAM, so the fact that the AlphaPanda pulls through testifies to its extraordinary power that it supplies to the user.
Linux Distributions
What can you do if you want both a Linux operating system and a Windows operating system on your computer? LattePanda has already proven that it is capable of double-booting these two operating systems, but some users may desire something even a bit lighter. Introducing WSL (Windows Subsystems for Linux) an emulator for Windows computers which can run Linux operations locally in the subsystems emulator. This allows a veritable portal to open for use of Linux distributions without having to leave your powerful Windows operating system on your LattePanda. This is immensely helpful to many users and the projects that they are looking to make which requires implementations of both Windows and Linux operating systems working in tandem. For more information on how some users have incorporated it into their LattePanda projects, please click on the link at the end of this article.
Android Apps
Finally, there is a viable way to utilize your Android apps on the go when only your computer is available and working! BlueStacks, one of many emulators which run Android apps on your computer, is one of the best of its kind. It requires a lot of your cpu and ram in order to run these apps successfully on your computer. However, if you encounter any probelms running the software and any downloaded apps on your LattePanda SBC, then you may have to alter some of the settings in order to enhance your user experience. A number of solutions to how to fix these types of problems can be found on BlueStacks’ official site.
Make sure to find what you need and keep making!
For the video which shows which games and emulators were tested on the AlphaPanda, please click here.For the article which details one important use of the Linux distribution emulator running on the AlphaPanda, please click here.For the video which shows RetroPie being tested and used on the AlphaPanda, please click here.For the video which shows Batocera being tested and used on the AlphaPanda, please click here.
Releasing Official Linux Ubuntu Support on LattePanda

We’ve been testing the beta version image with our partners and community members for more than 2 months to optimize it. Now we think it’s stable and ready for any commercial purpose usage and tinkering both.
Ubuntu on LattePanda VS Ubuntu on Respberry Pi
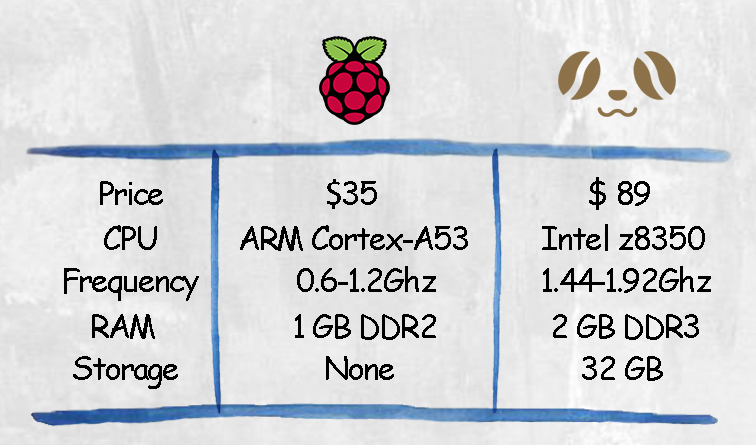
Specification comparison between LattePanda and Raspberry Pi
When it comes to Respberry Pi, what impressed you most? That’s the price. It’s so cheap that every geek want to have a try. The CPU of the Respberry Pi is great, but not perfect to deal with some complex algorithm. Sometimes it will lag when you are running your demo, even watching videos. LattePanda is based on x64 system and Intel Cherry Trail z8350 CPU. The performance is much better than Respberry Pi. Of course it’s bit more expensive at the same time. It will help you do your different projects, which Rpi can’t support. LattePanda also provide USB3.0 port, which means it can LattePanda support USB 3.0 devices! You can use hardware such as realsense!
What can Linux do on LattePanda?
Here’re some potential applications you can do with Linux on LattePanda in our view.
Host a Web Site or Webapp
It’s also a good platform to build your own web site. Many Linux-based web host like BlueHost, HostGator, GreenGeeks, Dreamhost can help you build your website. Although it’s a little difficult and complicated, it’s more secure to put your data in your own machine than in someone’s hands.

Deploy Home automation applications
Advance of Linux
Security
It sure isn’t invulnerable, but it is a lot more secure. There’s a relatively small number of people using Linux as a desktop OS, which means a relatively small number of hackers looking to exploit it, but besides the raw numbers, Linux is an incredibly secure OS to run. It’s designed from the ground up to be secure, from the default privileges given to users to the way that Linux code is developed and maintained. When you download Win10, you need to download/purchase an Antivirus program like Bitdefender, Norton, Kaspersky Lab to keep your computer safe from hackers. Although Linux still have a couple of Anti-Virus programs to keep your computer safe, it is often unnecessary.
Perfect For Makers
Some Makers shy away from using the Linux because they think it is too foreign and difficult. You need to know many many commands. It’s makes people crazy. But this is one of the most compelling reasons why Makers prefer using Linux OS as well. The terminal isn’t something you should be scared of – it’s a powerful tool with lots of uses. The Linux terminal makes the user get things done easily.
Linux also supports almost all of the major programming languages (Python, C/C++, Java, Perl, Ruby, etc.). You can study programming or do your project on it.
Customization
Different from Windows, one of the most utility things when you use Linux is that we can create your own distro which is one-hundred percent tailored to your needs instead of getting a ready-made one. Of course, you will need tools to make your own Linux distro such as Linux Respin, Systemback, Linux Live Kit, Ubuntu Imager, Linux from Scratch, etc. With these tools, you can easily make your own Linux distro!
You would be also surprised how many beautiful icon themes are there in Linux. You can tweak your system’s according to your imagination.
Apart from installing themes, you have tons of beautiful icon themes. In addition to that, you can use Conky to display system information on the desktop in the coolest way possible. Needless to say that you can do a lot around wallpapers in Linux.
Summary
The beta Linux OS for LattePanda has already been published. With the powerful CPU and better performance, LattePanda will help you do your projects better. A Powerful CPU ensure you run the demo with no lags. If you just want to use it as a home mini PC geek projects’ brain, embedded applications or want to get start with Linux, this cheap SBC OS is also a good choice for you.
Reference
What is Linux?

It’s a free open-source operating system, which means the code is available for anyone to explore. Anyone can contribute code to help enhance the users’ experience with Linux. As well, anyone can add features, fix bugs, reduce security risks, and more.
It has different distributions, for example Ubuntu, CentOS, and Debian. Each is used for different applications. Many DVD players, personal information managers, media terminals and Internet access devices install Linux as OS. Android OS is also based on Linux.
Linux system can be perfectly used for embedded applications because of its lightweight architecture .Thanks to this feature, the performance of the LattePanda gets a dramatic improvement. There are many efficient tools, LattePanda can operate them seamlessly.