Обзор moza mini-s
Содержание:
- Warranty Period
- Know about Dolly Zoom
- 2 Extra Tips
- Step by step tutorial-How to calibrate MOZA Mini-MI with your mobile phone
- Part V Procedure of warranty
- 6 Steps to Finish Your Masterpiece with MOZA Mini-MI
- How To Do It with Your Smart Phone
- Впечатление
- Внешний вид
- Управление и инструкция
- Приложение
- Repair Process
- 2. My MOZA product needs to be repaired – what are the next steps?
- 4. Ensure that you include all necessary information with the product being returned
- 5. Ensure that the product is securely packaged for transit
- 6. Once I have sent my product in for repair, what happens next?
- 7. Once the repair process is finished,what happens next?
- Part III replacement policies
- Part IV warranty service policies
- Part II refund policies
- Start the Primary Calibration
- Warranty policy
- Start the Advanced Calibration
Warranty Period
At Gudsen, we offer lifetime warranty and limited warranty for different products varying on the materials,
workmanship,
usage rate, and the availability of the spare parts for each product.Details as below:
|
Product |
Main Components |
Warranty Period |
|
MOZA Air Cross 2 |
AirCross 2 gimbal |
12 months |
|
Moza custom battery |
3 months |
|
|
Moza custom battery charger (optional) |
6 months |
|
|
Accessories cables |
1 month |
|
|
iFocus(option) |
12 months |
|
|
MOZA Slypod/Slypod E |
MOZA Slypod |
12 months |
|
Accessories Cable |
1 month |
|
|
MOZA Mini-S |
MOZA Mini-S Gimbal |
12 months |
|
Accessories Cables |
1 month |
|
|
MOZA Air 2 |
Air2 gimbal |
12 months |
|
Gimbal battery cover |
3 months |
|
|
Moza custom battery |
6 months |
|
|
Moza custom battery charger |
3 months |
|
|
Accessories cables |
1 month |
|
|
iFocus(option) |
12 months |
|
|
MOZA Air/AirCross |
Air/AirCross Gimbal |
12 months |
|
Handle Bars/Side handles/Handle Clamp |
12 months |
|
|
Wireless Thumb Controller |
12 months |
|
|
Moza Custom Battery |
6 months |
|
|
Moza Custom Battery Charger |
3 months |
|
|
Accessories Cables/Lens Support |
1 month |
|
|
MOZA Mini-MI |
MOZA Mini-MI Gimbal |
12 months |
|
Tripod |
1 month |
|
|
Charging Cable |
1 month |
|
|
MOZA Lite2/2P |
Lite2/2P Gimbal |
12 months |
|
Lite2/2P Carry Case |
12 months |
|
|
Wireless Thumb Controller |
12 months |
|
|
Moza Custom Battery |
6 months |
|
|
Moza Custom Battery Charger |
6 months |
|
|
Retailed accessories |
Retailed accessories |
1 month |
Consumers are responsible for shipping cost when sending their product(s) back if the permission is granted by
Gudsen,
Technical Support will examine and identify the problem and responsibility; Gudsen will cover all the test cost,
material
cost, labor cost, and delivery fee when sending the repaired product back to customers if it is a quality problem.
If the product is deemed not to be covered by this warranty, we will contact customer to accept the repair cost, or
on its
option, have the product returned back to the customer;
Consumers can contact support@gudsen.com for more details of
maintenance process;
Know about Dolly Zoom

The dolly zoom is an in-camera effect that appears to undermine normal visual perception. The effect is achieved by zooming a zoom lens to adjust the angle of view (often referred to as field of view, or FOV) while the camera dollies (moves) toward or away from the subject in such a way as to keep the subject the same size in the frame throughout. In its classic form, the camera angle is pulled away from a subject while the lens zooms in, or vice versa. Thus, during the zoom, there is a continuous perspective distortion, the most directly noticeable feature being that the background appears to change size relative to the subject. The visual appearance for the viewer is that either the background suddenly grows in size and detail and overwhelms the foreground, or the foreground becomes immense and dominates its previous setting, depending on which way the dolly zoom is executed. As the human visual system uses both size and perspective cues to judge the relative sizes of objects, seeing a perspective change without a size change is a highly unsettling effect, often with strong emotional impact. The effect was first conceived by Irmin Roberts, a Paramount second-unit cameraman, in Alfred Hitchcock’s film Vertigo. So it’s also called “Vertigo shoot”.
2 Extra Tips
Tip 1:
Exposure lock will help you avoid waste footage. Auto focus will influence the smooth timelapse so you’d better lock it in advance. Just tap the screen to turn the circle and square red and make your focus lock.

Tip 2:
Editing software makes your clip even cooler. You can edit some part of the clip to be quite slow for emphasizing your feature or you can make some part faster to accomplish smooth transition.

Thanks to EMT contributing to such gorgeous guide and tips. And we have spared no efforts to be devoted to friendly innovative film making, even if with your daily-use smart phone. Just follow our guidance and make your own fantastic composition with MOZA Mini-MI!
Step by step tutorial-How to calibrate MOZA Mini-MI with your mobile phone
Notice: Be sure to upgrade the firmware to the latest version before calibration
1 Balance MOZA Mini-MI with your phone until the phone starts to keep the level.

2 Turn on the MOZA Mini-MI
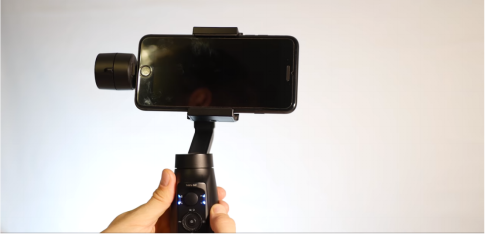
3 Enable Bluetooth on your phone

4 Launch MOZA Genie App

5 Connect the device


6 Tap the gimbal icon

7 Tap the calibration icon

8 Select “confirm”

9 Select default calibration

10 Place the gimbal and phone according to the on-screen instruction and click “start”.

11 Hold the mobile phone to make it level. When the lower part becomes green. Release the phone according to the countdown in the top left corner.

12 The step will last for a while, please be patient and don’t touch the phone. App will automatically enter to the next step of calibration after this step completes.

13 Refer to the on-screen instruction to place the gimbal on a level desk. Click to start the calibration. Wait for while.

14 Now the calibration of MOZA Mini-MI has been done.

15 Restart the device and reconnect it to app.
Part V Procedure of warranty
a. Consumers
can contact support@gudsen.com for the warranty service.
b. Consumers
are responsible for shipping cost when sending their product(s) back if the
permission is granted by the Gudsen, Technical Support will examine and
identify the problem and responsibility; Gudsen will cover all the test cost,
material cost, labor cost, and delivery fee when sending the repaired product
back to customers if it is a quality problem.
c. If
the product is deemed not to be covered by this warranty, we will contact
customer to accept the repair cost, or on optionally, have the product returned
back to the customer;
d. Consumers
can contact support@gudsen.com for more details of maintenance process;
6 Steps to Finish Your Masterpiece with MOZA Mini-MI
Step 1:
The first thing you need to do is to pair your smart phone with your gimbal. Remember to run MOZA genie app to connect them via blue tooth.

Step 2
Run MOZA Genie and Select the advanced motion timelapse mode.
Don’t forget to read the guide which will help you better understand the shortcut operation.


Step 3:
Once you get into the advanced timelapse mode, you will be able to choose up to 9 points by tapping the “+” or using the wheel center button. The points help to shape your shooting track so you may choose them tactically.

Step 4:
Adjust your shutter interval time. Expert EMT suggests to choose shorter interval if you want to make things move really fast. But for sunrise you can use longer interval with longer duration to present a grand moving scene.

Step 5:
Adjust your total duration time. According to EMT, he often uses 1.0s interval for 10 minutes duration and 2.0 for 20. You could refer to this or explore your unique time-lapse.

Step 6:
Click “start” or long-press the right wheel button to begin your own advanced timelapse shooting. And MOZA Mini-MI will master all to offer you a brilliant piece.
How To Do It with Your Smart Phone
Of course you need a MOZA Mini-MI, the best ever mobile gimbal. This cinematic skill was not caged in the great photographers’ hands while anyone could achieve it just through the smart attendance of MOZA Mini-MI. Let’s follow EMT and his suggested methods of dolly zoom.您的浏览器暂不支持播放该视频,请使用浏览器急速模式,或升级至最新版浏览器。
Method 1.1
Simply use the scrolling wheel to zoom in while you are moving backwards and forward when zooming out. This is one of the easiest way because you just have to scroll the wheel.

Method 1.2
Press the button at the bottom of the wheel, it will automatically zoom in or zoom out giving you kind of like automatic mode when moving forwards or backwards. The gear will control the focus by itself and all you need to do is to press the button and move.
Method 2
Triple click the top to enter the Inception mode. You can do in Inception mode while simultaneously doing Vertigo. So when it’s rotating, you can zoom in and move backward to create some really cool transitions and shots. Isn’t that trilling for you to create such dramatic works? Just come and try your brand new mobile stabilizer MOZA Mini-MI make your time memorable.
Впечатление
В целом MOZA Mini S оставляет двоякое впечатление. С одной стороны порадовала компактность в сложенном состоянии, простота и универсальность, с другой стороны «кривизна» ПО и не идеальное качество стабилизации.
Плюсы:
- Компактный;
- Универсальный;
- Поддерживает «тяжелые» смартфоны, до 260 грамм;
- Цена;
- Комплект поставки;
- Возможность управлять спуском камеры в любом приложении;
- Богатые возможности для творческой съемки.
Минусы:
- Качество стабилизации могло быть и лучше;
- Официальное приложение пока «сырое», по крайней мере на Android;
- При использовании комплектного шнура для съемки, стедикам работает как гарнитура, а следовательно звук на видео будет испорчен;
- Небольшая емкость встроенного аккумулятора (садится довольно быстро).
Можно ли ставить на него экшн камеры?
Да, но предстоит использовать специальный переходник, типа такого:

также обратите внимание, что в кадре будет виден один из моторов стабилизатора, поэтому предстоит «играться» с положением ручки, но можно добиться «чистой» картинки
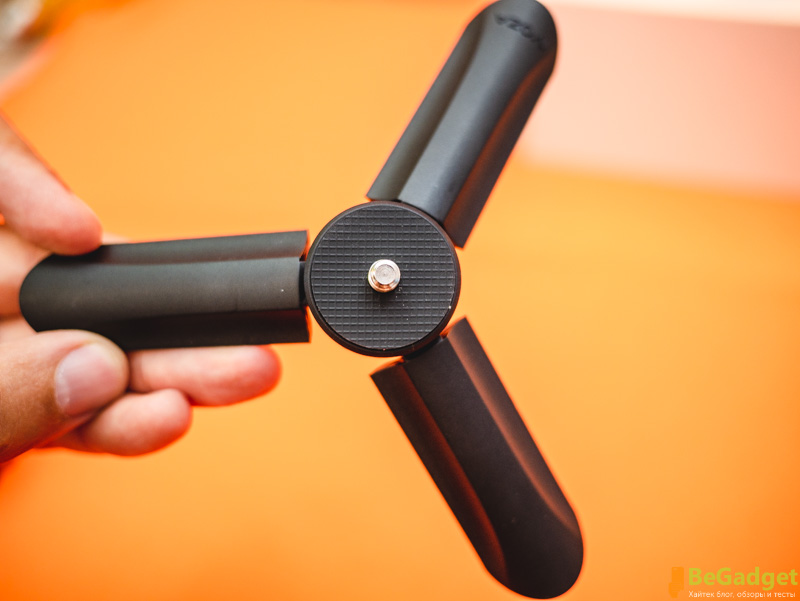
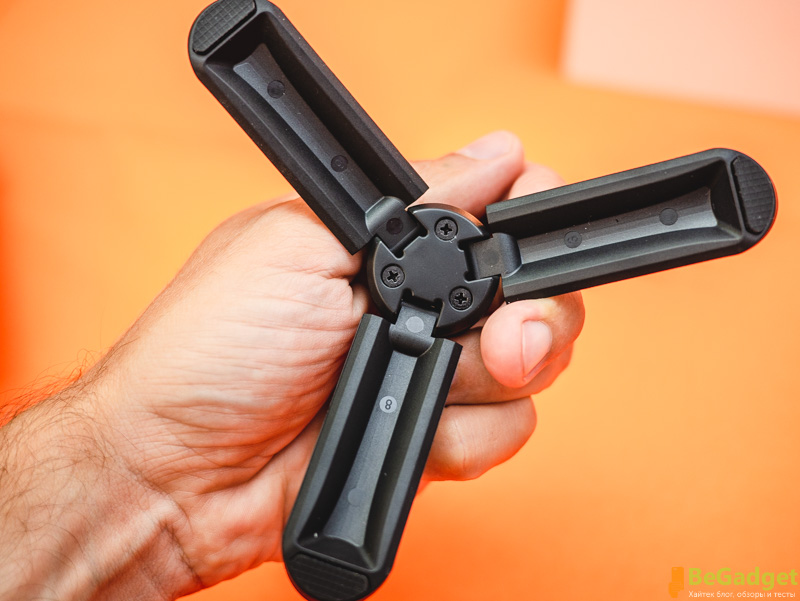
Внешний вид
Стабилизатор выполнен очень даже хорошо. Да, за эту стоимость не стоит ждать высококачественного пластика, но он действительно неплох.
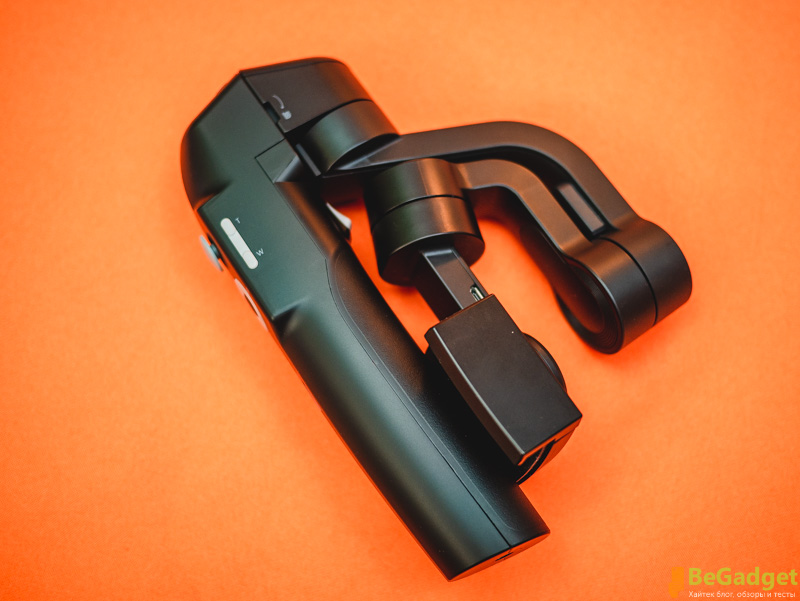
Кнопки пульта управления отлично подогнаны, нажимаются в меру туго и не имеют никаких лишних люфтов, скрипов.

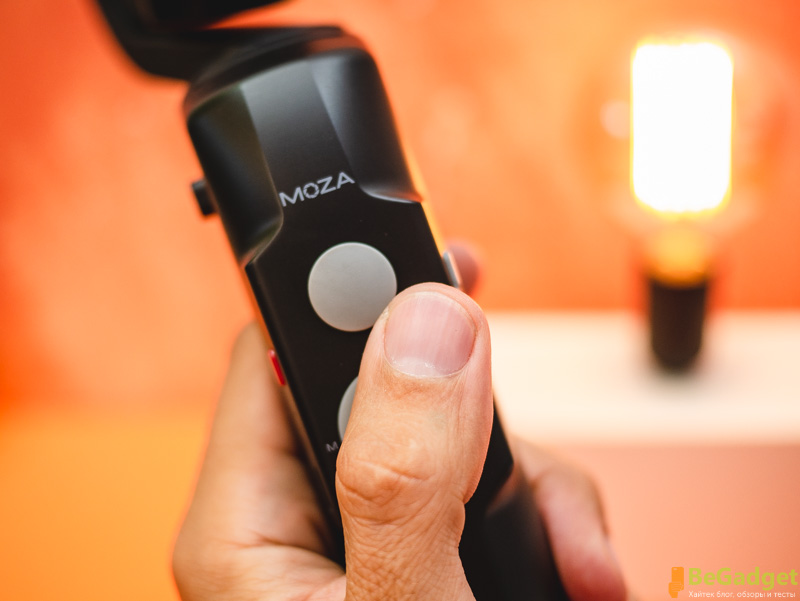
На лицевой панели стедикама есть джойстик для управления поворотами гимбола, а также четырех-позиционный диск и кнопка в центре, для управления съемкой.
Примечателен тот факт, что управлять данной кнопкой можно как в фирменном приложении MOZA Genie, так и в любой другой программе для съемки, но в таком случае понадобится подключить комплектный кабель.

Подключается он через специальный порт microUSB, который расположен на самой площадке стабилизатора. Комплектная тренога очень даже хорошего качества. Ее можно успешно использовать для съемки таймлапсов, да и вообще, для установки стабилизатора на любую поверхность.
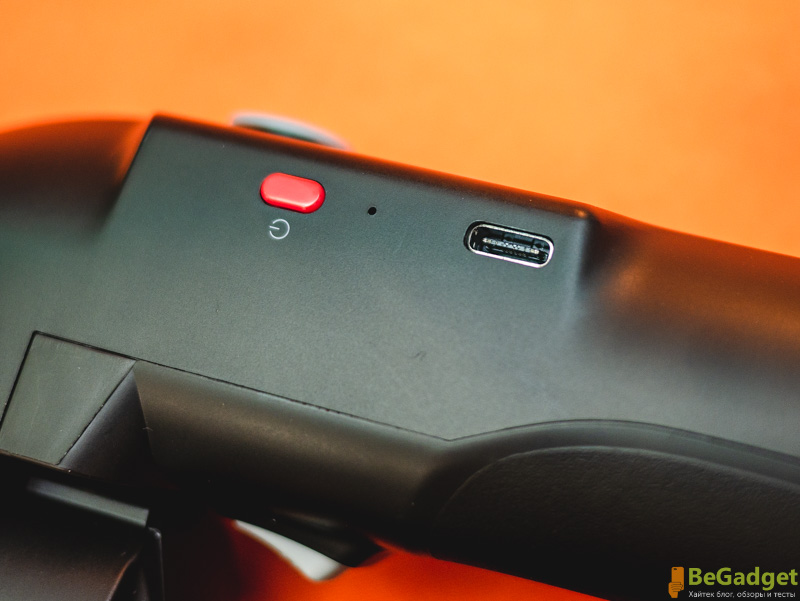
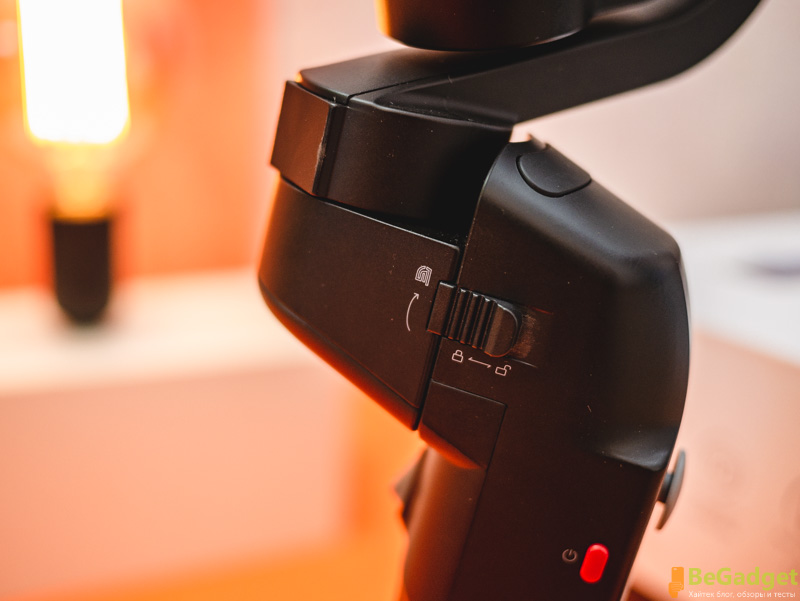
На левой грани расположена кнопка включения MOZA Mini-S, она маленькая, красного цвета и вполне удобна. Ниже имеется разъем USB Type-C.
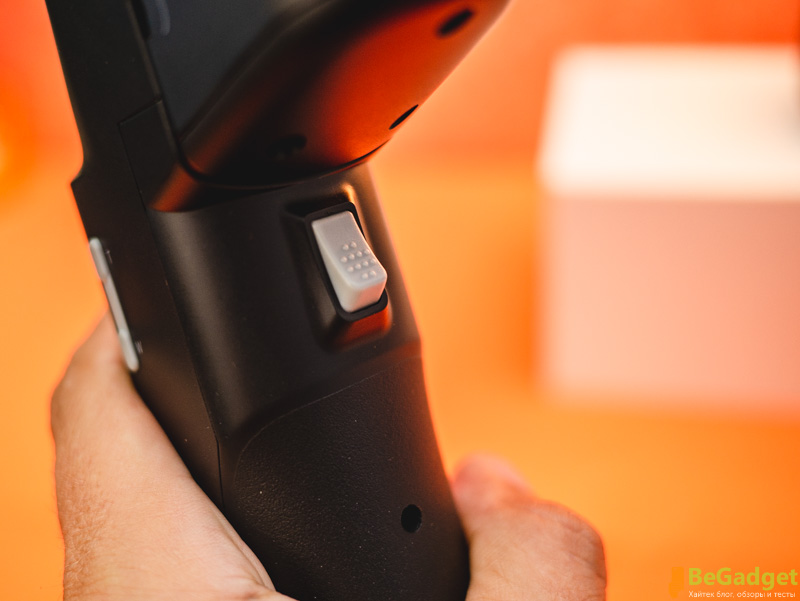
На правой грани качелька для управления зумом или фокусировкой камеры. Именно она позволяет делать эффект вертиго.
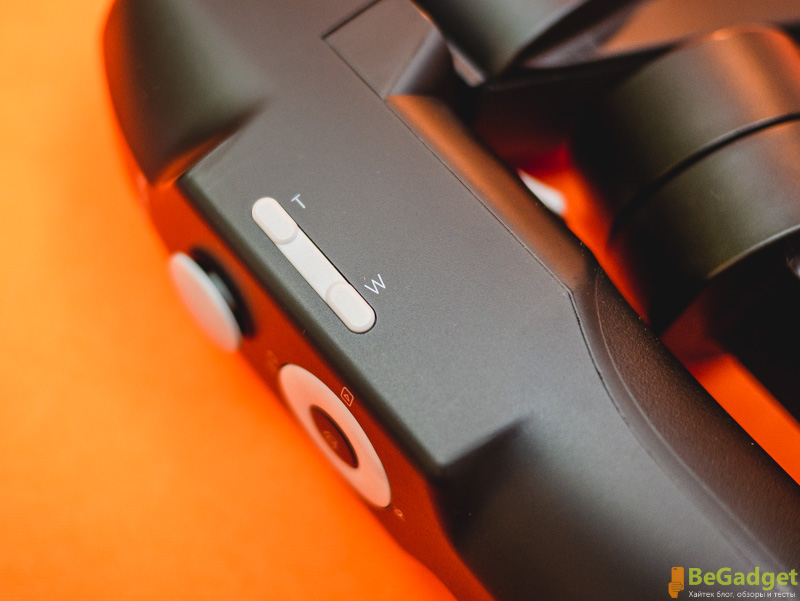
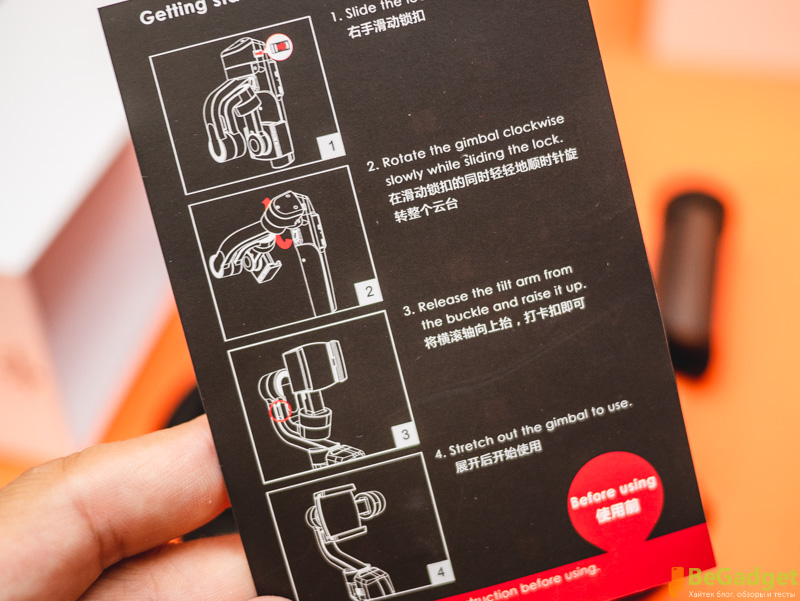
На внутренней части ручки есть кнопка-курок, которая используется для управления стабилизатором. Как именно она работает, смотрите . На корпусе есть также ползунок-фиксатор, который позволяет надежно закрепить стедикам в разложенном или сложенном состоянии.
Одним из плюсов является возможность устанавливать смартфон в обоих положениях — горизонтальном и вертикальном,
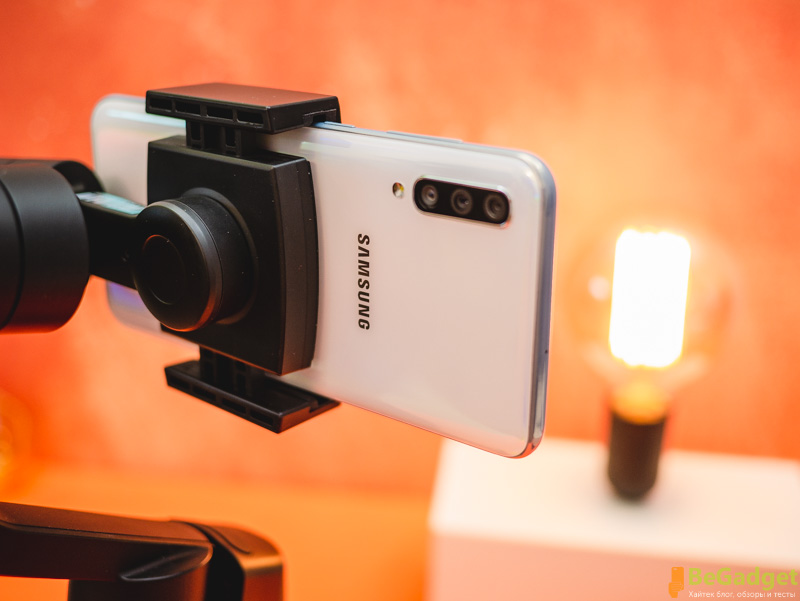
делается это легко и быстро, а сама конструкция устройства позволяет легко выставить баланс, не прибегая к различным «крутилкам», а просто двигая смартфон в зажиме.
При этом, порты телефона всегда остаются открытыми, что позволяет легко и быстро подключать к нему дополнительные аксессуары или зарядное устройство.

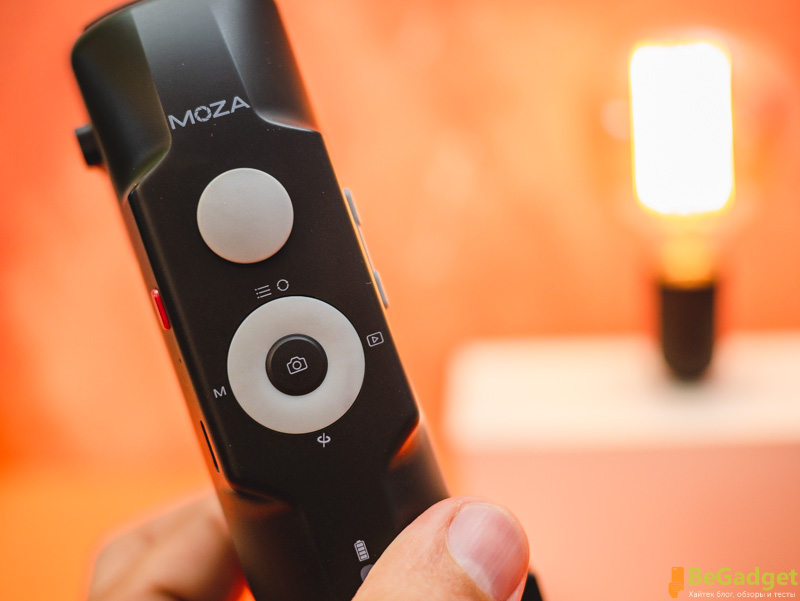
Управление и инструкция
Сразу добавлю краткую инструкцию к MOZA Mini-S из комплекта поставки, возможно кому-то будет полезна и ниже опишу подробно управление стедикамом.
Как управлять стабилизатором:
При включении устройство находится в режиме Pan Follow Mode, это когда стедикам будет поворачивать ваш смартфон в горизонтальном направлении, следуя за руками. Вертикальная ось, в таком варианте, заблокирована. Вы можете управлять джойстиком для перемещения смартфона вверх и вниз по горизонтальной оси, либо зажать курок поднимать (опускать) ручку стабилизатора.
Основные операции с этим триггером:
- Нажатие и удержание — движение смартфона по всем осям;
- Нажатие 2 раза и удержание — блокировка всех осей, смартфон находится в одном положении;
- Нажатие 2 раза и отпускание триггера — возврат стедикама в исходное положение, которое было при включении.
Также вы можете нажать 2 раза на четырех-позиционный диск, дабы разблокировать круговое вращение смартфона. Если же нажать 2 раза вниз на этом диске, то включится спортивный режим (Sport Gear Mode), это позволит очень быстро поворачивать смартфон по горизонтальной оси, что подойдет для съемки детей или спортивных мероприятий.
И наконец, тройное нажатие вниз на этот диск активирует так называемый Inception Mode, используя который, можно вращать смартфон джойстиком по горизонтальной оси, получая весьма интересный эффект. Также смотрите официальную инструкцию на видео ниже.
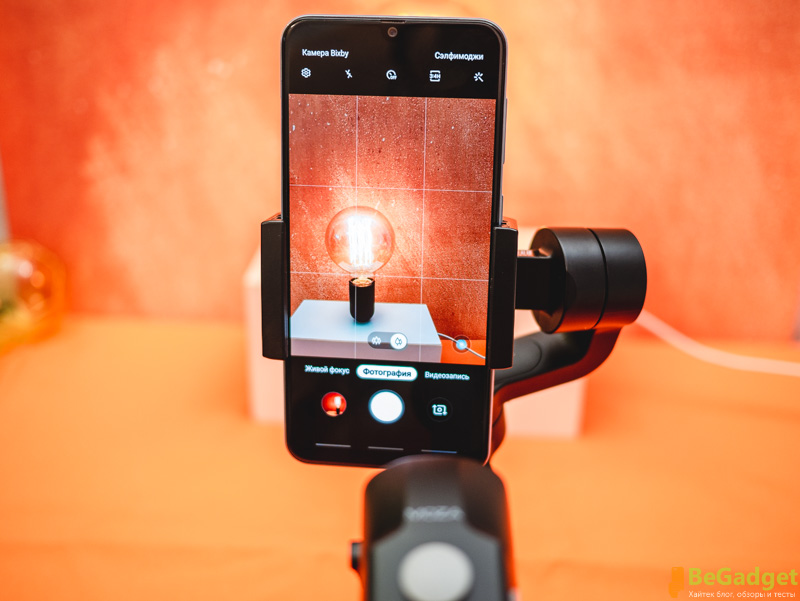
Приложение
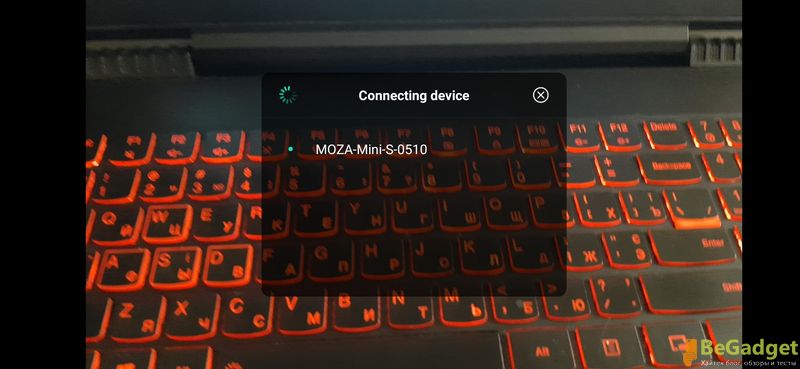
Сразу после запуска программы и включения стедикама, вы легко и быстро можете к нему подключиться через Bluetooth, нажав соответствующую кнопку в приложении.
Теперь вы способны полностью управлять камерой и стабилизатором, используя кнопки на нем.
Функционал приложения вполне неплох, но в зависимости от модели смартфона, некоторые функции могут отличаться. Качество видео можно устанавливать вплоть до 4K включительно, а вот при съемке таймлапсов доступно только 1080p.
Основные особенности программы:
- Запись видео;
- Съемка фото;
- Съемка таймлапсов статично и в движении;
- Съемка Слоу-Мо видео;
- Трекинг (слежение за объектом съемки, не работает в 4K режиме пока);
- Отдельное управление фокусом и экспозицией, возможность блокировки;
- Режим Про, в котором можно зафиксировать баланс белого, например;
- Встроенные фильтры;
- Прямые трансляции в Facebook;
- Эффект Вертиго и др.
Repair Process
2. My MOZA product needs to be repaired – what are the next
steps?
4. Ensure that you include
all necessary information with the product being returned
If you are claiming a warranty
repair, it is necessary to also include a dated proof of purchase for your
product. Gudsen
Service Centers cannot provide warranty repairs without receipt of any
applicable supporting documentation.
5. Ensure that the product
is securely packaged for transit
By sending an item to a Gudsen
Service Centre, you are not entering into an agreement with Gudsen, therefore Gudsen
will accept no liability for any loss or damage that occurs during transit. We
recommend that your product is safely and securely packaged. Depending on the
value of the product, you may also wish to consider insuring the shipment.
6. Once I have sent my product in for repair, what
happens next?
If you are claiming a warranty repair
for your product, an initial investigation of the product and supporting
documentation will take place in order to confirm that the warranty applies.
Gudsen will cover all the test cost, material cost, labor cost, and delivery
fee when sending the repaired product back to customers .
If for any reason it is determined
that a warranty repair is not applicable, we will contact customer to accept
the repair cost, or optionally, have the product returned back to the
customer;
Consumers can contact
support@gudsen.com for more details of repair process;
7. Once the repair process is
finished,what happens next?
We will send the product to the address provided on the MOZA after-service repair form. Please kindly note that the free
shipping(warranty repair) is only for the same country with the order address.
If the country address is not the same, an additional fee will be applied and is responsible by the customer.
Part III replacement policies
What is covered when you request a replacement
a. Manufacturing defects within 15 calendar
days (the actual date may vary according to local laws and regulations) of the day
of receiving the product.
b. The actual products are not matched with the
original description within 15 calendar days (the actual date may vary
according to local laws and regulations) of the purchasing date
c. Product has been damaged in transit,
which was found in the presence of the couriers or immediately unpacked and
reported when receiving the product;
The request of a replacement will be rejected if
a. The damage sustained in transit of the
product is not immediately reported when received the product;
b. The request for a refund is made beyond 15
calendar days (the actual date may vary according to local laws and
regulations) of the day receiving the product.;
c. Original accessory attachments,
specification, and packaging box are incomplete, missing, or cosmetic damage
caused by human negligence.
d. Legal proof of purchase like receipt or
sales order are unable to be provided, or have been forged or tampered;
e. No quality issues in itself were found after
the examination from Gudsen Technical Support;
f. Crash or burn caused by non-manufacturing
defects, or any damage caused by unauthorized modification, or entry of foreign
matters (liquid, dust, sand, etc.);
g. Labels, Serial Numbers, waterproof tag,
false proof mark, etc. were tampered or altered;
h. Failure and damaged caused by force majeure,
including fire, flood, earthquake, lighting strikes and etc.
i. A product has not been sent out in (7)
calendar days after warranty service confirmation from Gudsen.
Part IV warranty service policies
What is covered when request a warranty service
a. The
quality issue is caused by the manufacturing defects or loss in normal usage or
followed the official instructions during warranty period.
b. Product
has been damaged in the transit, which was found in the presence of the
couriers or immediately unpacked and reported when received the product;
The request of a warranty service will be reject if
a. The
product is no longer covered under warranty period.
b. The
product which did not operate or installation at environmental, mechanical or
electrical requirements;
c. Any
malfunction resulted from unauthorized modification, disassembly, or shell
opening not in accordance with the official instructions or manuals.
d. Any
malfunction resulted from improper installation, incorrect use or operation not
in accordance with the official instructions or manuals.;
e. Any
malfunction resulted from unauthorized circuit modification and mismatch or
misuse of the battery or ger.;
f. Any
malfunction reliability or compatibility issues when using unauthorized
third-party parts;
g. Labels,
Serial Numbers, waterproof tag, false proof mark, etc. were tampered or altered;
h. Failure
and damaged caused by force majeure, including fire, flood, earthquake,
lighting strikes and etc;
i. A
product has not been sent out in (7) calendar days after warranty service
confirmation from Gudsen.
Part II refund policies
What is covered when request a refund
a. Manufacturing defects within 7 calendar days
(the actual date may vary according to local laws and regulations) of the day
of receiving the product.
b. The actual products are not matched with the
original description within 7 calendar days (the actual date may vary according
to local laws and regulations) of the purchasing date.
c. Product has been damaged in the transit,
which was found in the presence of the couriers or immediately unpacked and
reported when received the product;
The request of a refund will be reject if
a. The damage sustained in transit of the
product is not immediately reported when received the product;
b. The request of refund is made beyond 7 calendar
days (the actual date may vary according to local laws and regulations) of day
of receiving the product.;
c. The product has been tampered with or there is evidence of an unauthorized modification or disassembling.
d. Original accessories attachments, specification,
and packaging box are incomplete, missing, or appearance is scratched or other visible
damage caused by human negligence.
e. Legal proof of purchase like receipt or
sales order are unable to provide, or have been forged or tampered;
f. Crash or burn caused by non-manufacturing
defects, or any damage caused by unauthorized modification, or entry of foreign
matters (liquid, dust, sand, etc.);
g. Labels, Serial Numbers, waterproof tag,
false proof mark, etc. were tampered or altered;
h. Failure and damaged caused by force majeure,
including fire, flood, earthquake, lighting strikes and etc.
i. A product has not been sent out in (7)
calendar days after warranty service confirmation from Gudsen.
*Note:
1. The refund is equal and will not exceed the value of the return product.
2. Refund service only provided for order from Gudsen MOZA Official Store https://store.gudsen.com/., We do not support refund service for orders from third-party websites or stores and suggest you to contact your original seller.
Start the Primary Calibration
Tap the gimbal icon to enter the setting interface,click «Calibrate» to start the calibration.

If there is no abnormal situation with the gimbal, please carefully decide whether to calibrate the gimbal. Click “Confirm” to enter the calibration interface.

Then the gimbal enters the sleep mode. Place the gimbal and phone according to the on-screen instructions.

Please make sure to place the gimbal on a flat surface, such as a flat desktop, otherwise the calibration will be affected. And ensure that the bottom of the phone holder fully fits onto the desk.
You can slightly press the top of the phone holder. Click «Start» to begin the calibration.

For iOS system, “Gyro calibrating”, “Calibrated!”, “Accelerometer calibrating”, “Calibrated” will appear on the screen in sequence.

For the Android, “Calibrating”, “Calibrated” will appear on the screen.

Now, the primary calibration has been done.
Warranty policy
Gudsen warranty covers all defects in materials and workmanship for all products sold by Gudsen.com. Only original,
unaltered,
and unmodified materials and workmanship are covered by this policy. This warranty does not cover damage caused by
improper deployment, misuse, accidents, neglect, or the natural breakdown of materials over time. Products should
be returned to us for evaluation. Items with defects in materials and workmanship will be repaired,exchanged or
refunded.For
more information about repair, exchange and returns, please visit our website’s after service policy .
Start the Advanced Calibration
Tap the gimbal icon to enter the setting interface,click «Calibrate» to start the calibration.

If there is no abnormal situation with the gimbal, please carefully decide whether to calibrate the gimbal. Click “Confirm” to enter the calibration interface.

Click the icon on the top right to enter the advanced calibration interface.

There are two ways of advanced calibration: Default calibration and Custom calibration. Select “Default Calibration”.

Stand the gimbal on a flat surface according to the on-screen instruction. Make sure the pan arm is aligned with the front of the handle.

For some smartphones, the tilt arm is not able to be balanced. This won’t affect the actual calibration, just hold the phone with hand to keep the tilt arm level.

Click «Start» to begin the calibration. Hold the smartphone, and make sure the phone screen is facing the operator.

Turn the phone gently until the lower part becomes green, release the phone when the countdown starts.

For iOS phones, “M-angle calibrated”, “Calibration completed” prompts will appear on the screen in sequence.

For Android phones, “Calibrate the electrical angle”, “Calibration is successful” will appear on the screen.

Please note that the operator must release the phone when the countdown starts, otherwise the calibration will fail.

Restart the gimbal and observe if there is anything abnormal. If there is slight drift, please start the primary calibration again.