Список операционных систем для nanopi
Содержание:
- 8 运行IPFS
- 7 FriendlyWrt的使用
- 5 Get Started
- 4 软件特性
- 1 Introduction
- 7 Work with FriendlyCore
- 3 Diagram, Layout and Dimension
- 1 Introduction
- 11 Connect External Modules to NEO Core2
- 11.1 Connect Python Programmable NanoHat OLED to NEO Core2
- 11.2 Connect Python Programmable NanoHat Motor to NEO Core2
- 11.3 Connect NanoHat PCM5102A to NEO Core2
- 11.4 Connect Arduino Compatible UNO Dock to NEO Core2
- 11.5 Connect NanoHat Proto to NEO Core2
- 11.6 Connect Matrix — 2’8 SPI Key TFT to NanoPi NEO Core2
- 8 如何编译FriendlyCore系统
- 7 FriendlyWrt的使用
- 2 Hardware Spec
- 5 快速入门
- 4 Software Features
- 12 更新日志
- GPIO — Интерфейс ввода/вывода общего назначения
8 运行IPFS
8.1 IPFS简介
星际文件系统(InterPlanetary File System,缩写IPFS)是一个旨在创建持久且分布式存储和共享文件的网络传输协议。它是一种内容可寻址的对等超媒体分发协议,在IPFS网络中的节点将构成一个分布式文件系统。
8.3 在PC机 IPFS节点里上传文件
在PC Windows系统上运行IPFS 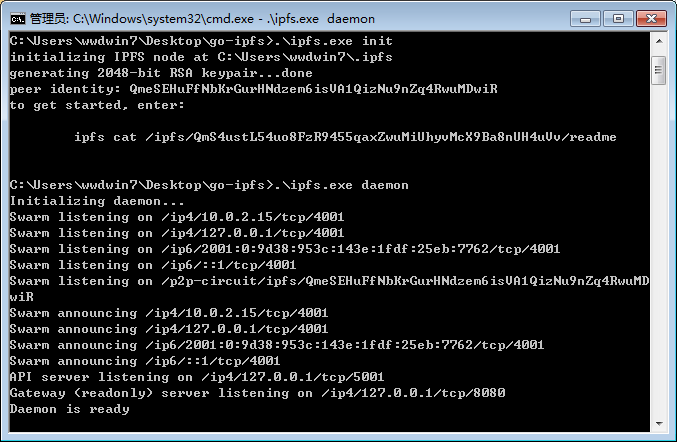
在PC Ubuntu系统上运行IPFS
$ ipfs daemon
API server listening on ip4127.0.0.1tcp5001
Gateway (readonly) server listening on ip4127.0.0.1tcp8080
Daemon is ready
在PC机 IPFS节点里上传文件
然后在PC上使用浏览器访问:
http://localhost:5001webui
进入PC机 IPFS节点的web界面:
点击Files菜单,然后点击Upload,选择想要上传文件,这里以文本文件test.txt为例,上传后可以看到如下界面:
对着文件点击鼠标右键,选择Copy hash,将文件的唯一hash值复制到剪切板中,再新建一个文本文件将hash值粘贴进去并保存下来:
QmNfcvc8m911hJgMf6bvtCvuneeiiWfLWRX7wbawjw5var
后面开发板会通过这个唯一hash值来获取该文件test.txt。
8.4 在开发板 IPFS节点里下载文件
$ tar xzf go-ipfs_v0.4.17_linux-amd64.tar.gz
$ cd go-ipfs
$ .install
Moved .ipfs to usrlocalbin
$ ipfs init
initializing IPFS node at root.ipfs
generating 2048-bit RSA keypair...done
peer identity: QmT7rYxLVhkhCWnLg7URJcubZvEnJmtiXQ5LYwr5XXXXXX
to get started, enter:

	ipfs cat ipfsQmS4ustL54uo8FzR9455qaxZwuMiUhyvMcX9Ba8nXXXXXXreadme
运行IPFS:
$ ipfs daemon &
使用下列命令下载文件:
$ ipfs get QmNfcvc8m911hJgMf6bvtCvuneeiiWfLWRX7wbawjw5var
$ cat QmNfcvc8m911hJgMf6bvtCvuneeiiWfLWRX7wbawjw5var
Hello IPFS
上述信息表明开发板已经成功通过IPFS获取到其他节点分享的文件。
7 FriendlyWrt的使用
7.2 登录系统
串口登录
如果您需要进行内核开发,最好选购一个串口配件,连接了串口,则可以通过串口终端对开发板进行操作。
使用串口模块能有效地提升开发效率,以下是串口模块的连接方法:
接上串口后,请注意串口模块的DC口和NanoPi NEO2 Black的MicroUSB口都需要供电:
也可以使用USB转串口模块调试,请注意需要使用5V/2A电源给开发板MicroUSB供电:
默认会以 root 用户自动登录,并且没有设置root用户的密码,你可以使用 passwd 命令来设置 root 用户的密码。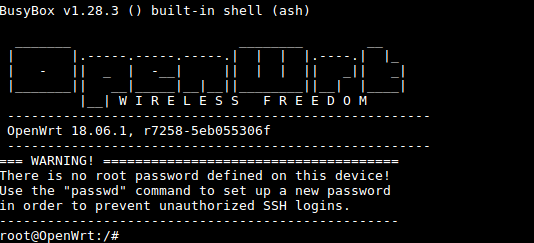
第一次运行系统时,系统会自动拓展TF卡上文件系统分区到最大可用空间: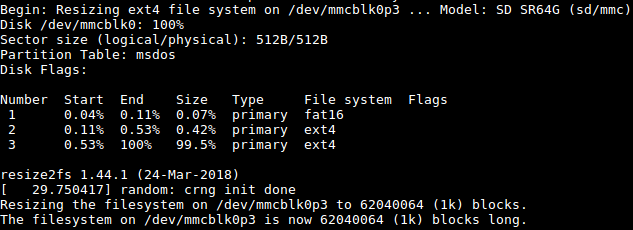
请耐心等待文件系统扩展完成。
SSH登录
在本开发板的FriendlyWrt系统里,有线网络(eth0) 被配置为WAN功能。
启动系统前,请先用网线连接板子的有线以太网口到一级路由器的LAN口,以便该以太网(eth0) 能通过DHCP获取到IP地址。
这里假设已经通过调试串口或者一级路由器确定板子的以太网(eth0) 的IP地址为192.168.1.163,执行下列命令通过SSH登录系统:
$ ssh root@192.168.1.163
无需密码,直接就可以登录。
Web登录
FriendlyWrt系统支持通过LuCI Web界面进行访问和配置。
在已完成 <SSH登录> 章节里的设置的基础上,假设板子的有线以太网的IP地址为192.168.1.163,在浏览器中输入该IP地址就可以登录LuCI界面了: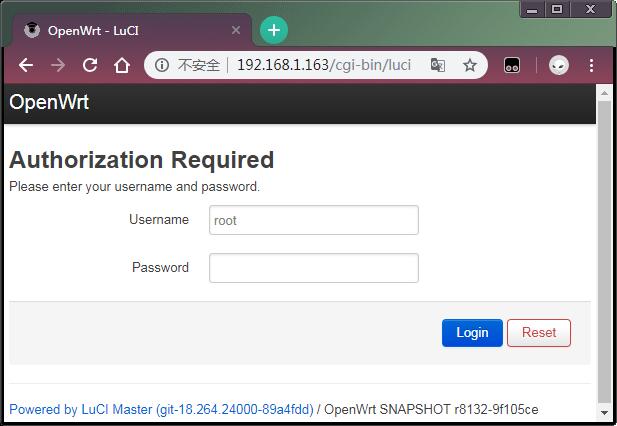
默认用户名为root,无需密码,直接点击»Login»按键即可登录。
7.3 软件包管理
FriendlyWrt使用opkg工具来管理软件包,执行如下命令可以获取opkg的帮助信息:
$ opkg
Package Manipulation:
        update                  Update list of available packages
        upgrade <pkgs>          Upgrade packages
        install <pkgs>          Install package(s)
        configure <pkgs>        Configure unpacked package(s)
        remove <pkgs|regexp>    Remove package(s)
        flag <flag> <pkgs>      Flag package(s)
         <flag>=hold|noprune|user|ok|installed|unpacked (one per invocation)

Informational Commands:
        list                    List available packages
        list-installed          List installed packages
        list-upgradable         List installed and upgradable packages
        list-changed-conffiles  List user modified configuration files
        files <pkg>             List files belonging to <pkg>
        search <file|regexp>    List package providing <file>
        find <regexp>           List packages whose name or description matches <regexp>
        info        Display all info for <pkg>
        status      Display all status for <pkg>
        download <pkg>          Download <pkg> to current directory
...
上面只截取了部分帮助信息,请自行查阅完整的帮助信息,下面会描述几个常用的opkg命令。
更新可用软件包列表
第一次安装软件前,建议先更新可用软件包列表:
$ opkg update
查看可安装的软件包:
$ opkg list
本WiKi编写时,可安装的软件包共有3241个。
查看已安装的软件:
$ opkg list-installed
本WiKi编写时,已安装的软件包共有124个。
安装/删除软件:
$ opkg install <pkgs>
$ opkg remove <pkgs>
查看已安装的软件包含什么文件:
$ opkg files <pkg>
安装LuCI中文语言包:
$ opkg install luci-i18n-base-zh-cn
查看当前系统中哪些配置文件被修改过:
$ opkg list-changed-conffiles
- 相关参考:
7.4 查看系统状态
命令行查看CPU温度和频率
$ cpu_freq
Aavailable frequency(KHz):
        480000 624000 816000 1008000
Current frequency(KHz):
        CPU0 online=1 temp=26548C governor=ondemand freq=624000KHz
        CPU1 online=1 temp=26548C governor=ondemand freq=624000KHz
        CPU2 online=1 temp=26548C governor=ondemand freq=624000KHz
        CPU3 online=1 temp=26548C governor=ondemand freq=624000KHz
上述信息表示当前有4个CPU核在线, 温度均约为26.5摄氏度, 运行的策略均为根据需求来决定运行频率, 当前的运行频率均为624MHz,设置频率的命令如下:
$ cpu_freq -s 1008000
Aavailable frequency(KHz):
        480000 624000 816000 1008000
Current frequency(KHz):
        CPU0 online=1 temp=36702C governor=userspace freq=1008000KHz
        CPU1 online=1 temp=36702C governor=userspace freq=1008000KHz
        CPU2 online=1 temp=36702C governor=userspace freq=1008000KHz
        CPU3 online=1 temp=36702C governor=userspace freq=1008000KHz
上述命令将4个CPU核的频率设置为1008MHz。
LuCI Web界面查看系统状态
登录LuCI界面后,点击顶部的 Statistics —> Graphs,可以查看系统的各种软硬件状态信息(即statistics),例如:
1) 系统负载:
2) 内存:
3) CPU温度:
Statistics界面对应软件包luci-app-statistics,luci-app-statistics软件包用Collectd工具收集状态数据并且用RRDtool工具将数据渲染为图表。
你可以通过安装额外的collectd-mod-*软件包去使能更多的statistics.
所有的collectd-mod-*软件包对应同一个配置文件: /etc/config/luci_statistics。
- 相关参考:
登录LuCI界面后,点击顶部的 Network —> Interfaces ,可以查看当前的网络设置:

Network -> Interfaces 界面的配置保存在/etc/config/network中。
5 Get Started
5.1 Essentials You Need
Before starting to use your NanoPi NEO2 get the following items ready
- NanoPi NEO2
- microSD Card/TFCard: Class 10 or Above, minimum 8GB SDHC
- microUSB power. A 5V/2A power is a must
- A Host computer running Ubuntu 16.04 64 bit system
5.2 TF Cards We Tested
To make your NanoPi NEO2 boot and run fast we highly recommend you use a Class10 8GB SDHC TF card or a better one. The following cards are what we used in all our test cases presented here:
SanDisk TF 8G Class10 Micro/SD TF card:

SanDisk TF128G MicroSDXC TF 128G Class10 48MB/S:

川宇 8G C10 High Speed class10 micro SD card:

5.3.1 Get Image File
-
-
Image Files: nanopi-neo2_sd_friendlycore-xenial_3.10_arm64_YYYYMMDD.img.zip Base on UbuntuCore, kernel:Linux-3.10 nanopi-neo2_sd_friendlycore-xenial_4.14_arm64_YYYYMMDD.img.zip Base on UbuntuCore, kernel:Linux-4.14 nanopi-neo2_sd_friendlywrt_4.14_arm64_YYYYMMDD.img.zip Base on OpenWrt, kernel:Linux-4.14 Flash Utility: win32diskimager.rar Windows utility. Under Linux users can use «dd»
-
5.3.2.1 Flash to TF
- FriendlyCore / Debian / Ubuntu / OpenWrt / DietPi are all based on a same Linux distribution and their installation methods are the same.
- Extract the Linux image and win32diskimager.rar files. Insert a TF card(at least 8G) into a Windows PC and run the win32diskimager utility as administrator. On the utility’s main window select your TF card’s drive, the wanted image file and click on «write» to start flashing the TF card.
Take «nanopi-neo2_sd_friendlycore-xenial_4.14_arm64_YYYYMMDD.img» as an example here is the installation window. Other image files are installed on the similar window: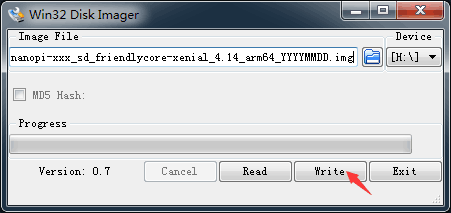
After it is installed you will see the following window:
Insert this card into your board’s BOOT slot and power on (with a 5V/2A power source). If the PWR LED is on and the STAT LED is blinking this indicates your board has successfully booted.
4 软件特性
-
-
FriendlyCore系统 交叉编译器 - gcc-linaro-6.3.1-2017.02-x86_64_aarch64-linux-gnu
- 适用于64-bit Armv8 Cortex-A, little-endian架构,在NanoPi H5开发板上长期验证和试用。
U-boot-2017.11 - 支持自动探测FriendlyElec所有的型号NanoPi H5开发板,自动加载对应的dtb文件。
- 优化内存设置。
- 支持设置CPU电压调节芯片sy8106a,仅适用于NanoPi K1 Plus/NanoPi NEO Core2。
- 支持基于H5 CPUID 生成非 OUI MAC地址供 Linux 的 eth0 使用。
- 支持从 EEPROM(如果存在的话) 读取OUI MAC地址供 Linux 的eth0使用。
- 支持检测SD/eMMC启动方式,自动加载对应存储设备里的内核。
Linux-4.14 - 支持LED,通过/sys/class/leds访问。
- 支持GPIO,通过/sys/class/gpio/访问。
- 支持UART0/1/2/3,通过/dev/ttySX访问。
- 支持I2C0,通过/dev/i2c-X访问。
- 支持PWM0,通过/sys/class/pwm/访问,与UART0引脚复用。
- 支持I2S0,默认配合PCM5102A codec使用,与I2C1引脚复用。
- 支持Watchdog,通过/dev/watchX访问。
- 支持读取CPU ID,通过/sys/bus/nvmem/devices/sunxi-sid0/nvmem访问。
- 支持IR Receive,需自行外接IR接收器。
支持CPU动态电压调节。
- 支持USB Host0/1/2/3。
- 支持TF Card。
- 支持eMMC。
- 支持1000M Ethernet。
- 支持H5自带Codec,录音与播放。
- 支持USB Camera(CAM202)。
- 支持市面上常见USB WiFi Adapter。
- 支持市面上常见USB Ethernet Adapter。
- 支持市面上常见USB Serial Converter。
- 支持市面上常见USB Sound Card。
- 支持NanoHat PCM5102A。
文件系统 - 基于UbuntuCore-16.04构建,保留UbuntuCore的原始特性。
- 内置常用软件包: VIM/Nano/SSHserver等。
- 内置Qt-Embedded-4.8,适合企业用户快速开发需要图形界面的产品。
- 内置网络管理工具NetworkManager,自动检测和连接网络,便于管理网络,参考 NetworkManager。
- 内置命令行配置工具npi-config,可用于配置用户密码、系统语言、时区、Hostname、SSH开关、自动登录选项、硬件接口,参考Npi-config。
- 使用 overlayfs,参考How to use overlayfs on Linux。
- 支持首次启动时自动扩展文件系统。
- 支持启动时自动修复文件系统。
- 启动512MB的swap分区。
- 支持WiringNP,通过类似Arduino的API访问NanoPi的gpio/i2c/spi等,参考WiringNP。
- 支持BakeBit,BakeBit是一套传感器连接的解决方案,包括硬件(NanoHat Hub扩展板)和软件(BakeBit),参考BakeBit 。
- 支持RPi.GPIO,通过Python访问NanoPi的gpio,参考 RPi.GPIO。
- 支持使用 eflasher 工具烧写到 eMMC(仅支持带eMMC的板子),参考EFlasher。
-
-
-
FriendlyWrt系统 交叉编译器 - gcc-linaro-6.3.1-2017.02-x86_64_aarch64-linux-gnu
- 适用于64-bit Armv8 Cortex-A, little-endian架构,在NanoPi H5开发板上长期验证和试用。
U-boot-2017.11 Linux-4.14 文件系统 - 基于 OpenWrt-18.06 构建,保留 OpenWrt 原生的功能特性;
- 基于 FriendlyElec 维护的 U-boot-2017.11 + Linux-4.14。
- 优化第一次开机时单板硬件相关的初始化。
- 支持 huawei wifi 2 mini(E8372h)。
- 支持 5G USB WiFi rtl8821cu,可热插拔。
- 支持 Matrix-LCD2USB,默认显示 IP 地址。
- 使用 overlayfs,参考How to use overlayfs on Linux。
- 支持首次启动时自动扩展文件系统。
- 提供一键编译 U-boot/Linux/FriendlyWrt rootfs 并且生成系统映像的脚本工具,参考How to Build FriendlyWrt。
- 支持使用 eflasher 工具烧写到 eMMC(仅支持带eMMC的板子),参考EFlasher。
-
-
-
eFlasher系统 交叉编译器 - gcc-linaro-6.3.1-2017.02-x86_64_aarch64-linux-gnu
- 适用于64-bit Armv8 Cortex-A, little-endian架构,在NanoPi H5开发板上长期验证和试用。
U-boot-2017.11 Linux-4.14 文件系统 - 基于UbuntuCore-16.04构建,保留UbuntuCore的原始特性。
- 内置图形界面eMMC烧写工具eFlasher,开机自动运行,参考EFlasher。
- 内置命令行eMMC烧写工具eFlasher。
- 支持多系统选择烧写。
- 支持显示烧写进度。
- 支持备份和还原eMMC。
- 支持自动检测外置存储设备(例如U盘)根目录上的烧写文件。
-
1 Introduction
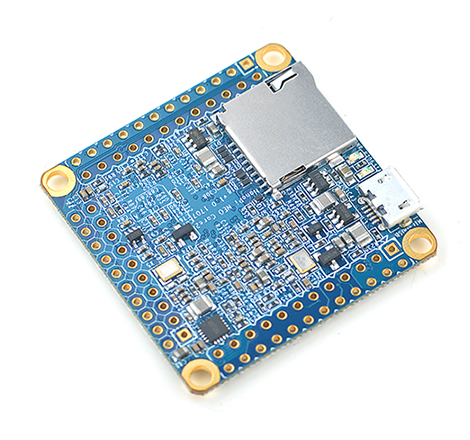
Overview
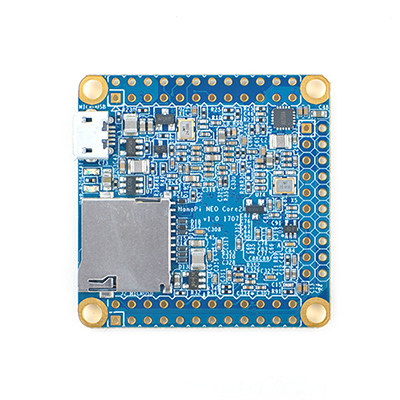
Front
Back
- The NanoPi NEO Core2 as its name tells is an alternative NanoPi NEO2 that works like a CPU board with male pin-headers. It has the same form facotor as the NanoPi NEO2, same pin descriptions and works with all the OS images the NanoPi NEO2 supports. The connectors and ports on the NEO2 are populated to pin-headers on the NEO2 Core. In addition the NEO Core2 can have an optional onboard eMMC flash and ESD protection for connectors and ports. There features are highly preferred by industrial customers.
- The NEO2 Core uses a popular Allwinner H5 SoC and has onboard 1G DDR3 RAM. FriendlyElec offers models with three eMMC options: 8GB(default)/16GB/32GB. FriendlyElec migrated UbuntuCore with mainline kernel 4.14 for it. It works with other OS such as Armbian as well. Compared to the NanoPi NEO2 the NanoPi NEO Core2 runs more reliably with much less overheat. It is a good platform for IoT applications, mornitoring systems, smart control systems, cluster computing and AI applications.
- FriendlyElec develops a Mini Shield for NanoPi NEO Core/Core2 which has the same form factor as the RPi 3. When a NanoPi NEO Core2 is connected to this Mini Shield the whole assembled module can be well fit into a common RPi 3’s case.
7 Work with FriendlyCore
Non-root User:
   User Name: pi
   Password: pi
Root:
   User Name: Root
   Password: fa
7.3 Setup Network Configurations
By default «eth0» is assigned an IP address obtained via dhcp. If you want to change the setting you need to change the following file:
vi etcnetworkinterfaces.deth0
For example if you want to assign a static IP to it you can run the following commands:
auto eth0
iface eth0 inet static
    address 192.168.1.231
    netmask 255.255.255.0
    gateway 192.168.1.1
To change the setting of «eth1» you can add a new file similar to eth0’s configuration file under the /etc/network/interfaces.d/ directory.
3 Diagram, Layout and Dimension
3.1 Layout
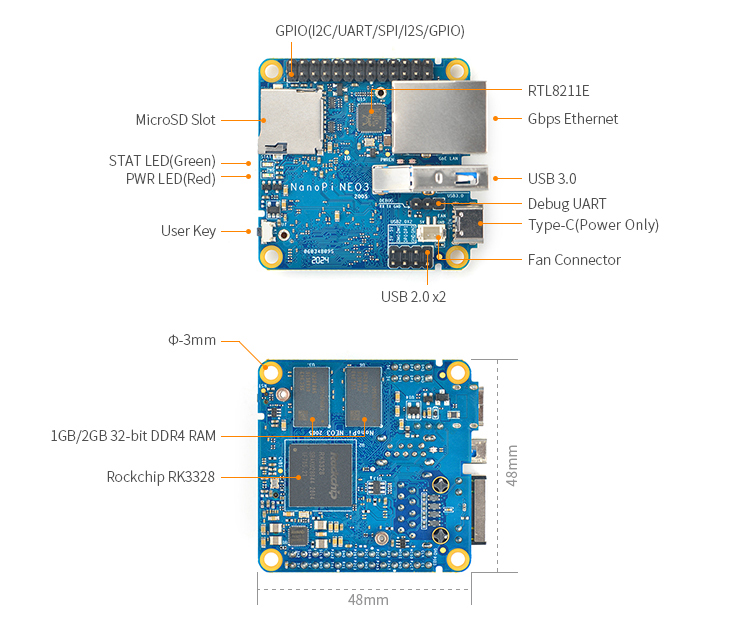
NanoPi NEO3 Layout
GPIO(I2C/UART/SPI/I2S/GPIO)
-
-
Pin# Name Linux GPIO Pin# Name Linux GPIO 1 3.3V(OUT) 2 5V(OUT/IN) 3 I2C0_SDA 4 5V(OUT/IN) 5 I2C0_SCL 6 GND 7 GPIO2_A2/IR-RX 66 8 GPIO3_A4/UART1_TX 100 9 GND 10 GPIO3_A6/UART1_RX 102 11 GPIO2_B7/I2S1_MCLK 79 12 GPIO2_C3/I2S1_SDI 83 13 GPIO2_C1/I2S1_LRCK_TX 81 14 GND 15 GPIO2_C2/I2S1_SCLK 82 16 GPIO3_A5/UART1_RTSN 101 17 3.3V(OUT) 18 GPIO3_A7/UART1_CTSN 103 19 GPIO3_A1/SPI_TXD 97 20 GND 21 GPIO3_A2/SPI_RXD 98 22 GPIO2_C7/I2S1_SDO 87 23 GPIO3_A0/SPI_CLK 96 24 GPIO3_B0/SPI_CSN0 104 25 GND 26 GPIO0_D3/SPDIF_TX 27
-
USB2.0
-
-
Pin# Name Pin# Name 1 GND 2 GND 3 DP1 4 OTG_DP 5 DM1 6 OTG_DM 7 5V 8 5V
-
- Note:
1 Introduction
1-bay NAS Dock v1.2 for NanoPi NEO/NEO2
- The 1-bay NAS Dock v1.2 for NanoPi NEO/Air/NEO2 is an expansion board which can be used to connect an external hard disk to a FriendlyElec’s NanoPi NEO/Air/NEO2. Together with FriendlyElec’s customized aluminum case and NanoPi NEO/Air/NEO2 you can quickly assemble a storage server.
- It uses JM20329 USB2SATA IC and communicates with a NanoPi NEO/Air/NEO2 via USB interface.
- It works with a 2.5″ SATA hard disk or SSD.
- It uses TI’s DC-DC chipset to convert a 12V input to 5V. It has a power switch for users to turn on/off the device.
- Its dual-color LED can indicate a connected hard disk’s status. When the LED is green it means the power is on. When it is red-blinking it means the connected hard disk is reading/writing.Warning: when the status LED is red-blinking do NOT shut down the power or plug/unplug the power.
- The onboard DS1307 RTC IC can provide precise clock for the board. A button cell can be used to power the RTC when the board is disconnected from power supply.
- It has an I2C interface.
11 Connect External Modules to NEO Core2
11.1 Connect Python Programmable NanoHat OLED to NEO Core2
The NanoHat OLED module is a small and cute monochrome OLED module with low power consumption. It has three user buttons. We provide its driver’s source code and a user friendly shell interface on which you can check system information and status.A customized aluminum case is made for it. You cannot miss this lovely utility! Here is a hardware setup:NanoHat OLED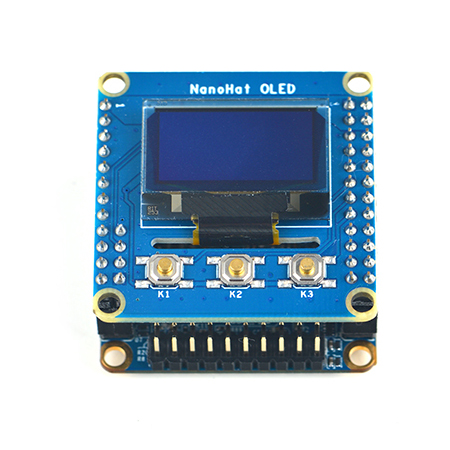
11.2 Connect Python Programmable NanoHat Motor to NEO Core2
The NanoHat Motor module can drive four 5V PWM steering motors and four 12V DC motors or four 5V PWM steering motors and two 12V four-wire step motors.Here is a hardware setup: NanoHat Motor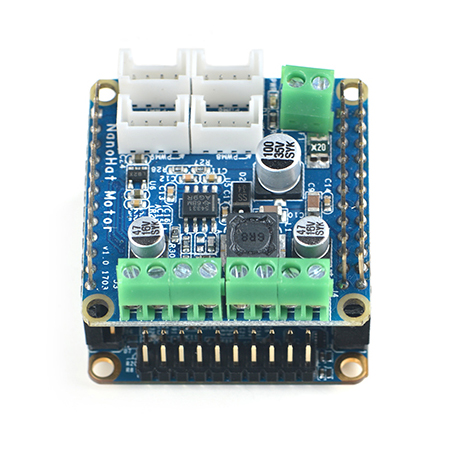
11.3 Connect NanoHat PCM5102A to NEO Core2
The NanoHat PCM5102A module uses TI’s DAC audio chip PCM5102A, a convenient and easy-to-use audio module for hobbyists. Here is a hardware setup:NanoHat PCM5102A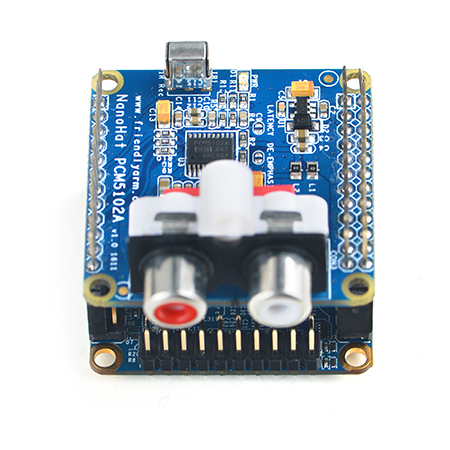
11.4 Connect Arduino Compatible UNO Dock to NEO Core2
The UNO Dock module is an Arduino board compatible with Arduino UNO and works with Arduino programs.You can use Arduino IDE to run all Arduino programs on the Dock.It also exposes the NanoPi NEO Core2’s pins.It converts 12V power input to 5V/2A output.You can search for various code samples from Ubuntu’s ecosystem and run on the Dock. These features make it a powerful platform for IOT projects and cloud related applications. Here is a hardware setup:UNO Dock for NanoPi NEO v1.0Matrix-UNO_Dock_NEO_Core2
11.5 Connect NanoHat Proto to NEO Core2
The NanoHat Proto is an expansion board which exposes NEO Core2’s various pins.It has an onboard EEPROM for data storage.Here is a hardware setup:NanoHat ProtoMatrix — NanoHat Proto_nanopi_NEO_Core2
11.6 Connect Matrix — 2’8 SPI Key TFT to NanoPi NEO Core2
The Matrix-2’8_SPI_Key_TFT module is a 2.8″ TFT LCD with resistive touch. It uses the ST7789S IC and XPT2046 resistive touch IC. It has SPI interface and three configurable user keys.Here is its wiki page Matrix — 2’8 SPI Key TFT
8 如何编译FriendlyCore系统
8.1 使用开源社区主线BSP
NEO2现已支持使用64位Linux-4.14内核,并使用64位Ubuntu Core 16.04,关于H5芯片系列开发板使用主线U-boot和Linux-4.14的方法,请参考维基:Mainline U-boot & Linux
8.2.1 准备工作
$ ls .
$ lichee
也可以从github上克隆lichee源码:
$ git clone https://github.comfriendlyarmh5_lichee.git lichee --depth 1
注:lichee是全志为其CPU的板级支持包所起的项目名称,里面包含了U-boot,Linux等源码和众多的编译脚本。
8.2.3 编译lichee源码
编译全志 H5 的BSP源码包必须使用64bit的Linux PC系统,并安装下列软件包,下列操作均基于Ubuntu-14.04 LTS-64bit:
$ sudo apt-get install gawk git gnupg flex bison gperf build-essential \
zip curl libc6-dev libncurses5-dev:i386 x11proto-core-dev \
libx11-dev:i386 libreadline6-dev:i386 libgl1-mesa-glx:i386 \
libgl1-mesa-dev g++-multilib mingw32 tofrodos \
python-markdown libxml2-utils xsltproc zlib1g-dev:i386
编译lichee源码包,执行命令:
$ cd licheefa_tools
$ .build.sh -b nanopi-neo2 -p linux -t all
该命令会一次性编译好U-boot、Linux内核和模块。
lichee目录里内置了交叉编译器,当进行源码编译时,会自动使用该内置的编译器,所以无需手动安装编译器。
下列命令可以更新TF卡上的U-boot:
$ cd licheefa_tools
$ .fuse.sh -d devsdX -p linux -t u-boot
/dev/sdX请替换为实际的TF卡设备文件名。
内核boot.img和驱动模块均位于linux-3.10/output目录下,将boot.img拷贝到TF卡的boot分区的根目录即可更新内核。
8.2.4 编译U-boot
注意: 必须先完整地编译整个lichee目录后,才能进行单独编译U-boot的操作。
如果你想单独编译U-boot,可以执行命令:
$ cd licheefa_tools
$ .build.sh -b nanopi-neo2 -p linux -t u-boot
下列命令可以更新TF卡上的U-boot:
$ cd licheefa_tools
$ .fuse.sh -d devsdX -p linux -t u-boot
/dev/sdX请替换为实际的TF卡设备文件名。
8.2.5 编译Linux内核
注意: 必须先完整地编译整个lichee目录后,才能进行单独编译Linux内核的操作。
如果你想单独编译Linux内核,可以执行命令:
$ cd licheefa_tools
$ .build.sh -b nanopi-neo2 -p linux -t kernel
编译完成后内核boot.img和驱动模块均位于linux-3.10/output目录下,将boot.img拷贝到TF卡的boot分区的根目录即可。
7 FriendlyWrt的使用
7.2 登录系统
串口登录
如果您需要进行内核开发,最好选购一个串口配件,连接了串口,则可以通过串口终端对开发板进行操作。
使用串口模块能有效地提升开发效率,以下是串口模块的连接方法:
接上串口后,您可以选择从串口模块的DC口或者从MicroUSB口 (如果有) 进行供电:
也可以使用USB转串口模块调试,请注意需要使用5V/2A电源给开发板MicroUSB供电:
默认会以 root 用户自动登录,并且没有设置root用户的密码,你可以使用 passwd 命令来设置 root 用户的密码。
第一次运行系统时,系统会自动拓展TF卡上文件系统分区到最大可用空间:
请耐心等待文件系统扩展完成。
SSH登录
在本开发板的FriendlyWrt系统里,有线网络(eth0) 被配置为WAN功能。
启动系统前,请先用网线连接板子的有线以太网口到一级路由器的LAN口,以便该以太网(eth0) 能通过DHCP获取到IP地址。
这里假设已经通过调试串口或者一级路由器确定板子的以太网(eth0) 的IP地址为192.168.1.163,执行下列命令通过SSH登录系统:
$ ssh root@192.168.1.163
无需密码,直接就可以登录。
Web登录
FriendlyWrt系统支持通过LuCI Web界面进行访问和配置。
在已完成 <SSH登录> 章节里的设置的基础上,假设板子的有线以太网的IP地址为192.168.1.163,在浏览器中输入该IP地址就可以登录LuCI界面了:
默认用户名为root,无需密码,直接点击»Login»按键即可登录。
7.3 软件包管理
FriendlyWrt使用opkg工具来管理软件包,执行如下命令可以获取opkg的帮助信息:
$ opkg
Package Manipulation:
        update                  Update list of available packages
        upgrade <pkgs>          Upgrade packages
        install <pkgs>          Install package(s)
        configure <pkgs>        Configure unpacked package(s)
        remove <pkgs|regexp>    Remove package(s)
        flag <flag> <pkgs>      Flag package(s)
         <flag>=hold|noprune|user|ok|installed|unpacked (one per invocation)

Informational Commands:
        list                    List available packages
        list-installed          List installed packages
        list-upgradable         List installed and upgradable packages
        list-changed-conffiles  List user modified configuration files
        files <pkg>             List files belonging to <pkg>
        search <file|regexp>    List package providing <file>
        find <regexp>           List packages whose name or description matches <regexp>
        info        Display all info for <pkg>
        status      Display all status for <pkg>
        download <pkg>          Download <pkg> to current directory
...
上面只截取了部分帮助信息,请自行查阅完整的帮助信息,下面会描述几个常用的opkg命令。
更新可用软件包列表
第一次安装软件前,建议先更新可用软件包列表:
$ opkg update
查看可安装的软件包:
$ opkg list
本WiKi编写时,可安装的软件包共有3241个。
查看已安装的软件:
$ opkg list-installed
本WiKi编写时,已安装的软件包共有124个。
安装/删除软件:
$ opkg install <pkgs>
$ opkg remove <pkgs>
查看已安装的软件包含什么文件:
$ opkg files <pkg>
安装LuCI中文语言包:
$ opkg install luci-i18n-base-zh-cn
查看当前系统中哪些配置文件被修改过:
$ opkg list-changed-conffiles
- 相关参考:
7.4 查看系统状态
命令行查看CPU温度和频率
$ cpu_freq
Aavailable frequency(KHz):
        480000 624000 816000 1008000
Current frequency(KHz):
        CPU0 online=1 temp=26548C governor=ondemand freq=624000KHz
        CPU1 online=1 temp=26548C governor=ondemand freq=624000KHz
        CPU2 online=1 temp=26548C governor=ondemand freq=624000KHz
        CPU3 online=1 temp=26548C governor=ondemand freq=624000KHz
上述信息表示当前有4个CPU核在线, 温度均约为26.5摄氏度, 运行的策略均为根据需求来决定运行频率, 当前的运行频率均为624MHz,设置频率的命令如下:
$ cpu_freq -s 1008000
Aavailable frequency(KHz):
        480000 624000 816000 1008000
Current frequency(KHz):
        CPU0 online=1 temp=36702C governor=userspace freq=1008000KHz
        CPU1 online=1 temp=36702C governor=userspace freq=1008000KHz
        CPU2 online=1 temp=36702C governor=userspace freq=1008000KHz
        CPU3 online=1 temp=36702C governor=userspace freq=1008000KHz
上述命令将4个CPU核的频率设置为1008MHz。
LuCI Web界面查看系统状态
登录LuCI界面后,点击顶部的 Statistics —> Graphs,可以查看系统的各种软硬件状态信息(即statistics),例如:
1) 系统负载:
2) 内存:
3) CPU温度:
Statistics界面对应软件包luci-app-statistics,luci-app-statistics软件包用Collectd工具收集状态数据并且用RRDtool工具将数据渲染为图表。
你可以通过安装额外的collectd-mod-*软件包去使能更多的statistics.
所有的collectd-mod-*软件包对应同一个配置文件: /etc/config/luci_statistics。
- 相关参考:
登录LuCI界面后,点击顶部的 Network —> Interfaces ,可以查看当前的网络设置:

Network -> Interfaces 界面的配置保存在/etc/config/network中。
7.6 查看Netwrok->Wireless的配置
登录LuCI界面后,点击顶部的 Network —> Wireless,可以查看WiFi 热点的设置界面:

默认的WiFi AP热点名称类似为“FriendlyWrt-10:d0:7a:de:3d:92”,密码为 «password»,手机可以直接连接该热点然后访问互联网。
Network->Wireless界面的配置保存在/etc/config/wireless中。
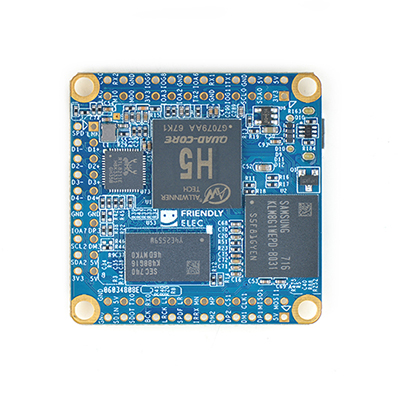
2 Hardware Spec
- CPU: Allwinner H5, Quad-core 64-bit high-performance Cortex A53
- DDR3 RAM: 512MB/1GB
- Storage: 8GB/16GB/32GB eMMC
- Connectivity: 10/100/1000M Ethernet utilizing RTL8211E-VB-CG
- USB Host x 3(included in 2.54mm pitch pin header)
- MicroSD Slot x 1
- LED: x 2, one for power status and the other for system status
- GPIO1: 2.54mm pitch 12 x 2 pin header containing UART, SPI, I2C, GPIO and etc
- GPIO2: 2.54mm pitch 24 pin header containing SPI, IR, I2S, USB, serial debug port, audio and etc
- GPIO3: 2.54mm pitch 20 pin header containing USB, Gbps Ethernet, I2C and etc
- PCB Size: 40 x 40mm
- MicroUSB: OTG and power input
- OS/Software: u-boot,Ubuntu Core
- Weight: xxg(Without Pin-headers)
5 快速入门
5.1 准备工作
要开启你的NanoPi NEO Core2新玩具,请先准备好以下硬件
- NanoPi NEO Core2主板
- microSD卡/TF卡: Class10或以上的 8GB SDHC卡
- 一个microUSB接口的外接电源,要求输出为5V/2A(可使用同规格的手机充电器)
- 一台电脑,需要联网,建议使用Ubuntu 16.04 64位系统
5.2 经测试使用的TF卡
制作启动板子的TF卡时,建议Class10或以上的 8GB SDHC卡。以下是经友善之臂测试验证过的高速TF卡:
SanDisk闪迪 TF 8G Class10 Micro/SD 高速 TF卡:
SanDisk闪迪 TF128G 至尊高速MicroSDXC TF 128G Class10 48MB/S:
川宇 8G手机内存卡 8GTF卡存储卡 C10高速class10 micro SD卡:
5.3.1 下载系统固件
-
-
使用以下固件: nanopi-neo-core2_sd_friendlycore-xenial_4.14_arm64_YYYYMMDD.img.zip 基于UbuntuCore构建的系统固件,使用Linux-4.14内核 nanopi-neo-core2_sd_friendlywrt_4.14_arm64_YYYYMMDD.img.zip 基于OpenWrt构建的系统固件,使用Linux-4.14内核 nanopi-neo-core2_eflasher_friendlycore-xenial_4.14_arm64_YYYYMMDD.img.zip eflasher系统固件,用于将FriendlyCore(Linux-4.14)系统烧写到eMMC nanopi-neo-core2_eflasher_friendlywrt_4.14_arm64_YYYYMMDD.img.zip eflasher系统固件,用于将OpenWrt(Linux-4.14)系统烧写到eMMC 烧写工具: win32diskimager.rar Windows平台下的系统烧写工具,Linux平台下可以用dd命令烧写系统
-
5.3.2.1 烧写到TF卡
- FriendlyCore / FriendlyWrt 等系统都属于 Linux 系统,所以它们的烧写方法是一样。
- 将 Linux 系统固件和烧写工具 win32diskimager.rar 分别解压,在 Windows 下插入TF卡(限4G及以上的卡),以管理员身份运行烧写工具 win32diskimager,在烧写工具 win32diskimager 的界面上,选择你的TF卡盘符,选择Linux 系统固件,点击 Write 按钮烧写。
这里以nanopi-neo-core2_sd_friendlycore-xenial_4.14_arm64_YYYYMMDD.img为例,其他Linux系统的烧写操作是类似的,烧写时的界面如下:
成功烧写后,会看到如下界面:
当制作完成TF卡后,拔出TF卡插入 BOOT 卡槽,上电启动(注意,这里需要5V/2A的供电),你可以看到STAT灯闪烁,这时你已经成功启动系统。
5.3.2.2 烧写到eMMC
5.3.2.2.1 eflasher脱机烧写
- eflasher的详细说明请参考wiki: EFlasher,请阅读该WiKi以了解eflasher系统的完整功能。
- 将 eflasher 系统固件和烧写工具 win32diskimager.rar 分别解压,在 Windows 下插入TF卡(限8G及以上的卡),以管理员身份运行烧写工具 win32diskimager,在烧写工具 win32diskimager 的界面上,选择你的TF卡盘符,选择 eflasher 系统固件,点击 Write 按钮烧写即可。
- 当制作完成TF卡后,拔出TF卡插入 BOOT 卡槽,上电启动(注意,这里需要5V/2A的供电),你可以看到STAT灯闪烁,说明已经成功启动 eflasher 系统。
- 对于没有HDMI接口的板子或者不想连接HDMI,可以在命令行终端中通过执行下列命令进行烧写:
$ su root
$ eflasher
root 用户的密码是 fa。
这里以nanopi-neo-core2_eflasher_friendlycore-xenial_4.14_arm64_YYYYMMDD.img为例,执行»eflasher»命令后会出现如下信息:
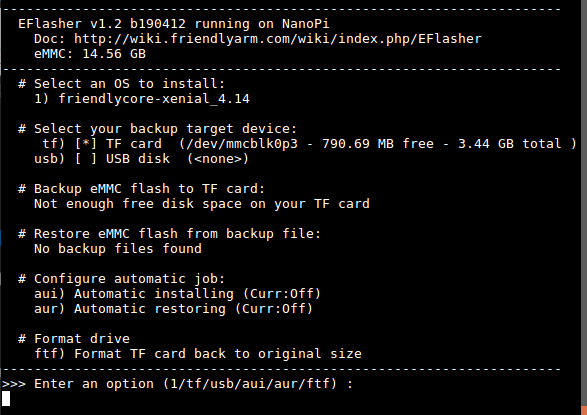
输入“1”,选择烧写friendlycore系统到eMMC上后,会提示如下信息:

输入“yes”,确定进行烧写:
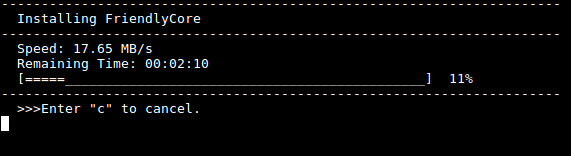
等待烧写完毕后,断电并从BOOT卡槽中取出TF卡,此时再上电就会从 eMMC 启动系统了。
如果想烧写其他系统映像到 eMMC ,请下载光盘里images-for-eflasher目录,将目录内的压缩包解压到 SD 卡的 FRIENDLYARM 分区。

4 Software Features
-
-
FriendlyCore System Cross-Compiler - gcc-linaro-6.3.1-2017.02-x86_64_aarch64-linux-gnu
- it applies to 64-bit Armv8 Cortex-A, little-endian architechture. FriendlyElec uses it for its H5 based boards.
U-boot-2017.11 - It can recognize a FriendlyElec’s H5 based board and load its dtb file accordingly.
- It optimizes memory settings.
- It supports voltage regulation IC sy8106a and applies only to NanoPi K1 Plus/NanoPi NEO Core2.
- It supports MAC generation from H5’s CPU ID.
- It supports system booting from either SD card or eMMC and can automatically load the kernel from the booting device.
Linux-4.14 - It supports LED. You can access it via «/sys/class/leds».
- It supports GPIO. You can access it via «/sys/class/gpio/».
- It supports UART0/1/2/3. You can access it via «/dev/ttySX».
- It supports I2C0. You can access it via «/dev/i2c-X».
- It supports SPI0. You can access it via «/dev/spidevX.X».
- It supports PWM0. You can access it via «/sys/class/pwm/». The UART0 pin is multiplexed.
- It supports I2S0. It works together with PCM5102A codec. The I2C1 pin is multiplexed.
- It supports Watchdog. You can access it via «/dev/watchX».
- It can read a CPU ID. You can access it via «/sys/bus/nvmem/devices/sunxi-sid0/nvmem».
- It supports IR Receiver. You need to connect an IR receiver to the board.
- It supports dynamic CPU voltage regulation.
- It supports Micro USB OTG.
- It supports USB Host1/2/3.
- It supports TF Card.
- It supports 1000M Ethernet.
- It supports H5’s internal Codec and supports voice playing and recording.
- It supports USB Camera(CAM202).
- It supports popular USB WiFi Adapters.
- It supports popular USB Ethernet Adapters.
- It supports popular USB Serial Converters.
- It supports popular USB Sound Cards.
- It supports FriendlyElec’s NanoHat PCM5102A.
File System - Based on UbuntuCore-16.04, it has original UbuntuCore features.
- It has popular utilties:VIM/Nano/SSHserver and etc.
- It has Qt-Embedded-4.8 and suitable for rapid product prototyping which needs a GUI.
- It has a network management utility «NetworkManager» which can automatically detect and connect to a network. For more details refer to: NetworkManager。
- It has a commandline utility «npi-config» which can be used to set a user password, language, timezone, Hostname, SSH enable/disable, auto-login, hardware interface and etc. For more details refer to Npi-config。
- It uses overlayfs.
- It expands the file system on the first system boot.
- It supports file system auto-repair on system boot.
- It supports 512MB’s swap.
- It supports WiringNP which functions like Arduino’s API and can be used to access NanoPi boards’ gpio/i2c/spi and etc. For more details refer to: WiringNP。
- It supports FriendlyElec’s BakeBit which is a set of sensor modules including hardware components(such as NanoHat Hub extension board) and software (such as BakeBit). For more details refer to BakeBit .
- It supports RPi.GPIO which can be used to access NanoPi boards’ gpio with Python. For more details refer to RPi.GPIO.
-
-
-
FriendlyWrt OS Cross Compiler - gcc-linaro-6.3.1-2017.02-x86_64_aarch64-linux-gnu
- Applicable for 64-bit Armv8 Cortex-A, little-endian. It has been tested and verified with FriendlyElec’s Allwinner H5 boards.
U-boot-2017.11 Linux-4.14 File System - Based on OpenWrt-18.06 and keeps OpenWrt’s original features;
- Based on a U-boot-2017.11 + Linux-4.14 system which is maintained by FriendlyElec
- Optimizes system initialization on a first time system boot
- Supports Huawei wifi 2 mini(E8372h)
- Supports 5G USB WiFi rtl8821cu, plug and play
- Supports Matrix-LCD2USB, by default it shows an IP address
- Utilizes overlayfs, for more details refer to How to use overlayfs on Linux
- Supports auto-extension of file system on a first time system boot
- Supports one-touch script to compile U-boot/Linux/FriendlyWrt rootfs and generate an image file, for more details refer to How to Build FriendlyWrt
- Supports flashing an image to eMMC with eflasher, for more details refer to EFlasher。
-
12 更新日志
注意: 本章节的描述针对所有的H5板子,部分硬件相关的功能描述仅支持特定的板子,请优先阅读开发板对应的维基以确定是否有相关的硬件功能。
<b>2019-12-19
— 修复dma驱动里的bug;
— 修复播放音频前后有爆破声的问题;
— uboot添加dtb overlay的功能;
— friendlywrt升级到r19,并且支持docker;
2019-11-05
— 修复 H5 运行 ubuntu-tft ROM tft屏无显示的bug;
2019-10-28
— 支持NanoPi NEO2 Black;
— 支持从 EEPROM(如果存在的话) 读取 MAC 地址供 eth0 使用;
— 增大 image-for-eflasher 里 rootfs 的分区;
— 将 FriendlyWrt 的 rootfs 从 armhf 版本修复为 arm64 版本;
2019-09-18
h5 OpenWrt:
— 将OpenWrt改名为FriendlyWrt;
— 修改WiFi热点名称为FriendlyWrt,并设置连接密码为password;
— 支持5g usb wifi RTL8821CU;
— 支持华为随行WiFi 2 mini(E8372H-155);
— K1 Plus 添加 friendlywrt系统;
h5 FriendlyCore:
— 支持5g usb wifi RTL8821CU/RTL8812AU;
— 支持docker;
h5 eflasher:
— 精简rootfs,提升启动速度;
— 支持LED显示烧写状态:快闪表示正在烧写中,慢闪表示没有在烧写;
— windows系统下可以查看FriendlyARM分区,便于拷贝image-for-eflasher文件;
2019-04-30
内核从4.14.52升级到4.14.111;
Linux-4.14 的ROM启用overlayfs,降低异常关机rootfs损坏的概率;
NEO2/NEO-Plus2/NEO-Core2添加OpenWrt的ROM;
提升Linux-4.14 AP6212 AP模式的稳定性;
2018-10-11
Linux-4.14 ov5640摄像头支持自动对焦;
规范images-for-eflasher的命名;
2018-09-19
规范系统固件的名称;
eflasher系统支持通过命令行方法备份和还原eMMC;
4.14内核使能多种USB转串口芯片;
2018-08-10
首次发布NanoPi K1 Plus的Android7.0系统固件和源码;
2018-07-11
光盘里添加非官方开发和维护的ROM: DietPi;
2018-07-04
NanoPi-K1-Plus添加DietPi的介绍页面。
2018-06-28
mjpg-streamer支持在指定的framebuffer上显示摄像头数据;
升级Linux4.14.0到Linux4.14.52;
Linux4.14.52内核支持I2S0 + PCM5102A;
2018-06-26
U-boot会打印启动设备的名称,例如: Boot device: emmc;
Linux-4.14支持摄像头Cam500B;
提高eflasher系统的稳定性,并且支持备份和还原emmc;
2018-05-11
Linux内核回退到LTS版本: 4.14;
4.14内核使能看门狗;
4.14内核使能红外接收;
4.14内核使能MicroUSB的OTG功能;
U-boot不再打印CPU ID, 4.14内核提供读CPU ID的接口(/sys/bus/nvmem/devices/sunxi-sid0/nvmem);
2018-04-20
ROM(Linux-4.x内核):
升级Linux到4.16.0版本;
支持DVP接口的摄像头Matrix — CAM500B;
支持I2S+NanoHat PCM5102A;
支持HDMI音频输出;
使能看门狗;
使能红外接收;
使能MicroUSB的OTG功能;
发布默认使能Matrix — 2’8 SPI Key TFT的ROM;
完善Npi-config,支持选择显示/声卡设备;
维基添加IR/watchdog说明章节;
启用512MB的swap分区;
不再预装WiringNP;
U-boot不再打印CPU ID,由内核提供读CPU ID的接口;
以CPU ID作为生成蓝牙的mac地址的种子;
2018-01-25
ROM(Linux-4.x内核):
WiFi-ap6212支持切换为ap模式;
2017-12-19
OLED-ROM:
修复sources.list异常的问题;
2017-12-08
ROM(Linux-4.x内核):
升级Uboot到2017.11版本;
升级Linux内核到4.14.0版本;
Linux内核使能PPP相关的配置项;
支持HDMI音频输出;
修复以太网LED显示异常的问题;
使能内存ODT功能;
2017-07-04
ROM(Linux-4.x内核)
使用NetworkManager作为网络管理工具;
支持I2S0和NanoHat PCM5102A;
支持Matrix-2’8_SPI_Key_TFT;
优化内存使用策略,提升系统稳定性;
NAS-ROM(Linux-4.x内核):
支持DS1307和NTP自适应设置系统时间;
2017-05-31
ROM(Linux-4.x内核):
升级U-boot版本到2017.05;
升级Linux内核版本到4.11.2;
2017-05-25
NAS-ROM(Linux-4.x内核):
升级U-boot版本到2017.05;
升级Linux内核版本到4.11.2;
改善NAS系统的稳定性;
优化OpenMediaVault的配置选项;
启用swap分区;
2017-05-23
FriendlyCore系统(Linux-3.x内核):
支持i2c0/1;
添加npi-config功能;
添加系统启动时显示欢迎界面功能;
支持Bakebit;
FriendlyCore系统(Linux-4.x内核):
使用npi-config配置使能pwm0时提示用户该操作会禁用调试串口;
OLED-ROM(Linux-3.x内核):
修复显示温度单位错误的问题;
2017-05-18
FriendlyCore系统(Linux-3.x内核):
支持通过npi-config使能/禁止i2c/spi/serial/pwm;
支持通过WiringNP来控制gpio引脚;
支持通过扩展3.5mm耳机孔录制和播放音频;
支持市面上大多数USB以太网卡/USB WiFi网卡;
支持串口打印内核启动信息;
支持软件生成唯一MAC地址功能;
支持使用Bakebit套件;
修复系统启动时欢迎界面温度显示异常的问题;
发布OLED-ROM;
2017-04-28
发布基于U-boot-2017.x和Linux-4.x.y源码的ROM,和基于Linux-3.x的ROM共用Debian和FriendlyCore文件系统;
2017-04-18
FriendlyCore系统:
修改了登录欢迎界面,当用户登录时会打印系统的基本状态信息;
增加 npi-config 工具;
预装NetworkManager作为网络管理工具;
新增pi用户,并配置为自动登录,自动登录特性可以使用npi-config工具配置;
2017-03-30
FriendlyCore系统:
GPIO — Интерфейс ввода/вывода общего назначения
GPIO 24 Pin
| Вывод# | Имя | Linux gpio | Вывод# | Имя | Linux gpio |
|---|---|---|---|---|---|
| 1 | SYS_3.3V | 2 | VDD_5V | ||
| 3 | I2C0_SDA | 4 | VDD_5V | ||
| 5 | I2C0_SCL | 6 | GND | ||
| 7 | GPIOG11 | 203 | 8 | UART1_TX/GPIOG6 | 198 |
| 9 | GND | 10 | UART1_RX/GPIOG7 | 199 | |
| 11 | UART2_TX/GPIOA0 | 12 | GPIOA6 | 6 | |
| 13 | UART2_RTS/GPIOA2 | 2 | 14 | GND | |
| 15 | UART2_CTS/GPIOA3 | 3 | 16 | UART1_RTS/GPIOG8 | 200 |
| 17 | SYS_3.3V | 18 | UART1_CTS/GPIOG9 | 201 | |
| 19 | SPI0_MOSI/GPIOC0 | 64 | 20 | GND | |
| 21 | SPI0_MISO/GPIOC1 | 65 | 22 | UART2_RX/GPIOA1 | 1 |
| 23 | SPI0_CLK/GPIOC2 | 66 | 24 | SPI0_CS/GPIOC3 | 67 |
USB / Аудио / ИК
| Вывод# | Имя | Описание |
|---|---|---|
| 1 | VDD_5V | Выход 5 В |
| 2 | USB-DP1 | USB1 сигнал DP |
| 3 | USB-DM1 | USB1 сигнал DM |
| 4 | USB-DP2 | USB2 сигнал DP |
| 5 | USB-DM2 | USB2 сигнал DM |
| 6 | GPIOL11/IR-RX | GPIOL11 или ИК приёмник |
| 7 | SPDIF-OUT/GPIOA17 | GPIOA17 или SPDIF-OUT |
| 8 | PCM0_SYNC/I2S0_LRC | I2S/PCM Тактовый сигнал/Sync |
| 9 | PCM0_CLK/I2S0_BCK | I2S/PCM Тактовый сигнал |
| 10 | PCM0_DOUT/I2S0_SDOUT | I2S/PCM Последовательный вывод данных |
| 11 | PCM0_DIN/I2S0_SDIN | I2S/PCM Последовательный ввод данных |
| 12 | GND | 0 В |
Аудио порт
| Вывод# | Имя | Описание |
|---|---|---|
| 1 | LINEOUTL | Выход левого канала |
| 2 | LINEOUTR | Выход правого канала |
| 3 | MICIN1N | Отрицательный контакт микрофона |
| 4 | MICIN1P | Положительный контакт микрофона |