Разработка на raspberry pi
Содержание:
- New Raspberry Pi 4, new features
- New Raspberry Pi 4 accessories
- Overview for the Pi 4
- Devices with known issues (not Pi 4)
- Своё облачное хранилище
- Области применения мини-ПК Raspberry Pi
- Первый запуск Raspberry
- FAQS
- New Raspbian software
- How to use PiServer
- PiServer to the rescue
- Строим умный дом
- Credits
- Установка операционной системы Raspbian
- I see no SD cards
- Raspberry Pi 4 FAQs
- Shooting troubles
New Raspberry Pi 4, new features
At first glance, the Raspberry Pi 4 board looks very similar to our previous $35 products, all the way back to 2014’s Raspberry Pi 1B+. James worked hard to keep it this way, but for the first time he has made a small number of essential tweaks to the form factor to accommodate new features.
Power
We’ve moved from USB micro-B to USB-C for our power connector. This supports an extra 500mA of current, ensuring we have a full 1.2A for downstream USB devices, even under heavy CPU load.

An extra half amp, and USB OTG to boot
Video
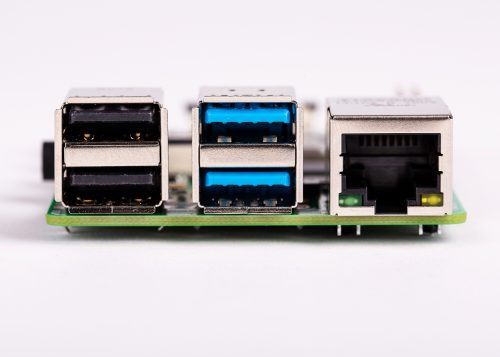
To accommodate dual display output within the existing board footprint, we’ve replaced the type-A (full-size) HDMI connector with a pair of type-D (micro) HDMI connectors.
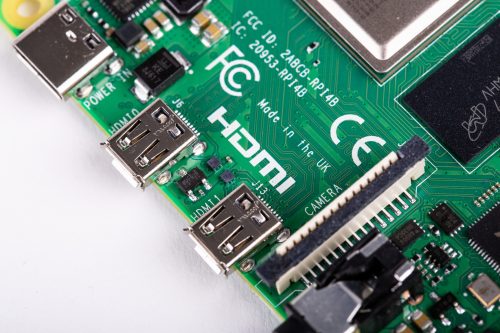
Seeing double
Ethernet and USB
Our Gigabit Ethernet magjack has moved to the top right of the board, from the bottom right, greatly simplifying PCB routing. The 4-pin Power-over-Ethernet (PoE) connector remains in the same location, so Raspberry Pi 4 remains compatible with the PoE HAT.
Through the looking glass
The Ethernet controller on the main SoC is connected to an external Broadcom PHY over a dedicated RGMII link, providing full throughput. USB is provided via an external VLI controller, connected over a single PCI Express Gen 2 lane, and providing a total of 4Gbps of bandwidth, shared between the four ports.
All three connectors on the right-hand side of the board overhang the edge by an additional millimetre, with the aim of simplifying case design. In all other respects, the connector and mounting hole layout remains the same, ensuring compatibility with existing HATs and other accessories.
New Raspberry Pi 4 accessories
Connector and form-factor changes bring with them a requirement for new accessories. We’re sensitive to the fact that we’re requiring people to buy these: Mike and Austin have worked hard to source good-quality, cost-effective products for our reseller and licensee partners, and to find low-cost alternatives where possible.
Raspberry Pi 4 Case
Gordon has been working with our design partners Kinneir Dufort and manufacturers T-Zero to develop an all-new two-part case, priced at $5.
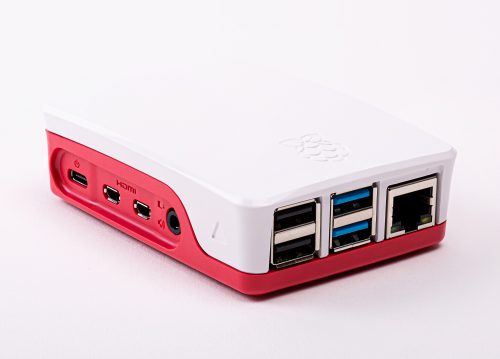
New toy, new toy box
We’re very pleased with how this has turned out, but if you’d like to re-use one of our existing cases, you can simply cut away the plastic fins on the right-hand side and omit one of the side panels as shown below.
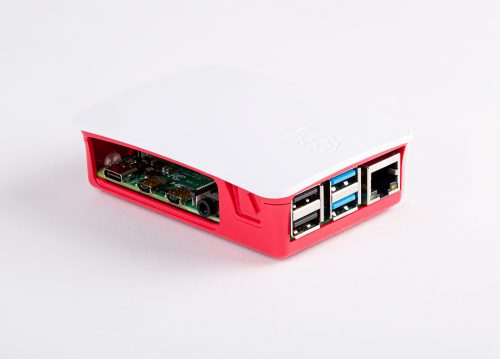
Quick work with a Dremel
Raspberry Pi 4 Power Supply
Good, low-cost USB-C power supplies (and USB-C cables) are surprisingly hard to find, as we discovered when sending out prototype units to alpha testers. So we worked with Ktec to develop a suitable 5V/3A power supply; this is priced at $8, and is available in UK (type G), European (type C), North American (type A) and Australian (type I) plug formats.
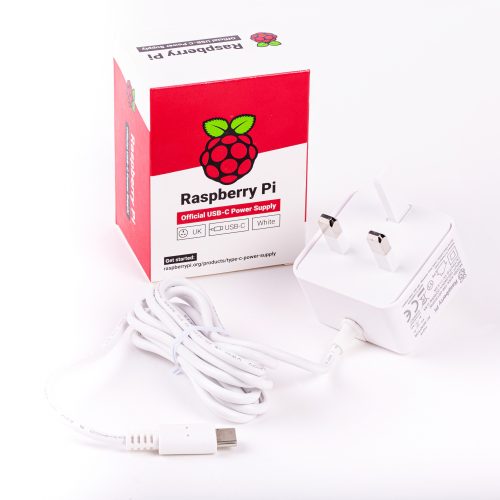
Behold the marvel that is BS 1363
If you’d like to re-use a Raspberry Pi 3 Official Power Supply, our resellers are offering a $1 adapter which converts from USB micro-B to USB-C. The thick wires and good load-step response of the old official supply make this a surprisingly competitive solution if you don’t need a full 3 amps.
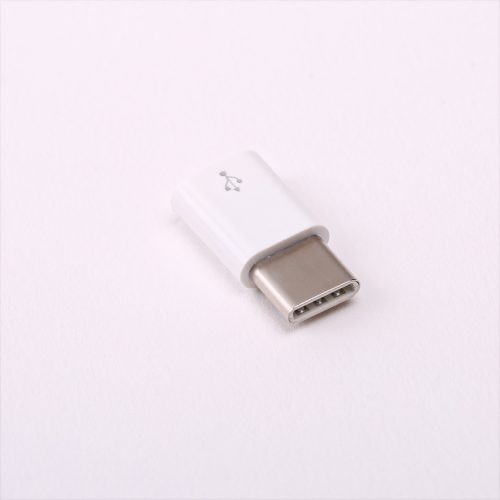
Somewhat less marvellous, but still good
Raspberry Pi 4 micro HDMI Cables
Again, low-cost micro HDMI cables which reliably support the 6Gbps data rate needed for 4Kp60 video can be hard to find. We like the Amazon Basics cable, but we’ve also sourced a 1m cable, which will be available from our resellers for $5.
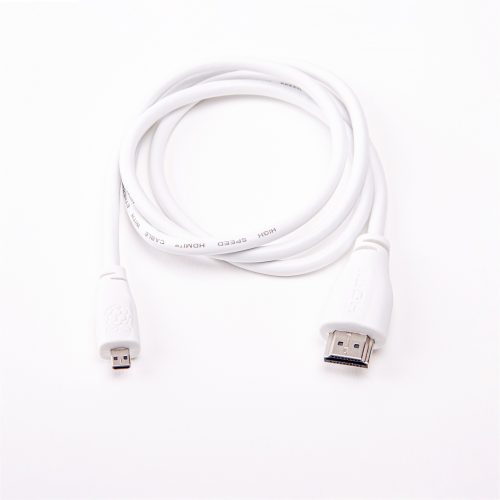
Official micro HDMI to HDMI cable
Updated Raspberry Pi Beginner’s Guide
At the end of last year, Raspberry Pi Press released the Official Raspberry Pi Beginner’s Guide. Gareth Halfacree has produced an updated version, covering the new features of Raspberry Pi 4 and our updated operating system.
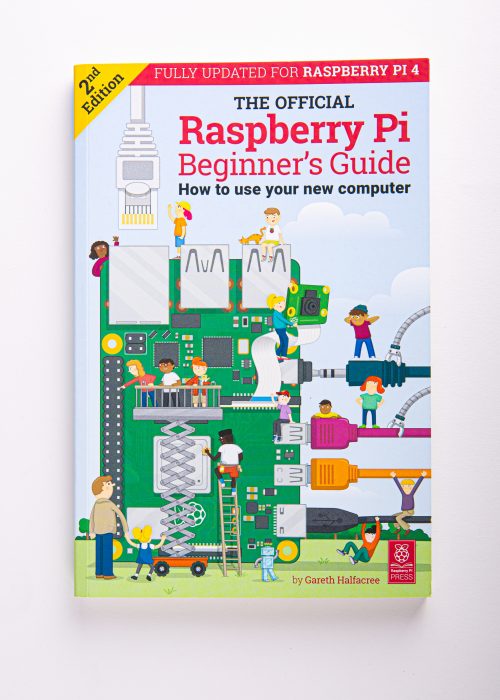
Little computer people
Raspberry Pi 4 Desktop Kit
Bringing all of this together, we’re offering a complete Desktop Kit. This is priced at $120, and comprises:
- A 4GB Raspberry Pi 4
- An official case
- An official PSU
- An official mouse and keyboard
- A pair of HDMI cables
- A copy of the updated Beginner’s Guide
- A pre-installed 16GB 32GB microSD card
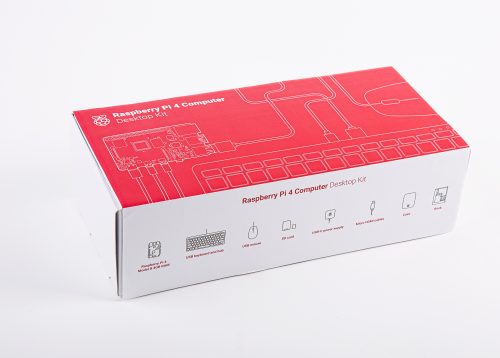
Raspberry Pi Desktop Kit
Overview for the Pi 4
For the Pi 4, a fully-featured host controller drives the downstream USB ports. Downstream USB is provided by a Via Labs VL805 chip — that supports two USB 2.0 ports and two USB 3.0 ports. This is connected to the BCM2711 SoC using a PCIe link, which is extremely fast. Therefore, the Pi 4 does not have the same speed constraints of previous models, which means very fast data transfer rates, especially when using the USB 3.0 ports. All connected USB 2.0 devices are connected via an internal hub which connects to the upstream PCIe link via a single USB 2.0 bus, giving a maximum combined bandwith for all USB 2.0 devices of 480Mbits/s. All four USB ports on the device are connected to the USB 2.0 hub, whilst the USB 3.0 ports (blue) are ALSO connected to the USB 3.0 bus via the USB 3.0 specific pins in the socket. USB 3.0 devices are constrained only by the total bandwidth available over the PCIe link.
You can use to display how the USB devices and hubs are arranged and their allocated speeds.
Most of the technical limitations of the USB implementation on previous models are no longer present.
The OTG hardware present on previous models of Pi is still available and it has moved to a single connection on the USB-C port. The OTG hardware is intended to be used in device-only mode on Pi 4.
Devices with known issues (not Pi 4)
1. Interoperability between the Raspberry Pi and USB 3.0 hubs
There is an issue with USB 3.0 hubs in conjunction with the use of full- or low-speed devices (most mice, most keyboards) and the Raspberry Pi. A bug in most USB 3.0 hub hardware means that the Raspberry Pi cannot talk to full- or low-speed devices connected to a USB 3.0 hub.
USB 2.0 high-speed devices, including USB 2.0 hubs, operate correctly when connected via a USB 3.0 hub.
Avoid connecting low- or full-speed devices into a USB 3.0 hub. As a workaround, plug a USB 2.0 hub into the downstream port of the USB 3.0 hub and connect the low-speed device, or use a USB 2.0 hub between the Pi and the USB 3.0 hub, then plug low-speed devices into the USB 2.0 hub.
2. USB 1.1 webcams
Old webcams may be Full-speed devices. Because these devices transfer a lot of data and incur additional software overhead, reliable operation is not guaranteed.
As a workaround, try to use the camera at a lower resolution.
3. Esoteric USB sound cards
Expensive «audiophile» sound cards typically use far more bandwidth than is necessary to stream audio playback. Reliable operation with 96kHz/192kHz DACs is not guaranteed.
As a workaround, forcing the output stream to be CD quality (44.1kHz/48kHz 16-bit) will reduce the stream bandwidth to reliable levels.
4. Single-TT USB hubs
USB 2.0 and 3.0 hubs have a mechanism for talking to full- or low-speed devices connected to their downstream ports called a Transaction Translator. This device buffers high-speed requests from the host (i.e. the Pi) and transmits them at full- or low-speed to the downstream device. Two configurations of hub are allowed by the USB specification: Single-TT (one TT for all ports) and Multi-TT (one TT per port).
Because of the OTG hardware limitations, if too many full- or low-speed devices are plugged into a single-TT hub, unreliable operation of the devices may occur. It is recommended to use a Multi-TT hub to interface with multiple lower-speed devices.
As a workaround, spread lower-speed devices out between the Pi’s own USB port and the single-TT hub.
Своё облачное хранилище
Сложность: 3/5.
Время: 2/5.
Зачем платить за облачные сервисы хранения данных, когда можно сделать свой? Если вы параноик и не хотите хранить личные фото на чужом сервере, то это — вполне ваш вариант. Тем более что размер хранилища и скорость загрузки зависят только от вас самих.
Настройка такого сервиса происходит в два этапа: сначала ставим Linux, например тот же Debian, а затем настраиваем удалённый доступ. В итоге своё облако можно приспособить для чего угодно: хранить почту, файлы, фото с отпуска, рабочие проекты для команды или фильмы, которые жалко удалять после просмотра.
Единственный минус — для бесперебойного доступа к файлам сервис должен работать круглосуточно.
Подробности: owncloud.org.
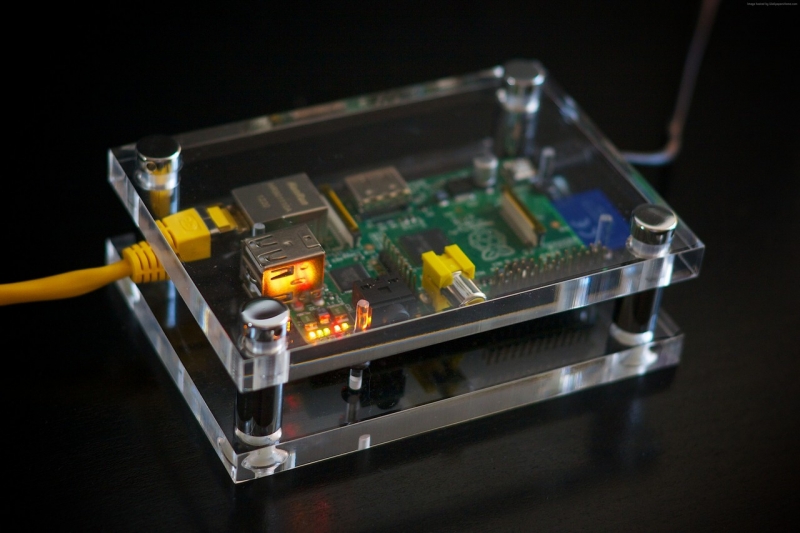
Области применения мини-ПК Raspberry Pi
- Использование в качестве полноценного ПК. Можете попробовать подключить монитор, клавиатуру, мышку и получить стационарный ПК на базе Windows 10. Однако, для этого подойдут только характеристики Raspberry Pi B, а ещё лучше — 2В или 3В;
- Собрать вместе десятки мини-ПК Raspberry Pi и получить многоядерный ПК. Для этого соедините в один сервер нужное количество устройств, найдите для них подходящее место и, желательно, охлаждение. Многоядерность такого сервера превзойдёт любой современный процессор за сотни долларов;
- Установите на одноплатный компьютер Raspberry эмулятор любимой консоли, скачайте пак образов для игр, подключите джойстик, монитор и наслаждайтесь игровой консолью в мини-формате;
- Подключите мини-ПК к сенсорному экрану, диагональю от 8 до 15 дюйм, сделайте корпус из металла или дерева, установите операционную систему Android и получите полноценный планшет, созданный своими руками;
- Создайте собственную систему освещения для дома или улицы, настроив Raspberry для чередования включения определённых ламп, и удивите близких;
- Установите на Raspberry Pi Skype, подключите его к стационарному телефону, спрячьте в корпусе и звоните друзьям из всего мира. Правда, для этого нужно ещё стабильное подключение к Wi-Fi и установленная система Adnroid или Windows;
- Создайте настенный органайзер, подключив мини-ПК к небольшому экрану, настроив операционную систему и вмонтировав всё это в стену.
Надеемся, наш обзор Raspberry оказался максимально информативным и помог определиться с покупкой новинки. Если вы хотите добавить немного искусственного интеллекта в повседневность или просто любите экспериментировать с электроникой — мини-ПК Raspberry создан для вас.
https://youtube.com/watch?v=ykbwUgabAEw
Первый запуск Raspberry
Подключаем к мини-ПК источник питания, ожидаем загрузку системы и видим окно с настройкой конфигурации;
Выбираем пункт «expand_rootfs» и устанавливаем желаемый размер root (объём файловой системы). Если хотите использовать всё доступное место на карте памяти — вписываете соответствующее значение;
Если хотите изменить драйвера клавиатуры или поставить пароль — заходите в 4 и 5 строчку, если нет — пропускаем эти пункты;
Заходим в change_locate и выбираем русский язык. Советуем использовать кодировку UTF-8, которая поддерживает большинство приложений, имеющих русский интерфейс;
В change_timezone выбираем свой часовой пояс. В дальнейшем, если есть подключение к интернету, время будет синхронизироваться под установленный регион;
Выбираем memory_split и устанавливаем объём памяти, который будет доступен для вытягивания с оперативки и использования графическим процессором. Если хотите проигрывать на Raspberry Pi video-файлы — ставите 128 или 256, если нет — достаточно 16 МБ;
Следующая вкладка «overclock» предназначена для разгона Raspberry Pi. Изменение значений в этой вкладке может привести к повреждению системы при недостаточном энергопотреблении или охлаждении
Если же вам крайне важно повысить частоту процессора — подымайте значение постепенно, начиная с «Modest», затем «Medium». Если система стабильно работает в тестах на производительность — можете попробовать режим «High»
Рекомендуем использование пресета «Turbo» только в рамках эксперимента, иначе восстановить начальное состояние устройства не выйдет;
Для использования Raspberry в режиме удалённого управления включаем ssh, для запуска визуальной оболочки во время запуска устройства — функцию boot_behaviour;
Нажимаем Ctrl и F, выбираем Finish. После этого произойдёт первое включение Raspberry и вы сможете увидеть работу скачанной ранее операционки.

Если всё сделано верно, можете приступать к изучению всех особенностей Raspberry Pi, начав внедрять их в проекты. Однако запуск и выключение гаджета дёрганьем шнура обеспечивает дискомфорт пользователю. Поэтому давайте рассмотрим возможность управления питанием при помощи кнопки на Raspberry Pi.
FAQS
We’ll keep updating this list over the next couple of days, but here are a few to get you started.
Are you discontinuing earlier Raspberry Pi models?
No. We have a lot of industrial customers who will want to stick with Raspberry Pi 1 or 2 for the time being. We’ll keep building these models for as long as there’s demand. Raspberry Pi 1 Model B+ and Raspberry Pi 2 Model B will continue to sell for $25 and $35 respectively.
What about Model A+?
Model A+ continues to be the $20 entry-level Raspberry Pi for the time being. We do expect to produce a Raspberry Pi 3 Model A, with the Model A+ form factor, during 2016.
What about the Compute Module?
We expect to introduce a BCM2837-based Compute Module 3 in the next few months. We’ll be demoing Compute Module 3 at our partners’ launch events this morning.
Are you still using VideoCore?
Yes. VideoCore IV 3D is the only publicly documented 3D graphics core for ARM-based SoCs, and we want to make Raspberry Pi more open over time, not less. BCM2837 runs most of the VideoCore IV subsystem at 400MHz and the 3D core at 300MHz (versus 250MHz for earlier devices).
Where does the “10x performance” figure come from?
10x is a typical figure for a multi-threaded CPU benchmark like SysBench. Real-world applications will see a performance increase of between 2.5x (for single-threaded applications) and >20x (for NEON-enabled video codecs).
New Raspbian software
To support Raspberry Pi 4, we are shipping a radically overhauled operating system, based on the forthcoming Debian 10 Buster release. This brings numerous behind-the-scenes technical improvements, along with an extensively modernised user interface, and updated applications including the Chromium 74 web browser. Simon will take an in-depth look at the changes in tomorrow’s blog post, but for now, here’s a screenshot of it in action.

Raspbian Buster desktop
Some advice for those who are keen to get going with Raspbian Buster right away: we strongly recommend you download a new image, rather than upgrading an existing card. This ensures that you’re starting with a clean, working Buster system. If you really, really want to try upgrading, make a backup first.
One notable step forward is that for Raspberry Pi 4, we are retiring the legacy graphics driver stack used on previous models. Instead, we’re using the Mesa “V3D” driver developed by Eric Anholt at Broadcom over the last five years. This offers many benefits, including OpenGL-accelerated web browsing and desktop composition, and the ability to run 3D applications in a window under X. It also eliminates roughly half of the lines of closed-source code in the platform.
How to use PiServer
The client machines
So that you can use a Pi as a client, you need to enable network booting on it. Power it up using an SD card with a Raspbian Lite image, and open a terminal window. Type in
and press Return. This adds the line to the end of the file in . Now power the Pi down and remove the SD card. The next time you connect the Pi to a power source, you will be able to network boot it.
The server machine
As a server, you will need an x86 computer on which you can install x86 Debian Stretch. Refer to Simon’s blog post for additional information on this. It is possible to use a Raspberry Pi to serve to the client Pis, but the file system will be slower, especially at boot time.
Make sure your server has a good amount of disk space available for the file system — in general, we recommend at least 16Gb SD cards for Raspberry Pis. The whole client file system is stored locally on the server, so the disk space requirement is fairly significant.
Next, start PiServer by clicking on the start icon and then clicking Preferences > PiServer. This will open a graphical user interface — the wizard — that will walk you through setting up your network. Skip the introduction screen, and you should see a screen looking like this:
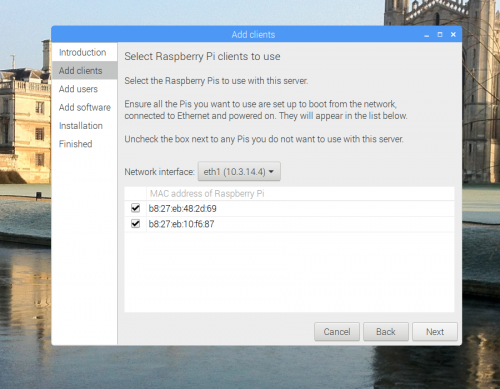
If you’ve enabled network booting on the client Pis and they are connected to a power source, their MAC addresses will automatically appear in the table shown above. When you have added all your Pis, click Next.
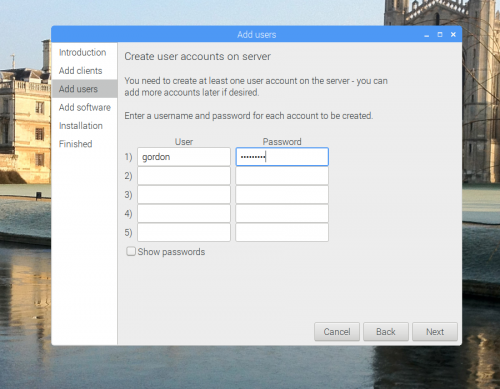
On the Add users screen, you can set up users on your server. These are pairs of usernames and passwords that will be valid for logging into the client Raspberry Pis. Don’t worry, you can add more users at any point. Click Next again when you’re done.
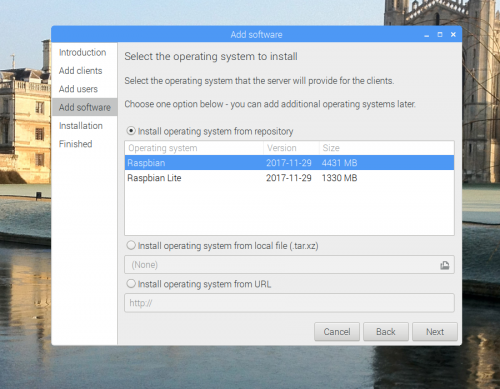
The Add software screen allows you to select the operating system you want to run on the attached Pis. (You’ll have the option to assign an operating system to each client individually in the setting after the wizard has finished its job.) There are some automatically populated operating systems, such as Raspbian and Raspbian Lite. Hopefully, we’ll add more in due course. You can also provide your own operating system from a local file, or install it from a URL. For further information about how these operating system images are created, have a look at the scripts in .
Once you’re done, click Next again. The wizard will then install the necessary components and the operating systems you’ve chosen. This will take a little time, so grab a coffee (or decaffeinated drink of your choice).
When the installation process is finished, PiServer is up and running — all you need to do is reboot the Pis to get them to run from the server.
PiServer to the rescue
To make network booting easy, I thought it would be nice to develop an application which did everything for you. Let me introduce: PiServer!
PiServer has the following functionalities:
- It automatically detects Raspberry Pis trying to network boot, so you don’t have to work out their Ethernet addresses.
- It sets up a DHCP server — the thing inside the router that gives all network devices an IP address — either in proxy mode or in full IP mode. No matter the mode, the DHCP server will only reply to the Raspberry Pis you have specified, which is important for network safety.
- It creates usernames and passwords for the server. This is great for a classroom full of Pis: just set up all the users beforehand, and everyone gets to log in with their passwords and keep all their work in a central place. Moreover, users cannot change the software, so educators have control over which programs their learners can use.
- It uses a slightly altered Raspbian build which allows separation of temporary spaces, doesn’t have the default ‘pi’ user, and has LDAP enabled for log-in.
Строим умный дом
Самый простой способ:
- Потребуется карта ёмкостью 16gb
- В Win32DiskImager (http://sourceforge.net/projects/win32diskimager/) выбирается «Image File» и «Device»
- Нажимаем «Write»
- После записи вставляем в Raspberry и стартуем
- Умный дом готов (по адресу Raspberry Pi доступен Web-интерфейс)

Проект MajorDoMo и Raspberry Pi открывает широкие возможности:
- управление освещением, воротами, отоплением и пр.;
- контроль безопасности и детектирование присутствия и пр.;
- режим экономии электроэнергии;
- удалённое и голосовое управление, уведомление и пр.;
- и многое другое.
Не требуется особых знаний в программировании, так как в примерах приведены сценарии на все случаи.
Credits
A project like this requires a vast amount of focused work from a large team over an extended period. Particular credit is due to Roger Thornton, who designed the board and ran the exhaustive (and exhausting) RF compliance campaign, and to the team at the Sony UK Technology Centre in Pencoed, South Wales. A partial list of others who made major direct contributions to the BCM2837B0 chip program, CYW43455 integration, LAN7515 and MxL7704 developments, and Raspberry Pi 3B+ itself follows:
James Adams, David Armour, Jonathan Bell, Maria Blazquez, Jamie Brogan-Shaw, Mike Buffham, Rob Campling, Cindy Cao, Victor Carmon, KK Chan, Nick Chase, Nigel Cheetham, Scott Clark, Nigel Clift, Dominic Cobley, Peter Coyle, Jon Cronk, Di Dai, Kurt Dennis, David Doyle, Andrew Edwards, Phil Elwell, John Ferdinand, Doug Freegard, Ian Furlong, Shawn Guo, Philip Harrison, Jason Hicks, Stefan Ho, Andrew Hoare, Gordon Hollingworth, Tuomas Hollman, EikPei Hu, James Hughes, Andy Hulbert, Anand Jain, David John, Prasanna Kerekoppa, Shaik Labeeb, Trevor Latham, Steve Le, David Lee, David Lewsey, Sherman Li, Xizhe Li, Simon Long, Fu Luo Larson, Juan Martinez, Sandhya Menon, Ben Mercer, James Mills, Max Passell, Mark Perry, Eric Phiri, Ashwin Rao, Justin Rees, James Reilly, Matt Rowley, Akshaye Sama, Ian Saturley, Serge Schneider, Manuel Sedlmair, Shawn Shadburn, Veeresh Shivashimper, Graham Smith, Ben Stephens, Mike Stimson, Yuree Tchong, Stuart Thomson, John Wadsworth, Ian Watch, Sarah Williams, Jason Zhu.
Установка операционной системы Raspbian
Raspberry Pi не имеет внутренней памяти для размещения файлов и операционной системы. Операционная система устанавливается на microSD карту, с которой и выполняется загрузка платы. У такого решения есть как плюсы, так и минусы.
К минусам стоит отнести более низкую скорость обмена данными, по сравнению со встроенной памятью (если бы она была). К плюсам можно отнести возможность выбора объема карты памяти под свои нужды. А также легкость восстановления — если вдруг что-то пошло не так, достаточно перезаписать систему на карте памяти. То есть превратить плату в «кирпич» очень сложно. К тому же можно иметь несколько разных карт с разными системами и при необходимости просто подключать нужную.
Процесс установки Raspbian
Почему-то раньше я думал, что установка системы для Raspberry Pi это сложное занятие, сопряженное с долгой настройкой и подготовкой платы к работе. Но, к счастью, я очень сильно ошибался. Установить Raspbian не просто, а очень просто. Это сделать проще, чем установить обычный дистрибутив Linux на персональный компьютер.
Процесс установки включает следующие шаги:
- Скачивание образа Raspbian (файл представлен в виде zip-архива).
- Запись образа на micoSD карту.
- Вставка microSD карты в Raspberry Pi (просто вставить карту в слот на плате).
- Включение Raspberry Pi и выполнение нескольких простых первичных шагов.
- Всё. Raspbian готов к работе.
Скачиваем Raspbian


Для загрузки доступны три вида образов (три редакции):
- Raspbian with desktop and recommended software — Редакция с графическим окружением и предустановленным набором утилит и некоторыми программами. Рекомендуется для большинства пользователей.
- Raspbian with desktop — Редакция с графическим окружением, но с минимальным набором предустановленных программ.
- Raspbian Lite — Минимальная редакция. Версия без графического интерфейса.
Если вы новичок, то рекомендую использовать первую редакцию — Raspbian with desktop and recommended software. Образ системы сжат в формате ZIP. Скачайте ZIP-архив или используйте torrent.

После того, как вы записали образ на microSD, необходимо вставить карту в Raspberry Pi.
Что такое NOOBS
Для справки: Вы могли заметить, что на странице загрузки Raspbian также предлагается скачать NOOBS. NOOBS (New Out Of the Box Software) представляет собой архив, содержащий утилиту для установки системы на Raspberry Pi. Пользователю достаточно скачать NOOBS и скопировать файлы на пустую карту, а затем вставить карту в Raspberry Pi. После запуска, в данной утилите можно выбрать систему, которую вы хотите установить. Предлагается Raspbian и некоторые другие системы. Мы не будем использовать NOOBS, так как на предыдущем шаге мы уже скачали образ Raspbian и нам достаточно записать его на карту (см. следующий шаг).
Запись образа на microSD
Теперь необходимо записать загруженный образ Raspbian на microSD карту. Для этого можно воспользоваться очень простой и бесплатной программой Etcher. Она доступна для Linux, Windows и MacOS.

Запишите загруженный образ (ZIP-архив), используя программу Etcher на карту.Инструкция: Как создать загрузочную флешку
Если вы используете другую программу для записи образа, то, скорее всего, вам нужно будет предварительно распаковать загруженный ZIP-архив. Внутри архива находится файл .IMG, который и нужно будет записать на карту.
Подключение карты памяти
После того, как вы записали образ системы на карту, необходимо вставить карту в слот, который расположен на обратной стороне платы Raspberry Pi.

I see no SD cards
Last year we described how the Raspberry Pi 3 Model B can be booted without an SD card over an Ethernet network from another computer (the server). This is called network booting or PXE (pronounced ‘pixie’) booting.
Why would you want to do this?
- A client computer (the Raspberry Pi) doesn’t need any permanent storage (an SD card) to boot.
- You can network a large number of clients to one server, and all clients are exactly the same. If you log into one of the clients, you will see the same file system as if you logged into any other client.
- The server can be run on an x86 system, which means you get to take advantage of the performance, network, and disk speed on the server.
Sounds great, right? Of course, for the less technical, creating such a network is very difficult. For example, there’s setting up all the required DHCP and TFTP servers, and making sure they behave nicely with the rest of the network. If you get this wrong, you can break your entire network.
Raspberry Pi 4 FAQs
We’ll keep updating this list over the next couple of days, but here are a few to get you started.
Wait, is it 2020 yet?
In the past, we’ve indicated 2020 as a likely introduction date for Raspberry Pi 4. We budgeted time for four silicon revisions of BCM2711 (A0, B0, C0, and C1); in comparison, we ship BCM2835C2 (the fifth revision of that design) on Raspberry Pi 1 and Zero.
Fortunately, 2711B0 has turned out to be production-ready, which has taken roughly 9–12 months out of the schedule.
Are you discontinuing earlier Raspberry Pi models?
No. We have a lot of industrial customers who will want to stick with the existing products for the time being. We’ll keep building these models for as long as there’s demand. Raspberry Pi 1B+, 2B, 3B, and 3B+ will continue to sell for $25, $35, $35, and $35 respectively.
What about a Model A version?
Historically, we’ve produced cut-down, lower-cost, versions of some of our $35 products, including Model 1A+ in 2014, and Model 3A+ at the end of last year. At present we haven’t identified a sensible set of changes to allow us to do a “Model 4A” product at significantly less than $35. We’ll keep looking though.
What about the Compute Module?
CM1, CM3, and CM3+ will continue to be available. We are evaluating options for producing a Compute Module product based on the Raspberry Pi 4 chipset.
Are you still using VideoCore?
Yes. VideoCore 3D is the only publicly documented 3D graphics core for ARM‑based SoCs, and we want to make Raspberry Pi more open over time, not less.
Shooting troubles
If you have trouble getting clients connected to your network, there are a fewthings you can do to debug:
- If some clients are connecting but others are not, check whether you’ve enabled the network booting mode on the Pis that give you issues. To do that, plug an Ethernet cable into the Pi (with the SD card removed) — the LEDs on the Pi and connector should turn on. If that doesn’t happen, you’ll need to follow the instructions above to boot the Pi and edit its file.
- If you can’t connect to any clients, check whether your network is suitable: format an SD card, and copy from on a standard Raspbian image onto it. Plug the card into a client Pi, and check whether it appears as a new MAC address in the PiServer GUI. If it does, then the problem is a known issue, and you can head to our forums to ask for advice about it (the network booting code has a couple of problems which we’re already aware of). For a temporary fix, you can clone the SD card on which is stored for all your clients.