Keep updated with all the cool stuff on electromaker.io!
Содержание:
- Samba
- WebDAV
- Stage #1: Power cycle
- Yocto
- How to create Android bootable media with empty MicroSD/eMMC or flash media
- 3.10.y & 4.9.y
- Step-by-Step guide to building an ODROID-XU3/4 Kernel
- Linux
- NAS
- ODROID-H2 Case Type 3 Kit Assembly
- Compile
- Installation
- Android TV
- How to build u-boot and kernel source
- OMV Basic configuration
- Select HDD and Assembly
- Price and Next Part
- Stage #2: Bootloader
- How to build u-boot
- Connect to the internet
- Toolchain
Samba
You can manage your data easily using Samba.
1. Enable Samba
Click “Services” — “SMB/CIFS” on OMV.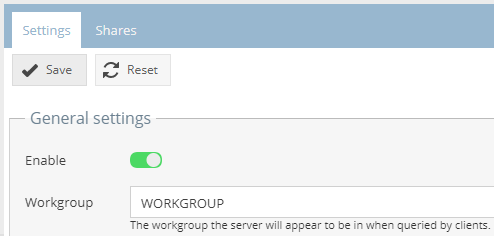
Simply check “Enable” option and save.
And you have to set the shared folders to use for Samba. Click “Shares” tab and click “Add” button.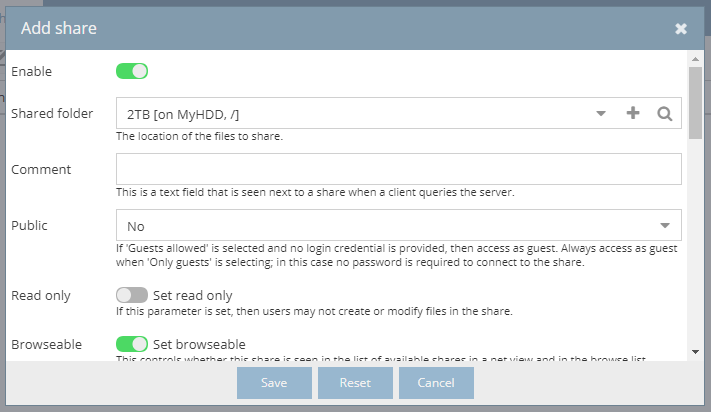
Once the “Add share” windows appeared, set the shared folder you created before that points the outermost of the HDD as “Shared folder”.
And click “Save” button to save.
2. File management
Register network drive (Windows)
Even if you enabled Samba but you might don’t know how to use it.
Once if you use Windows, simply you can register the HDD of the NAS as the drive which looks like the “C Drive” on your “This PC”.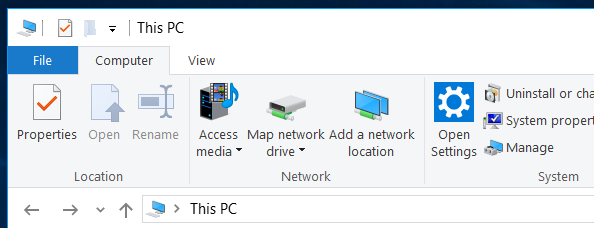
Open “This PC”, and click “Map network drive”.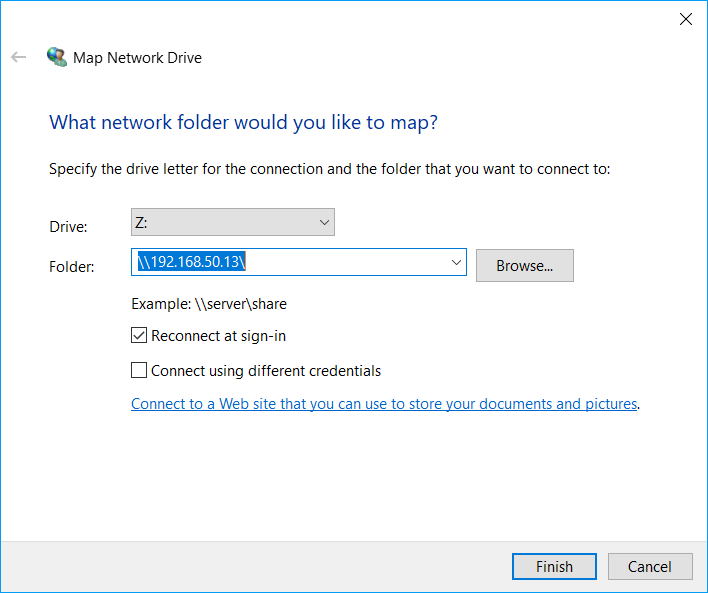
To find your ODROID NAS explicitly, enter “{ODROID IP}“ into “Folder”.
Then click “Browse…“ button.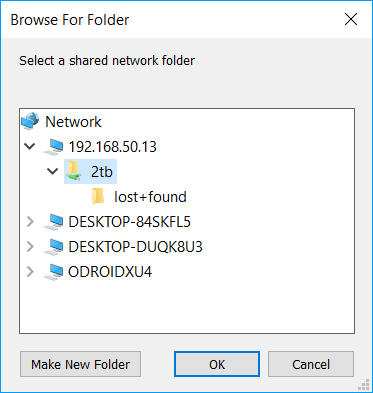
Your ODROID NAS is selected on the window, and you can see the “Shared folder” you set. Double-click to select the item.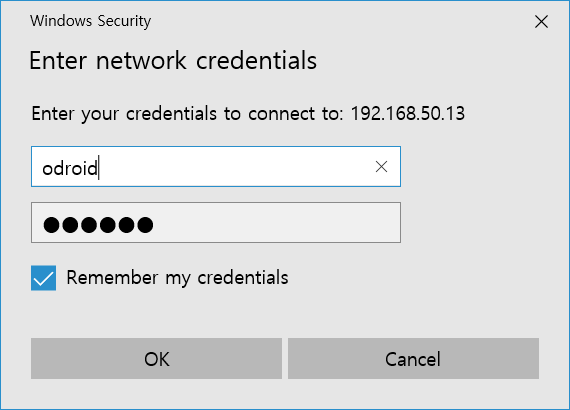
Enter the NAS user account you added before.
After authentication, added shared folder appears on the browse window. Click “OK” button after clicking newly appeared shared folder.
Now you can manage your HDD of the NAS easily.
nPlayer (Android, iOS)
You can start streaming your media using nPlayer on the Android and iOS devices.
It was performed by creating 2GB dummy file.
WebDAV
Unlike Samba, FTP, WebDAV is the service that allows you manage files and start stream media using Web protocols.
Since it’s a complete web-based service, it is easy to apply SSL and is excellent in security.
And unlike FTP, it is intended for web distributed authoring and version control, so it is possible to edit real time documents. For FTP, you need to upload the completed files to the server as a whole file after editing the document, but it is not necessary for WebDAV, and it also protects you from editing by others when your are editing.
However, there’s disadvantage in that it uses a web server so that there is a limit to the maximum transmission capacity for a single file.
1. Install WebDAV
WebDAV isn’t on OMV’s menu. You must install it directly with the OMV plugin.
Click the OMV “System” — “Plugins” menu.
And when you search for WebDAV, there will be only one entry in the list.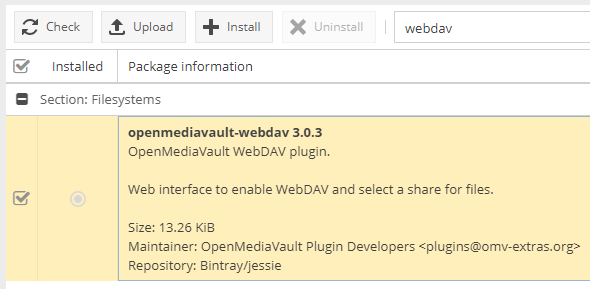
Click the appropriate item and click “Install” button to install.
2. Enable WebDAV
When the page is refreshed, there’ll be an OMV “Services” — ”WebDAV“ menu. Click that menu.
Set “Shared Folder”, and write “1954” in “Filesize upload limit(MiB)“. The process of setting the maximum transfer size of a single file to 2GB. And check “Enable” option and save.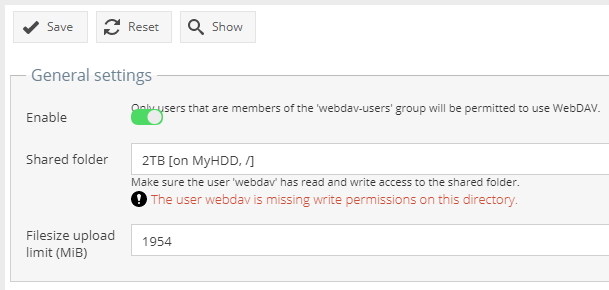
However you will see the warning “The user webdav is missing write permission on this directory”. To solve this problem, go to the OMV “Access Right Management” menu.
Click the shared folder you have set up in WebDAV and click “ACL“ button.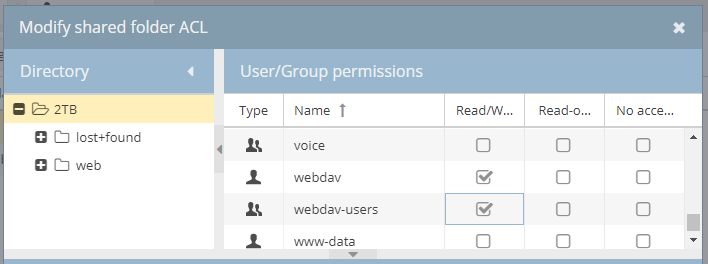
In the “User/Group permissions” section, scroll down to find “webdav”, “webdav-users” and give “Read/Write” permission to them.
And then in the “Extra options” section, check “Recursively” and click “Apply”.
If you go back to OMV “Services” — ”WebDAV“ menu, you can see the disappearing warning.
To access to WebDAV, you need to modify your user account.
Go to OMV “Access Right Management” — “Users” menu.
Click the user intended to accessing WebDAV, click “Edit” button.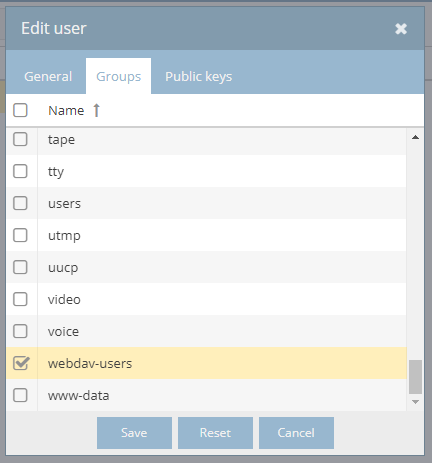
Go to “Group” tab, and check “webdav-users” and click “Save” button.
Now, let’s access to WebDAV by clicking the “Show” button in the OMV “Services” — ”WebDAV“ menu.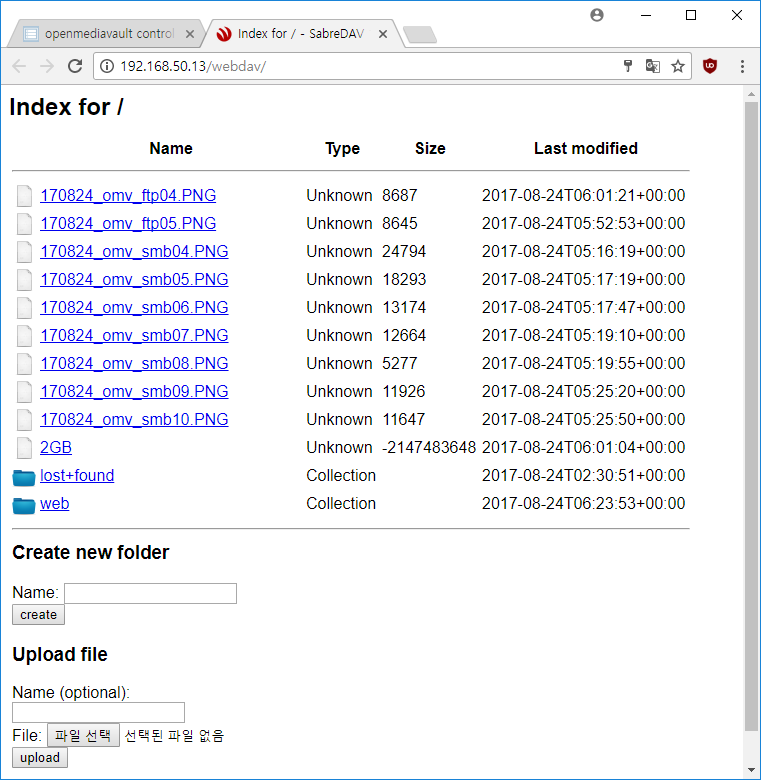
RaiDrive (Windows)
RaiDrive is free software that makes cloud storage such as FTP or WebDAV a drive into Windows Explorer like “C Drive”.
NetDrive is paid for, so it is recommended to use RaiDrive for those who are burdened.
Stage #1: Power cycle
This stage is aimed to fetch the bootloader software from the storage device mounted on or inserted to the board. ODROID-N2 offers three different boot storages, please visit to figure out the location. Especially, ODROID-N2 is the first SBC board with onboard SPI flash memory among Hardkernel’s ODROID boards.
- eMMC : Removable (custom design by Hardkernel, eMMC 5.0)
- Micro SD : Removable (UHS-I)
- SPI : On-board (NOR, 8MiB)
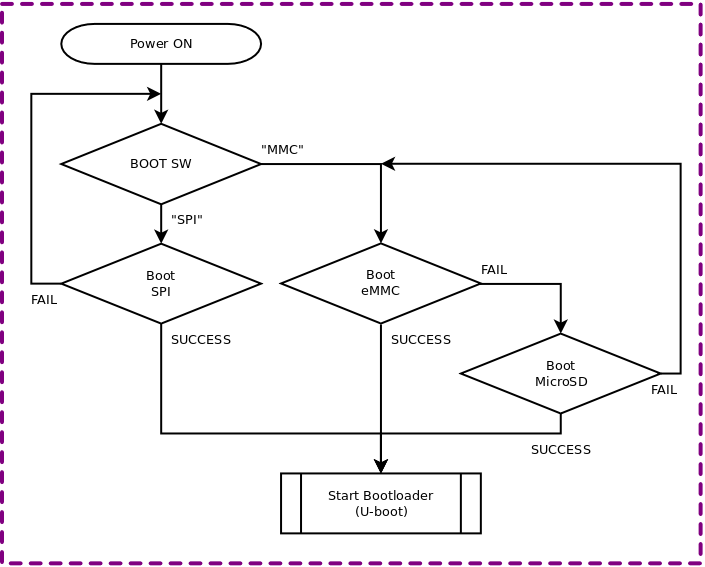
ODROID-N2 has “Boot Select Switch” which is to select SPI flash memory as the primary boot device or not. If the switch nob is located to “SPI”, then CPU will fetch the bootloader from SPI flash memory. On the other hand, when the switch nob is placed to “MMC”, the bootloader in the eMMC or the Micro SD will be fetched by CPU. Since the eMMC has a high priority, CPU will fetch from Micro SD if eMMC does not have the bootloader.
Yocto
The Yocto Project is an open-source project for making customized Linux-based systems. You can create anything from a lightweight PC to a maker-oriented IoT project. Running Yocto on the Odroid XU4 provides a bevy of options for a hardcore IoT project.
Best for: IoT applications
Best Operating Systems for the Odroid XU4: Final Thoughts
There are loads of operating systems available for the Odroid XU4. This makes it a versatile SBC ideal for projects ranging from a basic Linux PC to Android desktop, HTPC, retro gaming arcade, server, and more. With tons of OS choices, beefy hardware, and ease of use, the Odroid XU4 is an awesome single-board computer.
How to create Android bootable media with empty MicroSD/eMMC or flash media
Once Android build is complete, you will have all necessary files to download into your MicroSD/eMMC. You can install the Android image by two ways.
First, using the self-install image. you just flashing this image and that’s all. After booting, Android will be installed by automatically.
And as other way, you can flash each images by manual.
One touch self install
This is the same way the Hardkernel team creates Android release image and easiest way to have bootable media on your ODROID-N2 if you proceed one more build step. This procedure combines all required image files created by Android build into a single file, out/target/product/odroidn2/selfinstall-odroidn2.img.
You also can make a bootable media by using the self-install image, and you already made it.
$ make -j<core number> selfinstall
you can write the self-install image via or the dd commands.
$ sudo dd if=outtargetproductodroidn2selfinstall-odroidn2.img of=devsdd
$ sync
$ sudo eject devsdd
Manual install
Once Android build is complete, you will have all necessary files to download into your MicroSD/eMMC. If you already have a boot media and can switch to fastboot mode is U-boot, you can proceed to update while executing below commands one by one or ignore particular steps.
How to use fastboot
Boot loader
To use media on the ODROID-N2, you should flash bootloader to boot media first.
We supposed emmc node as /dev/sdd. you can find the media node by “sudo fdisk -l”.
$ cd <android_root>
$ cd bootloaderubootsd_fuse
$ .sd_fusing.sh devsdd
If you have installed media, you can flash bootloader via fastboot command.
$ fastboot flash bootloader bootloaderubootsd_fuseu-boot.bin
After flashing the bootloader, you can use fastboot command to flash images.
This command be done on u-boot.
On the board,
$ fastboot
$ fastboot oem fdisk
$ fastboot reboot-bootloader
Then, try belows to flash the images on your pc.
Kernel dtb
$ fastboot flash dtbs outtargetproductodroidn2objKERNEL_OBJarcharm64bootdtsamlogicmeson64_odroidn2_android.dtb
Data
data partition should be formatted at first.
$ fastboot erase data
After flashing all partiton, please reboot the device.
$ fastboot reboot
3.10.y & 4.9.y
Install dependencies:
odroid@odroid:~$ sudo apt-get install build-essential libqt4-dev libncurses5-dev git
Clone Repo:
odroidxu3-3.10.y
odroid@odroid:~$ git clone --depth 1 https://github.comhardkernellinux.git -b odroidxu3-3.10.y odroidxu3-3.10.y
odroid@odroid:~$ cd odroidxu3-3.10.y
odroidxu4-4.9.y
odroid@odroid:~$ git clone --depth 1 https://github.comhardkernellinux.git -b odroidxu4-4.9.y odroidxu4-4.9.y
odroid@odroid:~$ cd odroidxu4-4.9.y
Configure Kernel:
odroid@odroid:~$ make odroidxu3_defconfig
Do changes if you need/want:
odroid@odroid:~$ make menuconfig
Build Kernel and Modules:
odroid@odroid:~$ make -j8
This explanation assumes that your USB memory CARD reader is assigned at /dev/sdb. Be careful!
Install zImage & DTB file:
odroid@odroid:~$ mkdir -p mount
odroid@odroid:~$ sudo mount devsdb1 .mount
odroid@odroid:~$ sudo cp archarmbootzImage archarmbootdtsexynos5422-odroidxu3.dtb mediaboot && sync && sudo umount .mount
Install Modules:
odroid@odroid:~$ sudo mount devsdb2 .mount
odroid@odroid:~$ sudo make modules_install ARCH=arm INSTALL_MOD_PATH=.mount && sync && sudo umount .mount
odroid@odroid:~$ rm -rf mount
Copy .config to /boot for initramfs creation:
odroid@odroid:~$ sudo cp .config bootconfig-`make kernelrelease`
Create initramfs:
odroid@odroid:~$ sudo update-initramfs -c -k `make kernelrelease`
Create uInitrd:
odroid@odroid:~$ sudo mkimage -A arm -O linux -T ramdisk -C none -a -e -n uInitrd -d bootinitrd.img-`make kernelrelease` bootuInitrd-`make kernelrelease`
Install new uInitrd:
odroid@odroid:~$ sudo cp bootuInitrd-`make kernelrelease` mediabootuInitrd
reboot:
odroid@odroid:~$ sudo sync && reboot
Your new kernel should be installed.
Note for your own convenience we provide daily builds of Linux kernel that can be easily installed on Supported distros by using a ODROID Utility.
odroid@odroid:~$ sudo -s
root@odroid:~$ wget -O usrlocalbinodroid-utility.sh https://raw.githubusercontent.commdrjrodroid-utilitymasterodroid-utility.sh
root@odroid:~$ chmod +x usrlocalbinodroid-utility.sh
root@odroid:~$ odroid-utility.sh
Step-by-Step guide to building an ODROID-XU3/4 Kernel
Download the cross tool chain package
[ http://dn.odroid.com/ODROID-XU/compiler/arm-eabi-4.6.tar.gz ]
Note
- This toolchain is only used to build the kernel.
- This toolchain is included in the Android source package. ($ANDROID_ROOT/prebuilts/gcc/linux-x86/arm/arm-eabi-4.6)
Copy the cross tool package to /opt/toolchains
If the ‘/opt/toolchains’ directory does not exist in host pc, then create the directory.
$ sudo mkdir opttoolchains
$ sudo tar xvfz arm-eabi-4.6.tar.gz -C opttoolchains
Add Path in your environment file
Modify your ~/.bashrc file to add a new path with editor (gedit or vi)
export ARCH=arm
export PATH=${PATH}:opttoolchainsarm-eabi-4.6bin
export CROSS_COMPILE=arm-eabi-
To apply this change, login again or restart the .bashrc
$ source ~.bashrc
Check the tool-chain path to check it is set up correctly.
$ arm-eabi-gcc -v
Using built-in specs.
COLLECT_GCC=arm-eabi-gcc
COLLECT_LTO_WRAPPER=opttoolchainarm-eabi-4.6bin..libexecgccarm-eabi4.6.x-googlelto-wrapper
Target: arm-eabi
Configured with: tmpandroid-15472srcbuild..gccgcc-4.6configure --prefix=usrlocal --target=arm-eabi --host=x86_64-linux-gnu
--build=x86_64-linux-gnu --with-gnu-as --with-gnu-ld --enable-languages=c,c++ --with-gmp=tmpandroid-15472objtemp-install --with-
mpfr=tmpandroid-15472objtemp-install --with-mpc=tmpandroid-15472objtemp-install --without-ppl --without-cloog --disable-libs
sp --enable-threads --disable-nls --disable-libmudflap --disable-libgomp --disable-libstdc__-v3 --disable-sjlj-exceptions --disable-
shared --disable-tls --disable-libitm --with-float=soft --with-fpu=vfp --with-arch=armv5te --enable-target-optspace --with-abi=aapcs
 --with-gcc-version=4.6 --with-binutils-version=2.21 --with-gmp-version=4.2.4 --with-mpfr-version=2.4.1 --with-gdb-version=7.3.x --w
ith-arch=armv5te --with-sysroot=tmpandroid-15472installsysroot --with-prefix=tmpandroid-15472install --with-gold-version=2.21
 --enable-gold --disable-gold --disable-multilib --program-transform-name='s&^&arm-eabi-&'
Thread model: single
gcc version 4.6.x-google 20120106 (prerelease) (GCC)
Linux
Linux ODROID-XU3/4 works as follow:
It must have at least two partitions.
First Partition must be a FAT32/EXT4 partition.
Second Partition can be whatever the Filesystem that your kernel supports (must be built in).
Note: It is possible to use the first partition as ext4, however it is strongly not recommended due to Windows Users losing the capability of changing boot.ini
NAS
A NAS(Network Attached Storage) unit is a computer connected to a network
NAS users are able to access to their NAS whenever/wherever they are, and the administrator of the NAS can make it providing more services with help of many various programs.
Most common NAS or home server uses are:
- Automatic backup of smartphone data
- Manage and share my data on the internet
- Streaming videos that I saved
- Download and manage Torrents on your smartphone
- Hosting a personal blog
And SSL(Secure Sockets Layer) also can be applied on all of these stuffs for security on the internet.
This guide will walk you through all of the above entries. And it contains full explanation with screenshots to make it easy for anyone to follow.Even if you don’t have a knowledge of Linux and Network, you can start streaming your media, manage/share your data, and manage Torrents, so let’s build your own NAS with this guide.
ODROID-H2 Case Type 3 Kit Assembly
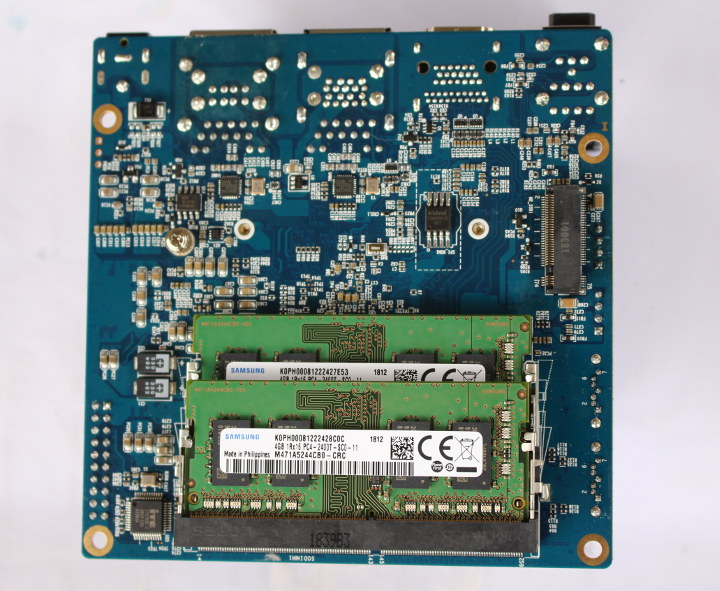
The first thing you’ll want to do is install the RAM stick(s) preferably two to get higher RAM bandwidth (dual-channel), as well as optionally an NVMe SSD.
 Click to Enlarge
I do not own the latter, so I only install the two 4GB RAM sticks provided by the company.
Next up is the fun part with the case assembly. Hardkernel offers 4 different cases depending on whether you do not need SATA drives, or plan on using 2.5″ or 3.5″ drives. Case Type 3 is made for up to 2.5″ drives, so I took out one SSD and one hard drive I already own, and normally use for reviews. The assembly method is shown in a video further down the article, but I’ve also included steps with photos.
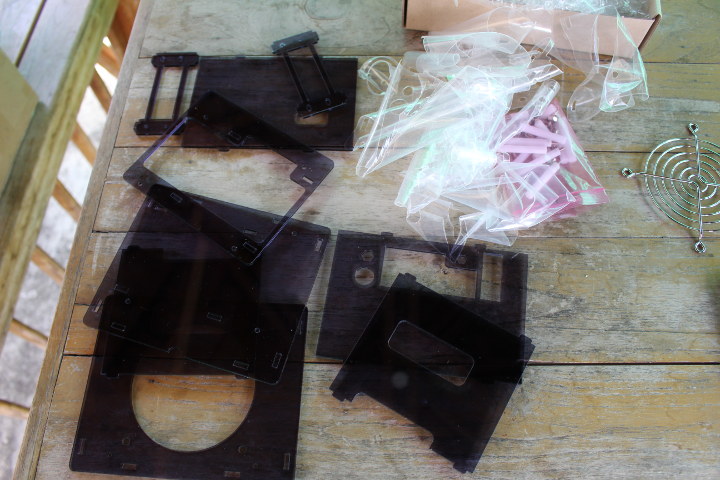
That’s optional, but most people will probably start by peeling off the protective film from all plastic parts since the case will look much better that way.
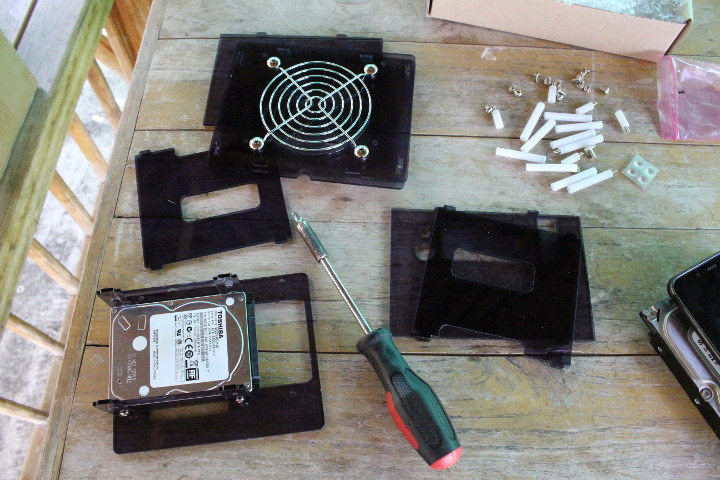 Click to Enlarge
Now we can screw the stainless cooling fan grill to the top cover, and start connecting the SATA drives to the brackets.
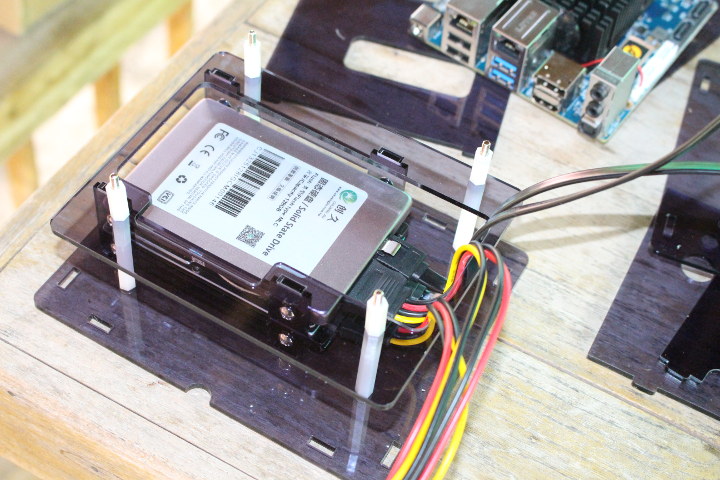 Click to Enlarge
Once we have our two drives attached to the brackets, we can add four long spacers to the bottom plate securing them with screws, and insert the SATA brackets into it. Time to insert the inner bracket on top, and screw four small spacers on top, before connecting SATA data and power cables to the drives, and make sure they go through the opening in the inner brackets as shown above.
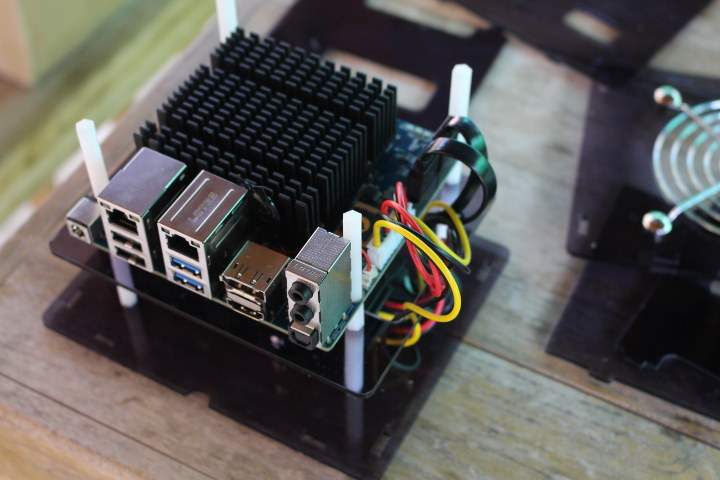 Click to Enlarge
Now place the board on top, and attach it with the four remaining spacers (female to female), and connect the SATA cables to the board.
Finally, we can add the four side panels, cover everything with the top cover, and tighten the final four small screws to get a fully assembled, and good-looking ODROID-H2 Case Type 3 kit.
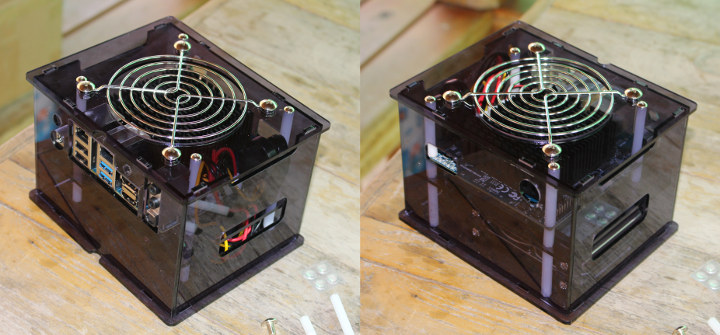
I have not used the fan, but it can be fitted on it by removing the cooling fan grill and placing the fan first, before putting the grill back on top. This would require removing the top cover first to access the nuts.
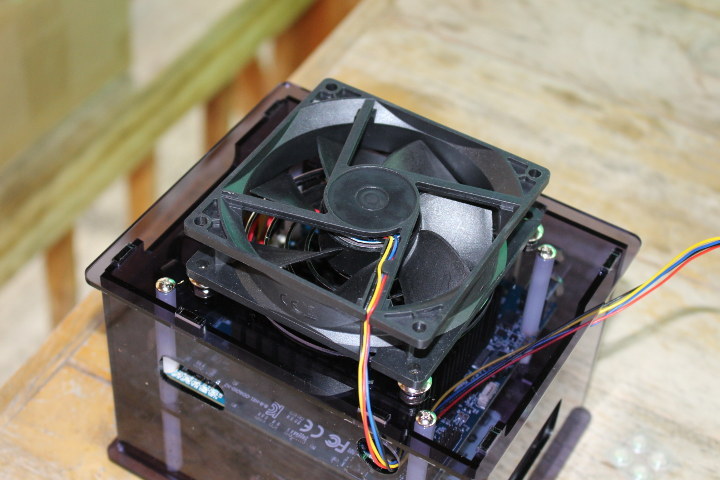 I have not done it just yet, because I would like to test the system fanless first, and because the plastic threads in the spacers do not look like they’ll survive frequent “mounting/unmounting”.
Compile
Before compiling, you must configure for ODROID-XU3 with following command.
Android Kernel
$ make odroidxu3_defconfig
$ make
Then you can start to build Linux kernel image, zImage-dtb.
This will create arch/arm/boot/zImage-dtb. You can also add -j option for fast compile.
Android Platform
$ export PATH=opttoolchainsgcc-linaro-arm-none-eabi-4.8-2014.04_linuxbin:$PATH
$ export JAVA_HOME=usrlibjvmjava-6-oracle
$ export PATH=$JAVA_HOMEbin:$PATH
$ .build.sh odroidxu3
Once you complete the long build process, the img files can be found in “out/target/product/odroidxu3/update” directory.
Installation
- The 1st stage bootloader, bl1.bin.hardkernel, is provided as prebuilt binary only.
- Bootloader signing process is not necessary for ODROID-C1 at all.
Installation to blank card
- Insert your card to USB card reader and attach to USB host port of your desktop.
- Check the device path of your USB card reader.
- Install the bootloader binaries using sd_fuse/sd_fusing.sh.
$ cd sd_fuse
$ .sd_fusing.sh <devicepathofyourcard>
Installation using fastboot
If you can boot your ODROID-C1 already and want to install a new u-boot.bin built by you. Fastboot helps you to install a u-boot.bin into your board.
$ sudo fastboot flash bootloader sd_fuseu-boot.bin
If installation is done, you care reboot your ODROID-C1 with fastboot.
$ fastboot reboot
Android TV
While there are official and third-party Android images for the Odroid XU4, there’s a fantastic Android TV image as well. For those seeking an incredible Android experience optimized for a television, monitor, or projector, check out the third-party Android TV image for Odroid XU4. Whereas the Android image is a tablet-optimized version of Android, the Android TV release is built specifically for navigation with a controller as opposed to a touchscreen. The straight-up Android release can be a bit clunky with just a gamepad or similar input device. You’ll find a mouse or touchpad necessary with the vanilla Android release.
Because the Android TV Odroid XU4 image is engineered for viewing on a television and navigation sans touchscreen, it’s best for a multimedia, like a DIY Nvidia Shield TV set up. However, this can also serve as a means to test Android TV apps in development.
Best for: HTPC and gaming use, Android TV app development
How to build u-boot and kernel source
The current version only provide Linux kernel and U-boot source code. Here are the instructions to checkout the source code and build. For more detail information, please visit U-boot and Kernel.
This guide is only for the NATIVE BUILD.
U-boot
$ sudo apt install git lzop u-boot-tools build-essential gcc-4.8 libncurses5-dev
$ sudo update-alternatives --install usrbingcc gcc usrbingcc-4.8 50
$ git clone https://github.comhardkernelu-boot.git -b odroidc-v2011.03
$ cd u-boot
$ make odroidc_config
$ make
Linux Kernel
$ git clone --depth 1 https://github.comhardkernellinux -b odroidc-3.10.y
$ cd linux
$ make odroidc_defconfig
$ make uImage modules
$ make dtbs
$ sudo make modules_install
$ sudo cp archarmbootuImage mediaboot
$ sudo cp archarmbootdtsmeson8b_odroidc.dtb mediaboot
OMV Basic configuration

1. General settings
You can see the OMV menu at the left side. Click “System” — “General Settings”.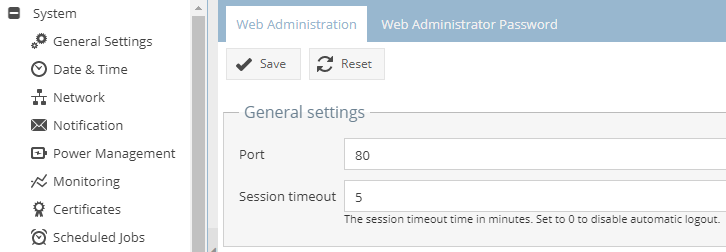
And type 0 into “Session timeout”, then click “Save” button.
In additional, click “Web Administrator Password” to change the password of the website administrator.
2. Update packages
The default packages in OMV image might be out of date. It must be updated with the latest version.
Click “System” — “Update Management”.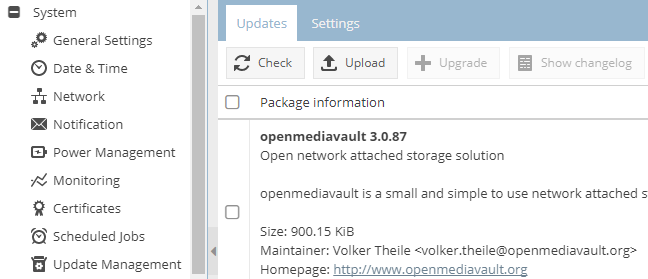
If there’s no item, click “Check” button to check if there’re updated packages.Check all items and click “Upgrade” button to update all of the packages.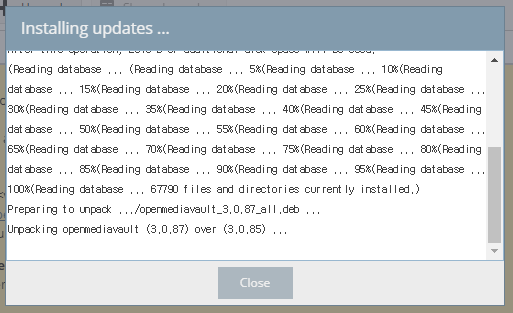
Once all of the packages are updated successfully, click “menu” button at the right top of the screen and reboot your ODROID-HC1 to take effect.
3. Mount HDD
- You should format your HDD to change file system to “ext4”. If it isn’t newer or involves the data, backup the files to other place first.
-
If the HDD you have already formatted to “ext4”, the format procedure is not needed and you can use it immediately. But since it is not recommended by OMV, it is recommended that the HDD will be formatted again on OMV Web GUI.
-
You can see following document to create new file system on OMV Web GUI.
OMV: Create a file system
-
You can see following document to create new file system on OMV Web GUI.
-
If ODROID-HC1 gives you no response during the operation associated with the HDD, then you can try it again after doing following “Disable UAS” document.
ODROID XU4 — Known issues and tips
You might equip the 2.5 inch HDD to your ODROID-HC1. Even if it was equipped well, you will not be able to do anything unless you enable it on the OMV.
To check if that was equipped normally, click “Storage” — “Physical Disks” on OMV.
You did well if there is “/dev/sda” with another “dev/mmcblk0” as above screenshot.
Then to use this HDD device, click “Storage” — “File Systems” on OMV.
There’s no item excepts “/dev/mmcblk0”. Click “Create” button to mount to use after creating new file system to the HDD.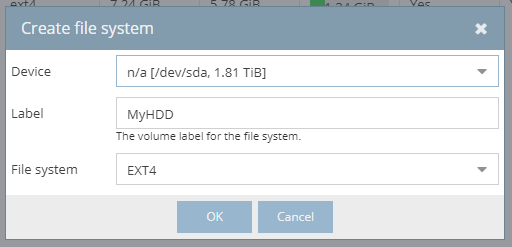
Enter the name that you want into “Label”, and set to “EXT4” as your “File System” then click “OK” button.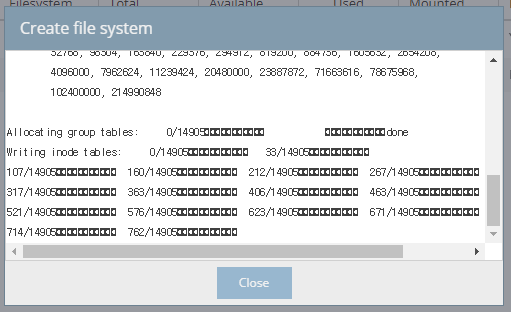
The Format message should be appeared. It might takes a lot of time so that you should wait more than 10 minutes.
Once the process is complete, you can see the new device named “/dev/sda1”.
Click “Mount” button after clicking new “/dev/sda1” device.
Now you can use your new HDD as well.
4. Add users
-
The users who are added here is for the NAS services. You can’t login with it to terminal. To Access via SSH with these users, you can use following document.
How to connect with SSH
There’s no user on OMV yet. As we can use admin account to login to OMV admin website, but this account is only for OMV management, not for NAS services. So that you have to add new user into OMV.
Click “Access Right Management” — “User” on OMV. And click “Add” button.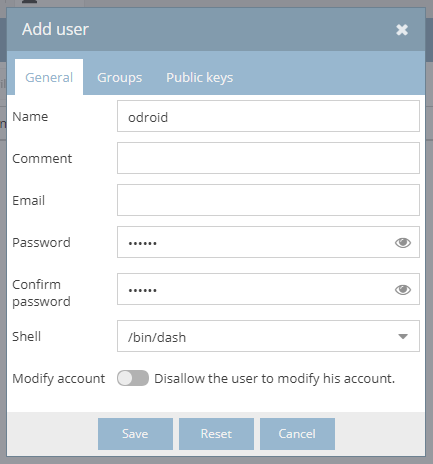
There are many items that can be setup, but you will set only “Name” and “Password” for now. Without any changes except these two things, click “Save” button to save settings.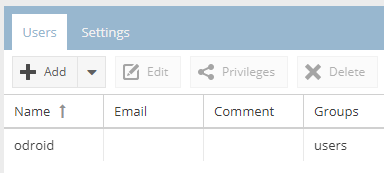
- This guide sets the all of the used shared folders to “/” which is root path of the HDD, uses that shared folder only.
- You can create the shared folders as you need and apply them to each service as you need.
- Since the permissions can be different on each shared folders, so that the data you have are protected/managed/shared very well.
The place where OMV stores/manages data is called a “Shared folder”. The “shared folder” is defined as the path inside of the specific file system.
If you are unfamiliar with the path, think of that path “/” as the outermost of the 2.5 inch HDD. If there is “Video” folder at the “/”, that can be defined “/Video” as path. If you willing to use that “Video” folder for Samba or FTP, you should set that “/Video” as shared folder for them. ??
Click “Access Rights Management” — “Shared Folders” on OMV and click “Add” button. 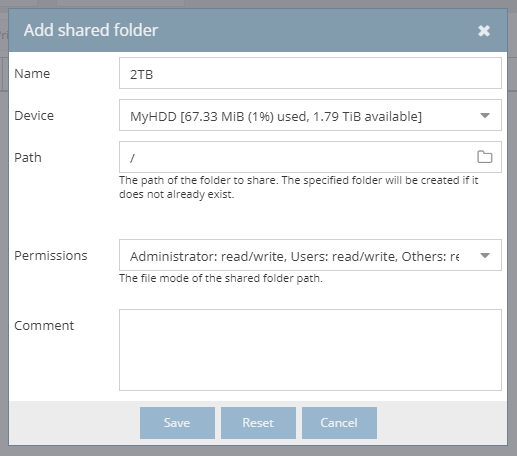
Here, set your device name as the “Device”, set the path that is the outermost of the HDD as the “Path”, enter the name you want into the “Name” and click “Save” button to save.
If you didn’t specify the name when you added the file system, you should select the “/dev/sda” item as the “Device”.
And click the new added item on the list of the shared folders, click “Privileges” button.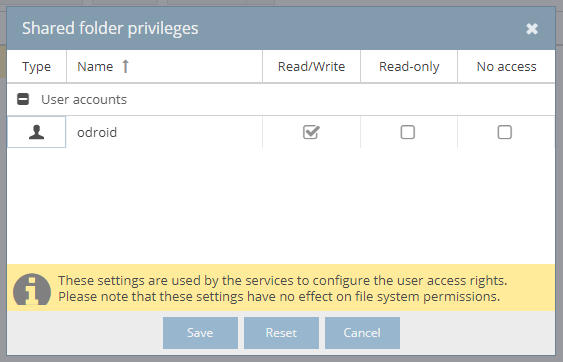
Check the permission of “Read/Write” for the new added user, and click “Save” button to save.
Also, click the “ACL“ button.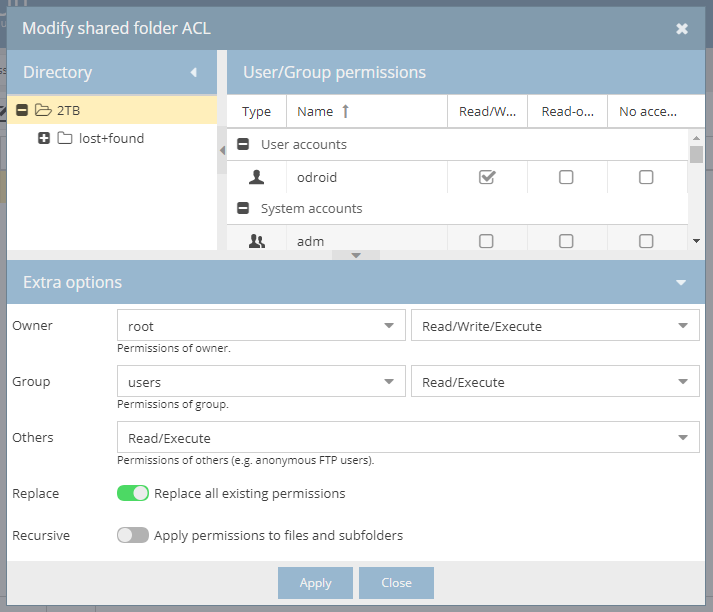
Setting up for the “ACL” is equal to the “Privileges”.Check the permission “Read/Write” for the new added user, and click “Apply” button.
Now you can use the outermost path(”/”) of the HDD for the services such as Samba and FTP.
Select HDD and Assembly
You can buy a new 2.5inch HDD/SSD or disassemble a external HDD to use as storage of server.
In this guide, we are going to disassemble a external HDD to build a NAS.
- If you choose the way that disassembling a external HDD, the interface of the HDD itself might be USB instead of SATA. In this case, you cannot install it to ODROID-HC1.
- It is not recommended to connect the external HDD to USB port on ODROID-HC1. But in the case of ODROID-XU4/XU4Q, you can connect it to USB 3.0 port on them via the power supplied USB 3.0 hub.
1. Disassemble external HDD

The prepared external HDD is Seagate Backup Plus 5TB portable.
It can be disassembled by removing top cover using thin bar inserted to joint.
A 2.5inch HDD is shown after removing top cover. Remove the shock absorber and rubber at the corner and totally remove it.


The HDD totally removed from the case.

After removing the SATA to USB converter in front of the HDD by pulling out,
and then make it arranged to assemble.
2. Assemble ODROID-HC1


As shown above, push the HDD to fit the ODROID-HC1 SATA/power connector.
Combine the HDD and heat shield by using included screw via the hole on the bottom of the heat shield.
3. Connect LAN cable

Connect ODROID-HC1 to the router that works fine.
To support gigabit bandwidth, using CAT.5e and above is recommended.
Price and Next Part
ODROID-H2 Rev B costs $111 plus shipping, but if you’d like the complete kit as above, you would need to add the following items:
- 32GB eMMC flash module – $26.90
- BIOS/RTC backup battery – $2.50
- ODROID-H2 Case Type 3 – $11.90
- 15V/4A 60Watt PSU – $9.4
- 2x Samsung 4GB DDR4 SO-DIMM – $44
- DC Cooling Fan w/ PWM – $4
- 2x SATA data & power cables – $6
That’s a total of $215.70 plus shipping. Note that most items are optional since you can boot the board from an SSD for example. In any case, it may be good to add the PSU since I’m not sure whether those are easily procurable.
In the next part of the review, I plan to test ODROID-H2 with the latest Ubuntu 19.04 image with Linux 5.0 kernel provided by the company. Eventually, I’ll probably use the board as a simple NAS for backups, file storage, and potentially offloading downloads.
Continue reading “ODROID-H2 Review – Part 2: Ubuntu 19.04“.
| Support CNX Software — Donate via PayPal, become a Patron on Patreon, or buy review samples |
Stage #2: Bootloader
The second stage to fetch the relatively huge software binaries from attached storage that can be accessible by the bootloader loaded at stage #1. In this stage, the system becomes more flexible to access various storage types and vendors. Even the OS software can be loaded through network protocol or USB storages. Also, the bootloader also offers a command line shell so a user can run commands manually or set/store the bootloader variables.
Boot from SPI
As shown in stage #1, this stage also checks whether SPI flash memory is selected to boot from. If so, the bootloader loads the software binaries from the SPI flash memory instantly. Currently, the Petitboot is ported to ODROID-N2 as a default software in the SPI flash memory. Please visit these pages if you like to read more information about Petitboot from Hardkernel.
Petitboot
Boot from eMMC/Micro SD
If ODROID-N2 is set to boot from eMMC or Micro SD, the bootloader looks up the first partition of each storage device from eMMC and Micro SD in order to find out the boot script. Actually, the contents in the boot script are the set of commands supported by the bootloader, , such as , and . The current bootloader supports two types of boot scripts.
boot.ini
This is a purely text-based file, human-readable and editable by any text editor so very handy to change its contents at any platform. This script type is traditionally used by Hardkernel’s ODROID SBCs. If any text file with contains the board specific magic string, for ODROID-N2, at the first line, the bootloader starts to execute the script.
boot.scr
This is a legacy script format of U-boot which contains the 64 bytes binary header and test-based commands. Since this file is also editable in a text editor, one can change the commands in it. But, unlike , has the checksum at the header in the first 64 bytes, the header must be regenerated by the tool which is one of U-boot tools whenever the contents of the script. This script is not handy but can prevent to be modified and executed unexpectedly.

Debugging at U-boot
As shown in the diagram, the bootloader traverses the boot storage one after another until boot successfully. For some reason, the bootloader cannot start the next software, expensive OS like Linux, it stops and gives a shell prompt through the serial port. With USB-UART Module Kit, one can read logging message from U-boot or gives commands directly.
The one may be curious what is the builtin boot command and what commands are. Basically, this is the command set to read various blobs from the boot memory card among eMMC or Micro SD that the bootloader is loaded and practically to boot Android platform that requires multiple blobs in different sizes and types more than 4 partitions which is the amount of the primary partitions in MBR (Master Boot Record). So in order to store numerous blobs for Android in the memory card, the partition table is designed and noted in the U-boot code. This partitions can be updated through the that is a popular tool to update Android system through a USB cable. So technically, if you have software blobs that will store in the memory card as a raw format other than a file in a file system, you could design the partition table and update them in U-boot. introduces the current partition table for Android.
How to build u-boot
Download the cross tool chain package
[ http://dn.odroid.com/ODROID-XU/compiler/arm-eabi-4.4.3.tar.gz ]
Note this tool chain only used to build the u-boot.
If you meet any compile error, try this tool chain package.
[ http://dn.odroid.in/ODROID-XU/compiler/arm-eabi-4.6.tar.gz ]
Copy the cross tool package to /opt/toolchains
If the ‘/opt/toolchains’ directory does not exist in host pc, then create the directory.
# sudo mkdir /opt/toolchains
# sudo cp arm-eabi-4.4.3.tar.gz /opt/toolchains
# cd /opt/toolchains/
# sudo tar zxvf arm-eabi-4.4.3.tar.gz
Add Path in your environment file
Modify your ~/.bashrc file to add a new path with editor (gedit or vi)
export PATH=${PATH}:/opt/toolchain/arm-eabi-4.4.3/bin
export CROSS_COMPILE=arm-eabi-
To apply this change, login again or restart the .bashrc
# source ~/.bashrc
Check the tool-chain path to see if it is set up correctly or not.
# arm-eabi-gcc -v
Using built-in specs.
Target: arm-eabi
Configured with: /home/jingyu/projects/gcc/android-toolchainsrc/build/../gcc/gcc-4.4.3/configure --prefix=/usr/local --target=arm-eabi
--host=x86_64-linux-gnu --build=x86_64-linux-gnu --with-gnu-as --with-gnu-ld --enable-languages=c,c++ --with-gmp=/home/jingyu/projects
/gcc/toolchain_build/obj/temp-install --with-mpfr=/home/jingyu/projects/gcc/toolchain_build/obj/temp-install --disable-libssp --enable
-threads --disable-nls --disable-libmudflap --disable-libgomp --disable-libstdc__-v3 --disable-sjlj-exceptions --disable-shared --disa
ble-tls --with-float=soft --with-fpu=vfp --with-arch=armv5te --enable-target-optspace --with-abi=aapcs --with-gcc-version=4.4.3 --with
-binutils-version=2.19 --with-gmp-version=4.2.4 --with-mpfr-version=2.4.1 --with-gdb-version=7.1.x --with-arch=armv5te --with-multilib
-list=mandroid --with-sysroot=/usr/local/google/home/android/cupcake_rel_root --program-transform-name='s&^&arm-eabi-&'
Thread model: single
gcc version 4.4.3 (GCC)
Source code download
You can get the latest source from here.
$ git clone https://github.com/hardkernel/u-boot.git -b odroid-v2012.07
$ cd u-boot
$ make smdk5410_config
$ make -j8
android-4.2.2
$ repo init -u https://github.com/hardkernel/android.git -b 5410_4.2.2_master
$ repo sync
$ repo start 5410_4.2.2_master --all
$ ./build.sh odroidxu platform
android-4.4.2
$ repo init -u https://github.com/hardkernel/android.git -b odroid_5410_master
$ repo sync
$ repo start odroid_5410_master --all
$ ./build.sh odroidxu platform
* Visit this link to install the repo.
http://source.android.com/source/downloading.html
* To get the same version source of this Alpha 2.0 in the future, try below command of tag.
$ repo forall -c git reset --hard 5410_v2.0
Connect to the internet
Smartphone USB tethering
If you have a smartphone, you can share your smartphone’s internet connection with your H2 Plus.
To do that, just connect between your smartphone and H2 Plus. Then enable USB Tethering option on your phone.

You don’t have to worry about the mobile data usage fee because you can connect to Wifi internet and can share that Wifi internet connection.
USB Wifi module
Since we can’t use the internet with the new Ubuntu installed H2 Plus, you should use a USB Wifi module on it.
If we look at Hardkernel products, these 2 products can be used without installing any additional drivers.
-
Wifi Module 0
-
Wifi Module 3
USB Ethernet adapter
Or you can use an Ethernet adapter connected using USB ports.
Most of them support Linux but you should check the compatibility before purchasing one.
Toolchain
Click one of the site to download toolchain to build Linux kernel.
Download Linux Kernel Toolchain(arm-eabi-4.6)
Once the download is done, extract the tarball to /opt/toolchains/.
$ sudo mkdir -p opttoolchains
$ sudo tar xvfz arm-eabi-4.6.tar.gz -C opttoolchains
In order to add the toolchain path to PATH, paste below lines to $HOME/.bashrc.
export ARCH=arm
export CROSS_COMPILE=arm-eabi-
export PATH=opttoolchainsarm-eabi-4.6bin:$PATH
You can apply the change if you login again or import
to apply this change, login again or evaluate $HOME/.bashrc with source command.
$ source ~.bashrc
You can check if the toolchain installed above works properly while checking the version of toolchain. If you can find gcc version 4.6.x-google at the end of the line, the toolchain is well installed.
$ arm-eabi-gcc -v
Using built-in specs.
COLLECT_GCC=arm-eabi-gcc
COLLECT_LTO_WRAPPER=opttoolchainarm-eabi-4.6bin..libexecgccarm-eabi4.6.x-googlelto-wrapper
Target: arm-eabi
Configured with: tmpandroid-15472srcbuild..gccgcc-4.6configure --prefix=usrlocal --target=arm-eabi --host=x86_64-linux-gnu
--build=x86_64-linux-gnu --with-gnu-as --with-gnu-ld --enable-languages=c,c++ --with-gmp=tmpandroid-15472objtemp-install --with-
mpfr=tmpandroid-15472objtemp-install --with-mpc=tmpandroid-15472objtemp-install --without-ppl --without-cloog --disable-libs
sp --enable-threads --disable-nls --disable-libmudflap --disable-libgomp --disable-libstdc__-v3 --disable-sjlj-exceptions --disable-
shared --disable-tls --disable-libitm --with-float=soft --with-fpu=vfp --with-arch=armv5te --enable-target-optspace --with-abi=aapcs
 --with-gcc-version=4.6 --with-binutils-version=2.21 --with-gmp-version=4.2.4 --with-mpfr-version=2.4.1 --with-gdb-version=7.3.x --w
ith-arch=armv5te --with-sysroot=tmpandroid-15472installsysroot --with-prefix=tmpandroid-15472install --with-gold-version=2.21
 --enable-gold --disable-gold --disable-multilib --program-transform-name='s&^&arm-eabi-&'
Thread model: single
gcc version 4.6.x-google 20120106 (prerelease) (GCC)
Install the Oracle JDK 6
Oracle JDK 6 is no longer maintained. It is not updated with the latest security patches and are not recommended for use in production.
You can however still download them from the Oracle Java Archive
http://www.oracle.com/technetwork/java/javasebusiness/downloads/java-archive-downloads-javase6-419409.html
$ java -version
java version "1.6.0_45"
Java(TM) SE Runtime Environment (build 1.6.0_45-b06)
Java HotSpot(TM) 64-Bit Server VM (build 20.45-b01, mixed mode)


